Orange Log Cabin Variations For My Son


A certain 3 year old boy is very, very excited for this quilt. I finished the top last week and his impatience for a finished quilt may not outlast my desire to wait for a certain fabric to be released in a few weeks, a fabric I want for the back of this. (Hoping for the large scale print from Carkai.)

His impatience for the quilt is only slightly above his impatience for enough snow to go sledding. If he can't ride his bike then that is an acceptable alternative. With the first snow only arriving yesterday and days staying below freezing it is an odd limbo that is tantamount to torture. But he has both the quilt and the snow to look forward to, right?


If you want to be a really good blogger, I recommend never making quilts with orange or red in them. So damn hard to photograph! Well, at least with my skills it is. But his favourite colour is orange and so orange the quilt must be. This is was the best I can do with the shot. Oy.

My plan for quilting is either an organic grid or something all over. It's a busy quilt top, so the quilting provides texture more than anything. Just need to get that fabric and wash my floors.

The Super Awesome Coloring Book (Weekend Reads)


If you haven't heard about the colouring book trend for adults then you are probably living like a hermit with no internet or TV and never a trip to a book store. Colouring books are HUGE. There are articles about the trend and research on the stress reducing aspects. 

When it first burst out I kind of shook my head and rolled my eyes, if I'm being totally honest. They're just colouring books after all. And it isn't like anyone who is a parent hasn't sat down to colour a million times in their life already! But, I have to admit now, I'm enjoying them. If only for the visuals.

In fact, I bet a bunch of people are buying them and not even colouring because they look so good! For quilters and other surface pattern lovers this is a boon for us probably more than anyone. We get another way to enjoy the design sensibilities of our favourite artists. 

Mark Cesarik is once such artist. He's designed some lovely fabric on top of having the cutest baby. I've enjoyed working with Mark in the past so I was happy to share his new colouring book when he asked.


Not all colouring books are created equal. Some are quite detailed, requiring super sharp pencil crayons or fine tip markers. Not to mention the patience of Job to colour them in! Many are designed around a theme - gardens, cities, mandalas, architecture styles. You name it, you can find it.

Two things I particularly like about The Super Awesome Coloring Book are, one, the varied imagery. There is no theme, just fun drawings. Some are in repeat, some are not. (The first page I went to was the mid mod chairs, of course.) And two, that the sheets are single sided. It's a small thing, but especially when you are colouring with markers that is a really nice feature.

Jenean Morrison, another wonderful artist with fabric, actually published the book. She's published her own, but is now licensing designers.

This colouring book trend has already lasted longer than I expected it to. Now that I've had some moments to sit quietly I get it. Plus, colour!

What Really Counts as Improv Quilting?


After a recent Improv with Intent class a student came up to me with deep concerns. Each student did their own project, with their own inspiration and their own execution. At the end of the day all the projects on the design wall displayed a wide range of styles and approaches. My wonderful student wondered just how much of it, however, was really Improv.

She looked around the room at people who had made triangles, strip sets, cut and resewed fabric, created specific shapes. When we came together at the end of the day people it no longer looked like our warm up exercises of random piecing. So was it still Improv?

There is a belief that unless you are picking your fabric blindly, not using a ruler, or making everything wonky it doesn't count as Improv.

So not true.

That is what I, and some others, might refer to as Pure Improv. It totally encompasses the true spirit of improvised quilting. But it is far from the only way to do it.


To clarify further, Improv is...

... taking a traditional pattern and making it without measuring pieces or worrying about perfect points. This often makes it wonky.
... sewing together random bits of fabric to become bigger pieces of fabric. These can be used on their own or as part of something else.
... taking a certain cut of fabric and sewing it to another with no preplanning about what goes next to what. Free form piecing.
... changing course midway - once, twice, or thrice (or more) - because you can.
... an attitude that allows you to not freak out when something goes wrong or off track while piecing a quilt top.
... being open to the direction your quilt takes or being okay with scrapping it when you hate it.
... as much about the process as the product.


You will automatically be bringing Intention to your work. Your intention can be a shape, a colour story, an image, a feeling, a place, a word, a symbol, a time. Even with Pure Improv there is an intention. It may be to use up all your scraps or you choose a specific colour way, but that is still intention.

When using an Improv approach to your project it is perfectly fine to bring order, square up, and otherwise define the components you are making. If you don't do this at some point you are asking for a bumpy quilt with puckers. I always tell my students that there is a time to bring back the ruler and rotary cutter, but go as far as you can without it. If you want to make a flat, squared quilt with the Improv pieces then you still need to follow those basic tenets of quilting - 1/4'' seam allowances, pressing, and squaring up (or, at the very least, shaping). For many people this then makes the Improv  feel fake. Not real Improv.

So not true.

Improv is an approach, a technique that starts with simply starting. You begin without knowing what the end product will look like. You are improvising the design as you go. Exactly how you do that will vary among quilters. It varies according to the skill level of the quilter, their comfort with improvising, and the intention they are bringing to the project.


As an example. If you've never worked without a pattern or a kit, simply sewing strip sets together without planning it all out may be enough to give you heart palpitations. People want to know every single step it takes to go from a pile of fabric to a quilt top. With Improv that is impossible to do. My strip set will look different than yours than your neighbour's. Improv for each quilter is as unique as your handwriting. We develop a rhythm and style that is all our own.

Improv provides insights to each quilter. We build confidence, curiosity, and authenticity in our work. That's on top of making a quilt that is distinctly unique. At the end of the day, if you felt like you were improvising then you were, no matter what anyone else says. As a teacher I often push my students out of the comfort zone. It isn't an accident either. I want you to challenge your own perceptions of how a quilt should be made or what colours can go together or how a block gets made. I might steer you away from the literal or towards it. Heck, we could even all start with the same Intention but will execute it differently!

For my student that day I went around the room and reviewed how each student took Improv as an approach and adapted it to the Intention they had. To be honest, I'm not sure she was totally convinced. Improv is a different mind set and so many of us have been trained in black or white on piecing techniques. What I, and any improv teacher can do, is teach you the general idea and give you confidence to do your own thing.


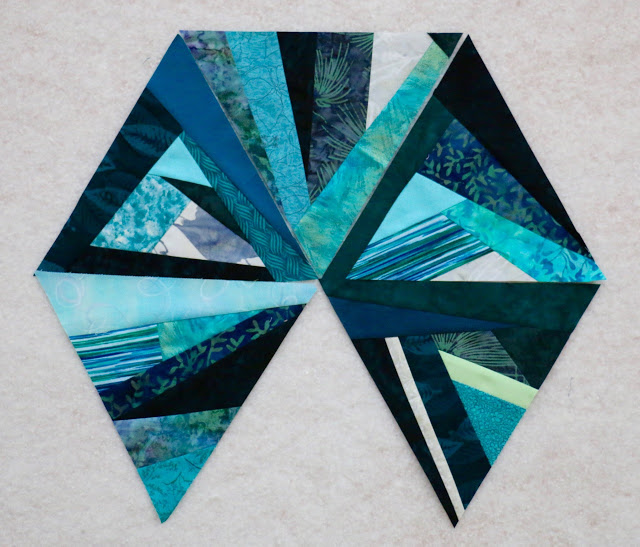
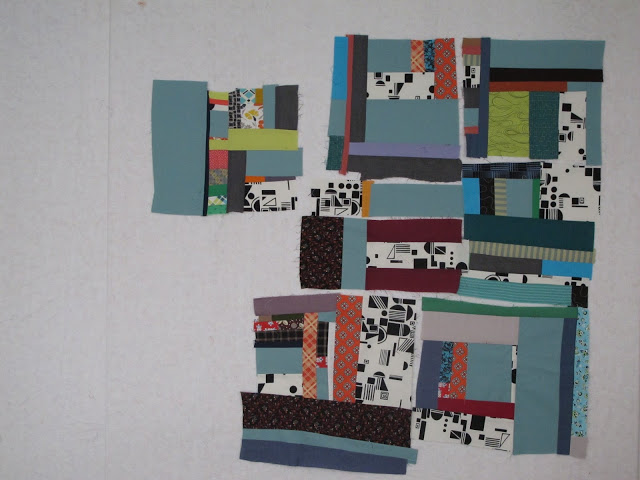
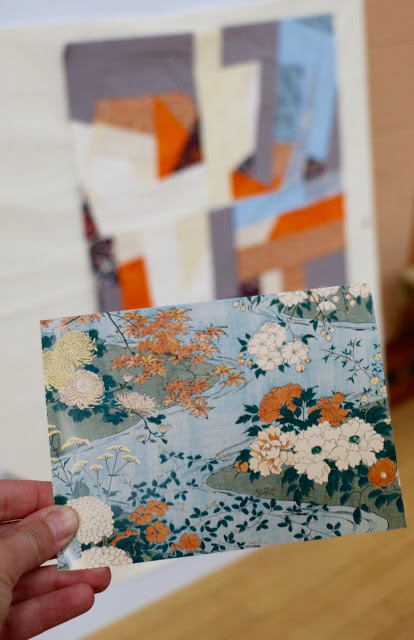
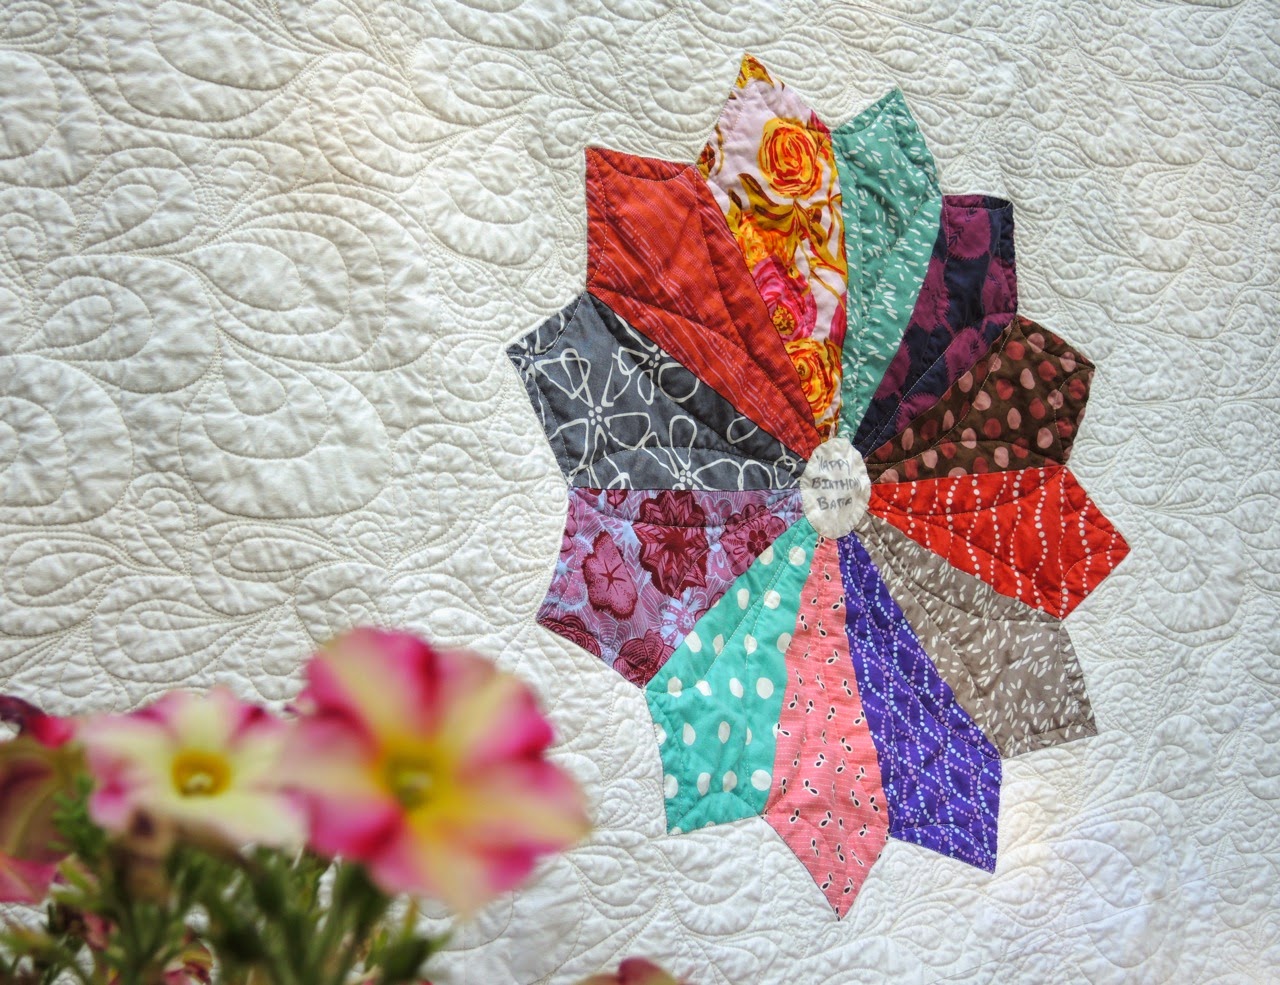
(Top photo, as well as the second and third from the bottom, are student work from my recent workshop with Victoria Modern Quilt Guild. The rest are my own projects.)

To learn even more about Improv quilting may I suggest my Creative Live class on the subject?

Giant Dresdens Quilt

Giant Dresdens for Baba O, 62'' x 90''

Sometimes quilts are really hard to give away. And sometimes you are so excited to do just that. Not because you want the quilt off your hands, but because you know the recipient will love it. Then there are the times you are sad to see the quilt go, but it is totally worth it because you get to see your cousins you hardly see in order to pass it on to their family. Sometimes.

I come from a giant extended family. My mom, an only child, became the 11th child of her aunt and uncle because that's how things work in big Ukrainian families on neighbouring farms. So I grew up with that family as mine as well. And while almost all of the family was in Saskatchewan, there was one set of cousins with us in Edmonton. We spent a lot of time together growing up, dancing, eating, playing, tormenting each other, laughing.

A few months back they asked me if I would make them a quilt for the Baba on the other side of the family as they are celebrating her 90th birthday this fall. Even though I don't really do commissions I wouldn't say no. Plus, I got to play with some ideas and that is always fun.

Three big Dresden plates, made with the

Fat Cat Ruler

. Gorgeous fabrics and loads of negative space to quilt on the long arm. Pretty quick to get together  - I think each Dresden took me about an hour to make, then only appliqué time. I machine appliquéd, so that wasn't very long either. Just 3 blocks to sew together and long strips for the side. And that was it.

I have a feeling there will be more Dresdens in my future. Maybe. I might need another request from the cousins in the midst of the other deadlines...

My dot to dot quilting on the long arm needs a fair amount of work, but I'm feeling very comfortable with all over free motion work. It is quite liberating and such a thrill to have it come together quickly. For this twin size quilt I was off the machine in slightly less than 4 hours, including my loading time and breaks for texts and instagram.  I used what I call a Paisley pattern, and my long arm teacher calls  headbands.

I've used it before

, but on my home machine.

The back was pieced with what I had at home, including this Amy Butler print from years ago. I bought it for another project that never came to fruition. I was worried it would be too girly for a 90 year old, but my cousins assured me that Baba O will like it. A few extra inserts of fabric that was also used on the front to bring it up to size.

On the front, in the centre of the Dresdens I wrote out birthday wishes. This way there is no need to flip it over to see the real reason Baba O is receiving this quilt. On the back are the labels - one with wishes from the family and one with maker and care info. As I pointed out, the quilt is likely to outlive even them, so the history needs to go with the quilt. But thankfully my cousin's wife has very neat handwriting so she actually wrote out the labels instead of me! I stitched those on over deck cocktails with my cousins. A gaggle of our kids eating popsicles and popcorn and playing in the backyard. Our conversations full of the stories of now and yesterday. Love, history, and the future all coming together, thanks to a quilt.