tips and tutorials

Label Your Quilts!

The corners of three quilts, from the back, with hand written labels

Everyone has a different approach to labelling a quilt. Some don’t do it at all, others design and make embroidered labels. Some simply sign it with a marker, others screen print fabric and make it part of the back. Some just add a ‘signature’ bit of piecing or binding, others have custom labels made and sew them in. Truth be told, there is no right or wrong way to do it. What is most important is that you put your name to the work.

For one, be proud of the work you did. You made that! Put your name to it, on it, in it.

Secondly, give your quilt the history to live beyond you.

There are various schools of thought about what should be included on a quilt label. Here is what I think should be on it:

  • Your name

  • Date the quilt was made/finished

  • Material make up

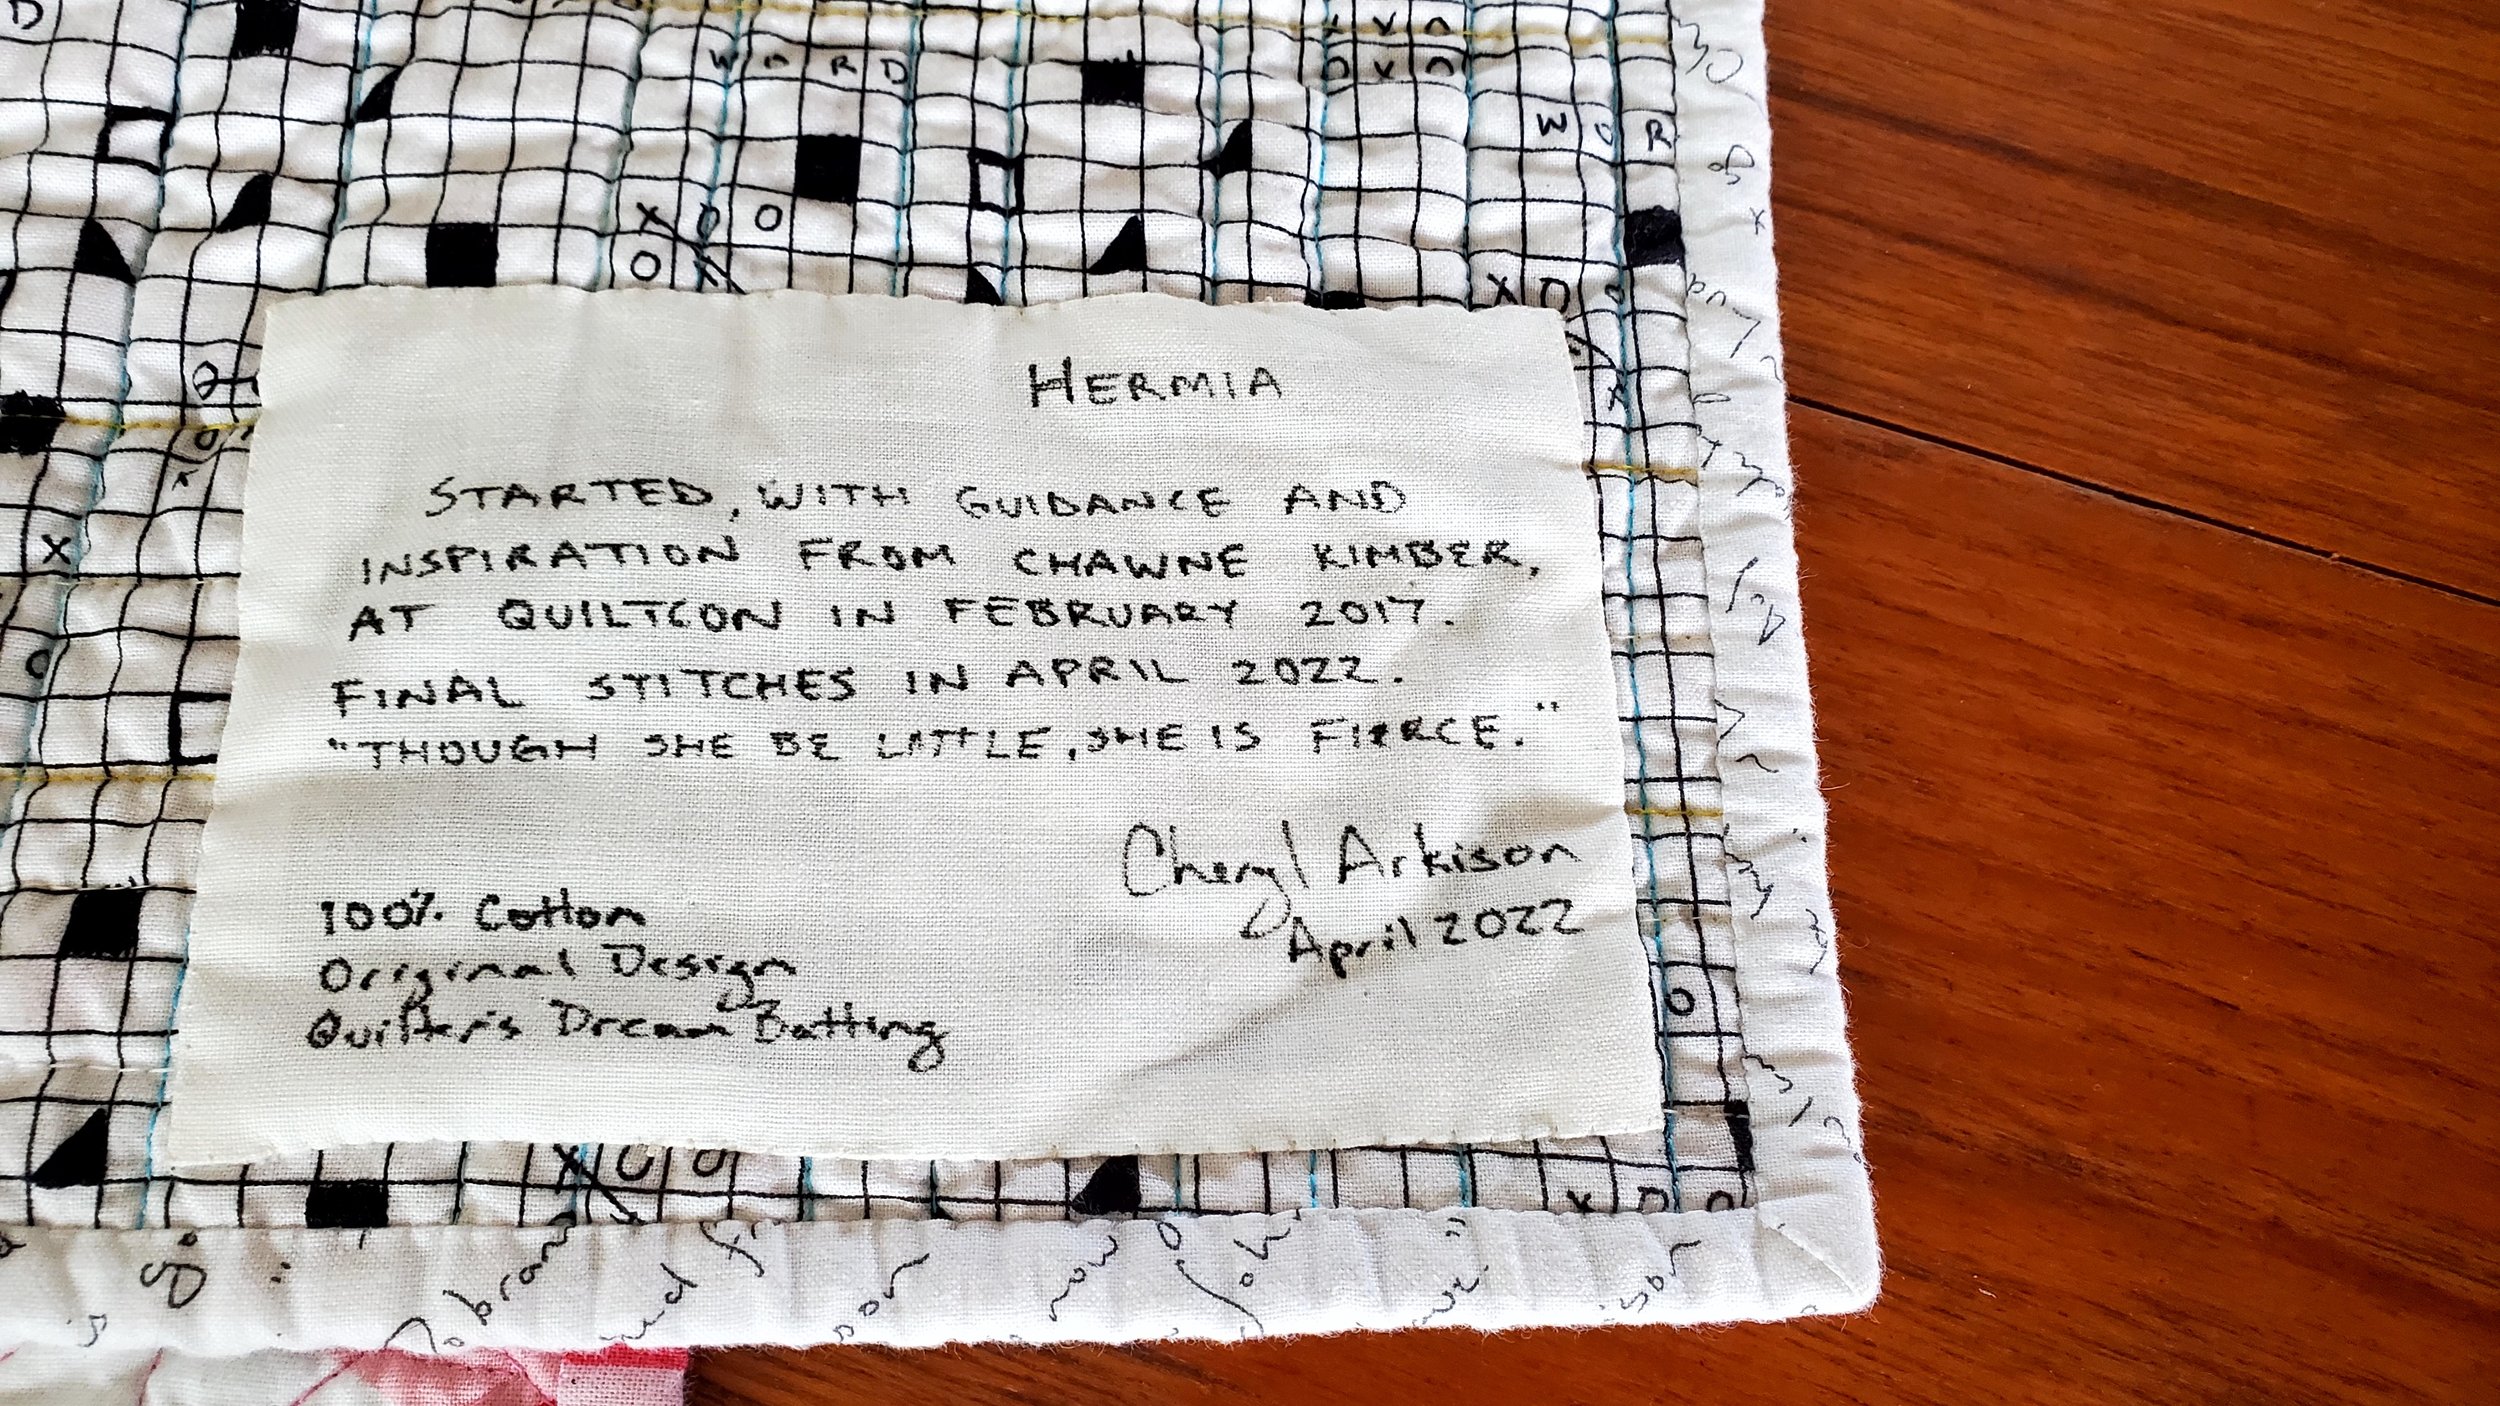
Anything else is just gravy. And gravy is good, so I include other things. I like to name my quilts so that is always there. If there is a specific inspiration or starting point, then that gets included. If I used a pattern I acknowledge it. If it is a gift, I like to put the recipients name on there too (and wedding/birth date if it is for that.)

Your name and the date is important. This is the history part. Should your quilt live beyond you or be separated from you (by choice or not) there is a record of the maker. If your grandchildren uncover the quilt one day they will want to know! So will the historian, the neighbour, the treasure hunter, the buyer.

Material make-up is very useful information for care instructions. I work almost always with cotton, including cotton batting and thread, so this helps any recipients present and future know how to wash it and care for it. If I use something different, then I include that. You could get super detailed here and list the thread used, batting chosen, and even fabric lines. The level of detail here is personal, but at least include material make up.

I know that labelling is a pain. We are so excited to finish the quilt, to wash it, to cuddle with it that we very often skip this system. Including myself in that majority. But I always label a quilt before gifting it. And lately I’ve been feeling the guilt of not having all my quilts lately. Might be the Covid stress and fear of the unknown - what quilts will outlive me? The solo show I had recently forced me to label a bunch of quilts as I did not want them going out into the world with no record.

As for ways to make labels, there are as many ways as there are quilts. I’ve seen people screen print fabric and sew it into the back of the quilt, embroider and stitch on a label, write right on the back of the quilt, sign the front, get custom labels printed, and appliqué something. Myself, I’ve done fancy ones where I’ve used leftover fabric for framing before stitching it onto the back, printed ones with special papers, intricate traced designs, and plain writing on white fabric. The last one has been my go-to of late. I use scraps of white fabric and a Micron pen to write it. Every now and then I might decorate the label with fabric markers. Nothing fancy, easy, and gets the job done. Unobtrusive too. Most importantly, it is there.

One last thing, a little tip I learned years ago. If you are gifting a quilt that will be used in a public setting like a dorm or care home, undo the binding and write some info on the inside of the binding before stitching it back up. Labels that are stitched on can be removed if someone really wants to claim the quilt as their own. But having a signature hidden in the binding then ownership can always be proven.

Broncos Block - Quilts for Broncos

Broncos Block Humboldt Strong

Like most quilters, most creatives, when bad things happen I respond by making. It helps me process my own pain or emotions. It also gets me to start thinking about how I can help others heal. This is, of course, by making and giving a quilt.

So when the horrific news out of Saskatchewan about the Humboldt Broncos bus crash rolled in, I immediately thought of making. I designed a quilt block with my daughters help - I was decorating a cake so I dictated numbers and a sketch to her. Initially, it had 14 HSTs, but it had to be updated when the death toll changed later that day. The design is a simplified, modern version of a horses mane. I was looking at the Broncos logo and thinking about what I might be able to do. This is it.

Making may help heal my emotions. Making or receiving a quilt may or may not do something for the families, the boys and woman still injured, the first responders, and team affected. But I do know that any show of support - when the entire country is behind you - can only help in the long run. So I will make. You can too.

Broncos Block

Cutting Instructions

Feature Fabric:

  • 8 squares 4'' x 4''

Background Fabric:

  • 8 squares 4'' x 4'' (from one strip cut 4'' x WOF)
  • 1 square 3 1/2'' x 3 1/2'' (All cut from one strip 3 1/2'' x WOF)
  • 1 rectangle 3 1/2'' x 6 1/2''
  • 1 rectangle 3 1/2'' x 9 1/2''
  • 1 rectangle 3 1/2'' x 12 1/2''

Assembly Instructions.

  1. Draw a line on the back of the background 4'' fabric squares, corner to corner on the diagonal.
  2. Pair a background 4'' square with the feature fabric square, right sides together. Line up and sew 1/4'' from the drawn line on both sides.
  3. Cut on the drawn line. Press towards the darker fabric.
  4. Square up the half square triangles to 3 1/2'' x 3 1/2''. Use the 45 degree line on your ruler (or something like a Bloc Loc ruler) to make sure the seam line is straight from corner to corner.
  5. Sew together 5 blocks, end to end, with the feature fabric in the upper right corner for placement. Make a row of 4 blocks, then 3, then 2. Note: You will have one HST leftover.
  6. Press the rows in alternate directions.
  7. Layout the entire block the following way  and sew the rows together and press the seams open or all in one direction:
  • 1 block plus 3 1/2'' x 12 1/2'' background
  • 2 blocks plus 3 1/2'' x 6 1/2'' background
  • 3 blocks plus 3 1/2'' x 9 1/2'' background
  • 4 blocks plus 3 1/2'' x 3 1/2'' background
  • 5 blocks
Quilts for Broncos Broncos Block

There is an official quilt block/quilt drive hosted by Haus of Stitches, the local quilt store in Humboldt and the Prairie Patchwork Quilt Guild. They are coordinating to make and receive at least 200 quilts to be distributed among survivors, families and billet families, first responders, and the team. The block they've chosen sews together very quickly. Full details here.

I am making blocks like above, plus the Quilts for Broncos blocks as per the official instructions. Everything I make will be donated to the official drive. I am also gathering, for local to Calgary quilters, any work they do and delivering it to Saskatoon. It will then go on to Humboldt from there. 

This tragedy is devastating. I think every parent can imagine their kid on that bus. I have hockey playing nephews, my own kids have played, my daughter does bus travel for her sport. It is an accident, plain and simple, but it hits hard. I know 3 people - with no connection to each other - who had connections to kids on the bus. That's how hockey is in Canada. It's why we are seeing kids wearing Jerseys to school, sticks left out on porches, professional sports teams honouring the team for their own connection to their past, and why quilters are making. We can't heal the deep wounds, we can't make the pain go away, but we can make and show support. No one is alone in this. 

March On - Free Improv Quilt Block Tutorial

In the wake of the US election I, like many others, felt compelled to make. I needed the comfort of sewing more than anything else. The familiarity, the creation, the time alone with my thoughts. Rather than start something new I decided to pull out some very meaningful blocks. After sharing them on Instagram I had a few requests for a block tutorial. With my compulsion to create in overdrive I decided to make a video tutorial.

Feel free to make your own March On blocks. Any shape, any size. These instructions are for roughly a 9 1/2'' square block, but they will vary.  If you want smaller, start smaller. If you want bigger, start bigger. They go together quickly so without any trouble you will have yourself your own solidarity march in no time. 

What Really Counts as Improv Quilting?


After a recent Improv with Intent class a student came up to me with deep concerns. Each student did their own project, with their own inspiration and their own execution. At the end of the day all the projects on the design wall displayed a wide range of styles and approaches. My wonderful student wondered just how much of it, however, was really Improv.

She looked around the room at people who had made triangles, strip sets, cut and resewed fabric, created specific shapes. When we came together at the end of the day people it no longer looked like our warm up exercises of random piecing. So was it still Improv?

There is a belief that unless you are picking your fabric blindly, not using a ruler, or making everything wonky it doesn't count as Improv.

So not true.

That is what I, and some others, might refer to as Pure Improv. It totally encompasses the true spirit of improvised quilting. But it is far from the only way to do it.


To clarify further, Improv is...

... taking a traditional pattern and making it without measuring pieces or worrying about perfect points. This often makes it wonky.
... sewing together random bits of fabric to become bigger pieces of fabric. These can be used on their own or as part of something else.
... taking a certain cut of fabric and sewing it to another with no preplanning about what goes next to what. Free form piecing.
... changing course midway - once, twice, or thrice (or more) - because you can.
... an attitude that allows you to not freak out when something goes wrong or off track while piecing a quilt top.
... being open to the direction your quilt takes or being okay with scrapping it when you hate it.
... as much about the process as the product.


You will automatically be bringing Intention to your work. Your intention can be a shape, a colour story, an image, a feeling, a place, a word, a symbol, a time. Even with Pure Improv there is an intention. It may be to use up all your scraps or you choose a specific colour way, but that is still intention.

When using an Improv approach to your project it is perfectly fine to bring order, square up, and otherwise define the components you are making. If you don't do this at some point you are asking for a bumpy quilt with puckers. I always tell my students that there is a time to bring back the ruler and rotary cutter, but go as far as you can without it. If you want to make a flat, squared quilt with the Improv pieces then you still need to follow those basic tenets of quilting - 1/4'' seam allowances, pressing, and squaring up (or, at the very least, shaping). For many people this then makes the Improv  feel fake. Not real Improv.

So not true.

Improv is an approach, a technique that starts with simply starting. You begin without knowing what the end product will look like. You are improvising the design as you go. Exactly how you do that will vary among quilters. It varies according to the skill level of the quilter, their comfort with improvising, and the intention they are bringing to the project.


As an example. If you've never worked without a pattern or a kit, simply sewing strip sets together without planning it all out may be enough to give you heart palpitations. People want to know every single step it takes to go from a pile of fabric to a quilt top. With Improv that is impossible to do. My strip set will look different than yours than your neighbour's. Improv for each quilter is as unique as your handwriting. We develop a rhythm and style that is all our own.

Improv provides insights to each quilter. We build confidence, curiosity, and authenticity in our work. That's on top of making a quilt that is distinctly unique. At the end of the day, if you felt like you were improvising then you were, no matter what anyone else says. As a teacher I often push my students out of the comfort zone. It isn't an accident either. I want you to challenge your own perceptions of how a quilt should be made or what colours can go together or how a block gets made. I might steer you away from the literal or towards it. Heck, we could even all start with the same Intention but will execute it differently!

For my student that day I went around the room and reviewed how each student took Improv as an approach and adapted it to the Intention they had. To be honest, I'm not sure she was totally convinced. Improv is a different mind set and so many of us have been trained in black or white on piecing techniques. What I, and any improv teacher can do, is teach you the general idea and give you confidence to do your own thing.


(Top photo, as well as the second and third from the bottom, are student work from my recent workshop with Victoria Modern Quilt Guild. The rest are my own projects.)

To learn even more about Improv quilting may I suggest my Creative Live class on the subject?