We are about halfway through our first CSA experience. What have we learned so far?
1. The entire family really enjoys going out to the pick-up spot to picking up our weekly delivery, including the dogs. Of course, when it is in the parking lot of an off-leash park that certainly makes it easier for our family. In truth, we really enjoy chatting with the other members and in talking to our farmers, Jon, Andrea, and Manou. And to be honest, as exhausting as it is for them I think they get a bit of energy in talking to us members. They hear about what we made the previous week, they see the girls eager to grab something out of the basket to try, and connect with the people who really appreciate all their hard work.
2. I've paid attention to the weather more this summer. Generally I get annoyed with people who complain about it being too hot, too rainy, too cold, too, too, too. Get over it people, you live in Canada. But I really noticed this year that June was dry and we're getting our good heat late.
3. You can grow some really cool, and really unique things in this climate. All sorts of Asian greens like tatsoi, edible herbs like Mallow (which even the former Gardening Editor of Martha Stewart Living,
Margaret Roach, didn't even know about!), and ten million different kinds of lettuce.
4. Therefore, you must like salads. You will eat them everyday, for lunch and supper. I've come up with some fantastic salad combos this summer. My recent favourite has been baby greens with nectarines, walnuts, sunflower seeds, and balsamic vinaigrette.
5. It is hard to not be tempted by the other goodies you find at the farmers' market. We really do get enough from our CSA share for veggies for the week with two adults and two little ones in the family, especially of late. But the peas, beans, corn, and cauliflower all look so good! But if I buy them then something may go to waste.
6. Therefore, you share. In order not to get overrun with salads I've shared my greens with neighbours and family. Or at least invited people over to get through it all. This is really just an extension of the notion of community that a CSA membership inherently promotes. And that is a fabulous thing.
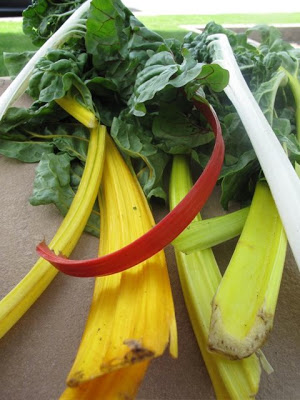
7. Finally, you must really, really like Swiss Chard. I mean really like it. We've had it every week for the past five. And one week Jon doubled up my share when her heard we liked it. Good thing we really like it. Aside from freezing the extra bits for winter soups, we've made
roasted chickpeas with garlic and chard (which the girls love), simple sauteed chard, swiss chard frittata, swiss chard with raisins and feta, spaghetti carbonara with swiss chard, and my all time favourite, swiss chard fricos.
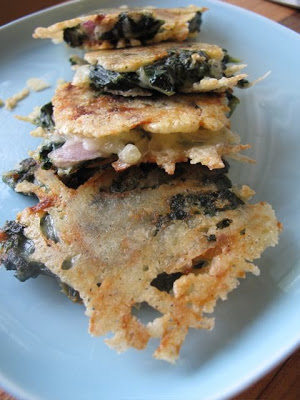
The frico is traditionally a pile of melted cheese, usually parmesan, that crisps up like a cracker as it cools. This version is a rip-off of a recipe I saw on
Lydia's Italy. The things you learn from PBS when tied to a chair nursing a newborn! I saw this last summer and they are a staple in this house now. I find it highly appropriate that Smilosaurus loves them as much as I do.
This version sandwiches the crispy melted cheese around cooked chard and onions. So you get green sweetness in the middle of crispy saltiness. Pretty much a perfect taste.
Lydia made hers when she was focused on the Fruilia region of Italy, therefore using a fantastic Montasio cheese. Montasio is nutty and buttery, on the hard side of the cheese scale. I've found both Italian and Canadian Montasio at the Italian markets. There is a significant price difference, and yes, a taste difference. Not a bad one, but a noticeable one. If your budget allows definitely go for the Italian. I've also made this with Parmesan and Asiago. Either works quite well.
 Swiss Chard Fricos
(makes 8-10)
1 bunch Swiss Chard
1/2 small onion, red or white
1 clove garlic
1/2 cup water
olive oil
1 egg, beaten
2 tablespoons flour
1 cup coarsely grated parmesan or asiago cheese
1. Grate the cheese use the large holes on a box grater. Set aside.
2. Remove ribs from swiss chard and reserve for another use. Coarsely chop leaves of swiss chard.
3. Slice onion half in half again lengthwise and slice across, creating roughly 1 inch slivers of onion. Finely chop garlic clove.
4. Place swiss chard and water in a non-stick or cast iron frying pan, salt generously, cover and steam 5 minutes. Remove from pan and drain well. Wipe pan dry.
5. Place onions in dry pan and drizzle with olive oil and a pinch of salt. Cook over medium heat until soft but translucent. Add in the garlic and cook for 30 seconds until you can just smell the garlic. Remove from heat and place in a bowl to cool. Wipe pan clean.
6. When onions and chard have cooled slightly mix together with the egg and flour. Season with a bit of pepper. It will be wet and sticky.
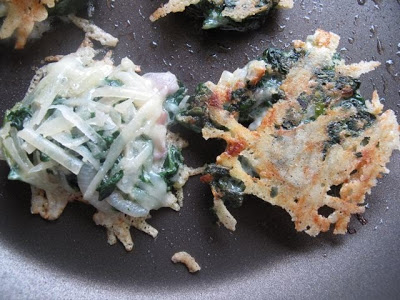
7. With pan on medium heat, put your cheese on a plate beside the stove. Working one at a time create patties with the swiss chard mixture. Place the patty on the cheese plate. Using your fingers push down gently and then cover the patty with more cheese. Carefully lift the patty and place it in the hot pan. The cheese will start to melt. Resist the urge to lift up the patty for at least 1-2 minutes. The cheese will melt, brown, and form a crust. When it does flip it over with a flat spatula and cook on the other side. Repeat with the remaining mixture. Serve hot as an appetizer or side dish.