improvisation

The Start of Mountain Meadows


Hmmm.... I'm not sure about these.

I had a chance to play with my green scraps recently and this is where I started. I did sort the scraps by value/colour to begin with. This is the first go around, with predominantly light greens. My overall concept is to have light and dark areas, to mimic the race of light across the mountain meadow. I don't want each area to be a solid block though, that's why there are some dark bits mixed in. The dark blocks will be the opposite.

This is also the beginning of adding in the idea of flowers in the meadow. In a real meadow the flowers are small and scattered across the hill, that's why there aren't many here. I've got some pink, yellow, orange, and white scraps set aside to make more flowers.

However, I'm not sure about these. Maybe the green chunks are too big? Maybe it is too random? Should I stop being so literal with my interpretation and make these blocks instead of one giant slab quilt? What I do know is that I need to play a little bit more before I make any more judgements.

Wine Gums in Progress


When we were writing the book I was in awe of Amanda Jean's quilts. She specializes in making use of the teeny tiny scraps. It's a great use of fabric, but all those pieces do mean that even a small quilt takes some effort. Don't be fooled by the size. You get great impact and an amazing use of fabric. And truly, it is hard to appreciate the scale of some of these quilts from the book.

It wasn't until we were giving our schoolhouse at Market that I could appreciate this. And now that I am out and about giving trunk shows I realize that I need to share these quilts to show more quilters the awesome opportunity presented by these designs. The first of Amanda Jean's little pieces quilts I'm tackling is Gumdrops.


I actually started this quilt in March, when I got my new scissors. And when cutting up little pieces of fabric was about all my big ol' pregnant body could handle. The little pieces then got put aside in favour of the baby and other work. But after my last trunk show I decided they needed return to daylight and be put to use.

Of course, I had to do things differently than Amanda's pattern. I have such a hard time following patterns. This time, however, it was unintentional.

In the pattern Amanda suggests fusing the scraps to a lightweight fusible BEFORE cutting the shapes. I neglected to read these instructions before I started cutting out my gumdrop shapes. That meant I would have to add fusible in tiny pieces, after the fact. That bit of work did not appeal to me. But, I do think you need some stabilization of the pieces to the background prior to assembly.

This piece has you sew down your applique and quilt as one step, so the pieces need to be stabilized prior to basting.


Instead of fusible I rummaged through the girls' craft supplies for a glue stick. Yup, a plain old glue stick. A little bit of glue on the back of each piece tacks it to the background. Then you can sew your strips together, baste, and quilt. As long as you don't coat the back there is no residue left after quilting and washing. You also don't get the stiffness associated with even a lightweight fusible.

As a bonus, this becomes a craft project with a bored preschooler missing her big sister at school all day. An excellent alternative to the endless tea parties.

Making It Work

When it came time to put together the Triangle Quilt I had some work to do. When I started out in the bee I wasn't overly particular about finished block size, just asking for a variation of 12.5'' to 18.5''. And in sending out a Canadian fat quarter of the background fabric it isn't always easy to get a 18.5'' block. It would have been impossible with a US fat quarter. That meant that I got blocks 12.5'' square, 18.5'' square, and 12.5'' by 18.5''.

What to do?

My initial plan was to mix it all up and assemble the top like a puzzle, adding extra blocks or chunks as needed. It is a part of the process I actually relish, the puzzle challenge.

When I decided to turn these blocks into a bed quilt, however, I needed something a bit more straightforward. I needed blocks, all the same size. If this quilt was going to get done it needed an easier puzzle.

That meant that I had to turn the smaller blocks into 18.5'' square blocks. A run through my stash revealed that I was no longer in possession of some of the fabrics I'd used. It confused me, because I could have sworn I kept aside some extra fat quarters for this precise purpose. Oh well, nothing a little shopping (at home and at the store) couldn't solve.

Of course I could not find the fabrics I'd used, save for one. No problem. The backgrounds were already a mix of yellows, adding a few more wasn't going to be the end of the world. I truly embrace the improvisational spirit. Tim Gunn would be proud.

It seems fairly standard to add sashing to bee blocks. For one, this increases the size of your quilt without having to make more blocks. Secondly, it is a good way to even out the size of what might be slightly different sized blocks. Even with a good pressing, one person's 12.5'' square can be slightly different than another person's. Adding to each block is an alternative to adding sashing.

Besides, you know how I feel about sashing.

This is what I did. (Using 2 blocks as an example.)


So I added on to about 8 blocks. I also made another 12 blocks from my yellows and leftover geese fabric. I laid out the top.

Then I found the yellow fabric I'd set aside.

Decisions Decisions

The versatility of the half square triangle is liberating. It can also be paralyzing when you actually examine the options for laying out a quilt from nothing but HSTs. If you are a person who has a hard time making decisions it is best not to play with layouts. Go with your gut the first time out.

If, however, you are like me and enjoy playing with layouts, then grab a beer or a tea and contemplate away.

Option 1

Option 2

Option 3

Option 4

Option 5

Option 6

Option 7

Option 8

Option 9


This is just a small sample of blocks, the finished quilt will likely be 16 or 17 blocks across and down.

Now I'm not generally someone who has a tough time with decisions. I learned a long time ago that too much is wasted contemplating "what ifs". That being said, I've got no clue where I want to go with this one. I'm bringing you and Hubby into the fold. You, my readers, because you always point out interesting things I may not see. And Hubby, because this is now going to be a wedding present for friends and if he wants his name on the label then he has to help.

So... opinions?

Upcoming Classes Spring 2011

Interested in some modern quilt classes in the Calgary area? I've got two coming up at, of all places, Traditional Pastimes. It only sounds ironic in name, Bernadette is a great supporter of modern quilting and brings in some of the best new fabrics to hold court next to civil war reproductions.

Want to learn about Values Quilts and perfect your half-square triangle technique? This will be a one night class to get you set. We'll discuss ways to see and use value, make-up a set of blocks, then play with settings.

Thursday, April 14
6:30-9:30 pm


How about Improv? I've made a few adjustments to my Improv class. Not only will we be practicing different techniques for improv blocks, like a wonky log cabin and free piecing, we also tackle the challenges of breaking free from precision cutting and patterns.

Monday, May 2 and May 9
6:30-9:30 pm

To register for either class contact Traditional Pastimes.

Round Robin - Start

Just a simple block. In the next 4 months it should turn into something pretty cool.

You see, I do belong to a traditional guild as well as our Calgary Modern Quilt Guild (Sew Night on this Saturday!). In an effort to push myself outside of my little box of creating, I decided to join this year's round robin. It is really pushing me out of my box as most of these ladies are quite traditional quilters. Amazing work and a very fun group of women, but still quite traditional in quilting style.

This block, mine, will get added to by three others. I gave them free reign on colours and design. Maybe my simplicity and improv block will challenge them too? You know how I love to push people.

I would show you the block I received - lots of triangles in red, beige, and hunter greens - but its in the car. Yup, I'm lazy this morning. First winter storm combined with kids barfing all night and me with a cold. I am not leaving my house today. More time for sewing, painting, and stories.

Oh, and bear with me as I make some changes on the blog. I'm testing some new designs.

Fear

Fear holds a lot of people back. Not only in life, but also in quilting. Fear of a new technique, fear of messing up, fear of being less than perfect, even fear of not being liked (the work, that is). I'm here to tell you to stop being afraid.

(I feel evangelical just typing that. Maybe I should be on a stage with a tiny microphone on my face and gesticulating calmly as I speak. You know, projecting a voice of inspired energy and turning you over to my side?)

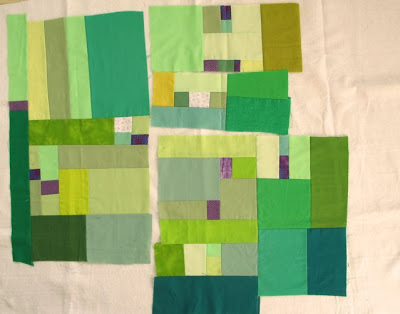
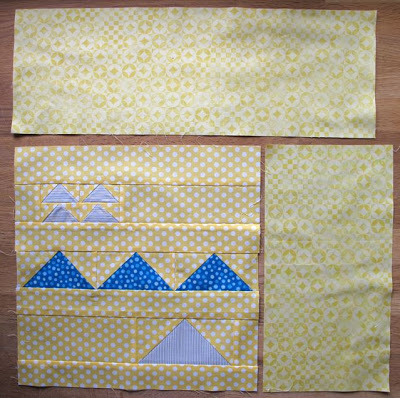
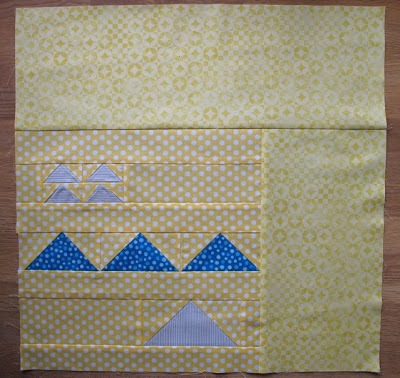
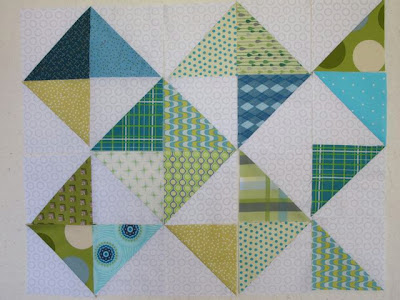
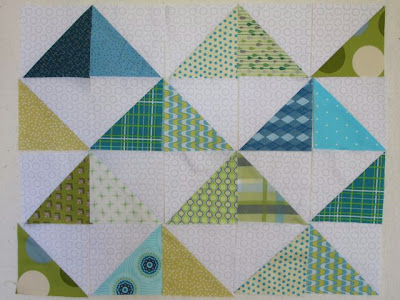
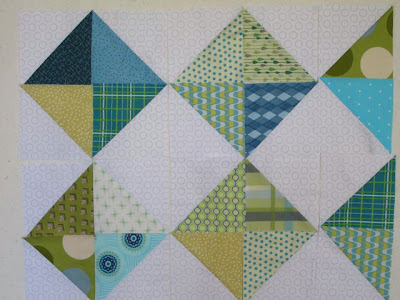
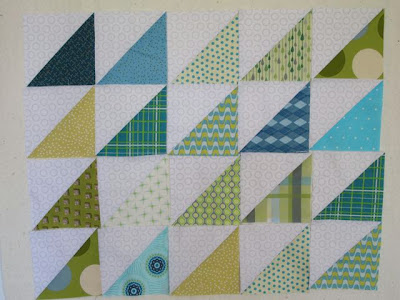
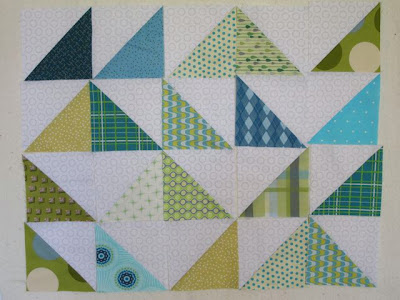
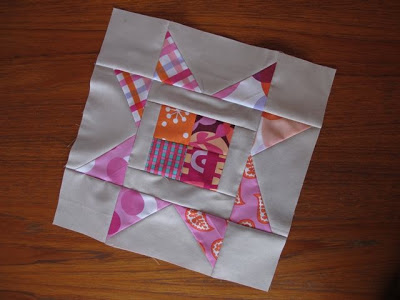
This is a bee block. Just a simple wonky star with a twist was requested. I can get those directions, play around with the fabric given, and come up with something a bit different from the typical stars seen out there. For another person, those directions can simply stop them in their tracks. For one, saying wonky paralyses many. Must have a straight lines... And two, this begs for improvisation. Must have a pattern... Finally, what if the recipient doesn't like what I do?

For a long time I didn't understand these fears. In my case it was because I happen to like a challenge and actually sewing that way. But then people asked me to sew very precise things in their bees, with very specific instructions. Definitely not my go-to-choice for a project. But I'd made the commitment to the bee and my fellow participants. And I wasn't afraid so much as less than excited. But it's one block, what's the big deal?

But one block can be a big deal to a beginner, or to someone whose never made a triangle or not worked with a pattern. I don't want it to be a big deal though. I want people to look past those fears and relish the challenge. Why not try something new? Do you want to make log cabins or simple patchwork for the rest of your life?

Okay, maybe you do. Maybe you would be really happy churning out those quilts. And that's fine. But then stay away from on-line bees and expect other people to get bored with your work if you choose to share it with a very public audience. That's all good if you are happy doing what you are doing.

Looking for more, though? Feeling inspired by all you see on-line or at guild? Then it is time to set aside some fear. Here are some tips to get you moving past the fear:

- Join an on-line bee. This will force you to try new techniques and meet other quilters. Alternatively, join a round robin or guild bee.

- Play. You can just sew for the sake of sewing, it doesn't have to turn into anything.

- Don't blog about it. If you are worried about what people think, then don't share it.

- Blog about it. Push yourself to put it out there, flaws (perceived or real) and all.

- When in doubt about that one fabric, include it. If it still niggles at you once you've used it, then take it out. It is only fabric.

- Ask for help. Whether from an in-person friend or by posting on-line, seek input from others (like we did with the Workshop in Progress).

- Challenge yourself. Set up regular goals to try new techniques or colours.

- Stop reading blogs and books for a little while. It can be demoralizing for many to see so much inspiring work. That is, we think we can't be good enough or think it is beyond us. So take a little retreat for yourself and turn off the computer and stay away from the stack of books. Fondle your fabric and sew for yourself.

- Colour. Stuck when it comes to fabric? Then pull out the crayons, markers, or pencils and just colour. Even if it is just a colouring book, go for it. Give people blue skin, colour the trees purple, or make polka-dotted dogs.

Keep in mind that if you are stuck there is no need to make an entire quilt to move past the fear. Make one block, just play for a bit. This reduces the commitment and moves your forward one step, one block at a time.

What other tips do you have for facing the fear?

Making Do

We are 4 people and 2 dogs living in 1100 square feet. Out of our dining room we run the home and two businesses. In theory, there is a basement reno underway. It moves in fits and starts, but it still generally moves forward, sort of.

Last year I was using my fence as a design wall. But to be honest, that's rather annoying when you are trying to actually sew from it. So when Hubby gave me the day off weeks back I rigged up this temporary design wall.

This is the wall between our kitchen and dining room. Since I sew at the dining room table this set-up worked great.  Well, except for one large detail - I kept walking into the chandelier.

Belated Easter Treats


How very Martha of me. Not that I dyed Easter eggs using cabbage, beets, onions, and turmeric. Not that I also decided to dye some fabric. But the colours are all Martha. And if you look around this site for about five minutes you'll see that I don't generally work in softer colours. Like I always say, it's good to change things up a little.

We dyed eggs with friends on Friday. I was totally enamoured with the colours, and very surprised from that orange from just a few onion skins. So I left all the eggs with our friends, but took home the rest of the dye juices. We dyed a few more eggs but that liquid colour looked too good to throw away. I already had all my scraps out so I grabbed some pieces of white on white and threw them in the bowls. The orange is from onion skins, the yellow from turmeric, and the purple measuring cup contains the liquid from boiled red cabbage.

This is the fabric as it came out of that red cabbage juice. Such a lovely purple. It clearly turned the eggs blue, so this was a bit of a shock. But a good rinse in cold water and some air time to dry and the fabric all turned the same soft blue/grey as the eggs. Perhaps a little less blue.

These are the turmeric stained fabrics right out of the dye water. So yellow! And even though I rinsed and rinsed they stained quite bright. And point of fact: turmeric dyed fabric will smell like turmeric long after it is rinsed and dried.

Look at my strips drying so nicely together!

And here are the eggs and their associated fabrics. In truth, they may be Martha colours, but they really are softer versions of the colours already in our house, namely turquoise and orange.

So I took all the scraps, trimmed them into strips, and started sewing. I went for the silly a little, in making an egg shaped placemat. This was easy to do. I simply created an egg shape out of paper so I had something to compare to as I sewed. You could also use it as a paper pieced project. Then I sewed the strips together. Once I knew I had my desired size I trimmed the top, cut out backing and batting and sewed it all together with right sides together.

Full disclosure, I screwed up twice when sewing it together. That's what I get for rushing to get it done during naptime. But I got myself sorted out and finished it off after turning it all right sides out and sewing that last seam around the edge.

There is a peak of the backing fabric. I put on something bright and fun so that if/when the top gets wrecked/runs I can use the other side for springtime. And there is my Smilosaurus checking it all out.

What Does Modern Quilting Mean to Me?


Over at The Modern Quilt Guild this week they've had a series of posts from some significant bloggers in the the modern quilt movement. I've rather enjoyed the conversation, so I decided instead of just commenting on all the posts, I would create my own post. So, what does modern quilting mean to me?

Central to modern quilting, I believe, is the idea of Freedom. Unlike traditional quilting which can feel very restrictive in both construction and design, modern quilting is about freedom. Freedom to throw tradition out the window or tweak it with fabrics, layouts, and improvisation. Freedom to try something new in colours or construction. Freedom to do what you want without fear of the quilt police knocking down your door.

Improvisation is also central to modern quilting.  This doesn't just mean the wonky log cabin. Improvisation is about starting a quilt and seeing where it goes, without a detailed plan. Maybe you could also talk about process here.  When I was asking you about The Whys of quilting, process was something that was central to me at the end of that discussion. I think modern quilting stresses the process as much as the final product (regardless of your technique) and improvisation is central to many a modern quilter.

Even when a modern quilter is using calm colours or simple designs, The end result is always something quite bold.  It might the fabrics themselves, or the final design, but when I think of modern quilts, subtlety does not come to mind.

I know that there are many traditional quilters out there under the age of 40. And there are modern quilters out there over the age of 50. But when I think of modern quilting I tend to think of youth. Perhaps it is because there is an energy to the work and the movement? It might be because most (but not all) of the bloggers I've encountered are closer to my age than my mom's age? But that youthful enthusiasm and energy has, I think, a powerful influence on the quilting world as a whole.

It would be remiss to not mention the role of technology in modern quilting. I don't just mean the design software. Blogs, virtual quilting bees, Flickr, and Etsy are all having a powerful influence on quilting. Have you heard of Web 2.0, where we the readers are also the content providers and help determine the present of the internet? Well, technology has allowed us to have Quilting 2.0 as well. Not only are we connecting and working together in a way that wasn't possible beyond the traditional guild, we are also working with each other projects, lending opinions through workshops and our blogs, and generating a never ending cycle of inspiration.

Finally, I want to highlight, that for me, it is important not to throw out the baby with the bath water. That is, there is a lot in traditional quilting that shouldn't be thrown away just because we like a modern aesthetic. This includes basic technique - we still want a quality piece at the end, not just one that looks good in a small on-line picture.  It also includes colour theory and design basics. We're modern and it is up to us to push the boundaries a little. Like modern architecture though, the building still has to stand on its own.

In a somewhat contradictory twist to this conversation I will be attending my first guild meeting tomorrow, a traditional guild. I'm quite excited about it, and it seems that this guild has some modern tendencies and vibrant members. With The Modern Quilt Guild springing up across North Amercia, maybe one day there will be a Calgary chapter?

Colour Blocks

A while back I shared with you an improv colour block I made as a sample for my Improv Class. That pile of scraps has developed into a full-blown obsession.  So far I've made 16 blocks (at 16 inches square).  A good dent has been made on the scraps, but I still want to make more. I'm aiming for 25 in total.

Here is the first round of blocks.  I took these photos on our plain white new curtains, hence the stained glass effect.


My goal is to get the blocks together and the quilt finished in time to submit to the Quilt Canada 2010 Invitational.  I see lots of late nights sewing in my immediate future.

Bits and Pieces

Life is a bit all over the place right now.  I'd hoped to have wrapped up the Quilt Along by now. My sincerest apologies.  But if you've been following along then your top should be done. And if you've been following, but not keeping up, then you are probably happy for the break to catch up. Or, the break to actually deal with a hectic holiday season. We'll return to wrap up the Quilt Along (or start it) in January.

Lately it seems like everything I do - whether it is life or quilting - is happening in bits and pieces.  We're knee deep in dust and noise as the basement reno is in full swing - new furnace and water system, walls, and concrete Oh My! Between work, writing, and family there is only time for snippets of life and creativity where one can get it.  That explains the above picture.  I was sorted small scraps while the girls played in the tub. I thought it was bad enough sharing those stylish, but horridly coloured bathroom sinks, so I spared you the charcoal/mustard combo on a 50 year old bathroom! But don't my piles look pretty.

I've been turning those piles into these blocks.

Single colour blocks of scraps, with that one bit of white thrown in for fun.

These blocks are so cathartic to make.  I can simply sit and sew, grabbing as I go. There is no plan to them.  I trim pieces relatively square and start sewing them in pairs.  Then I trim the seam allowances, press, and keep adding pieces.  After I have a couple of sections made I square them up and start playing with overall block layout.  Then I add or trim as necessary until I have a block big enough to trim to 16 inches square.

I say they are cathartic because there is no prep to them.  No cutting, no precision, no purposeful thought.  It is simply sewing.  And when life is throwing you so much it is nice to break down your creativity into simple processes to nurture the soul. No pressure either, just action. Little bits when I can steal little bits of time.

Woohoo! An Announcment

If you know me at all by now it should be clear that I am not enamoured of my desk job. I have grand fantasies that may or may not come true about making a career out of being a creative soul. But in order for me to have even a remote chance of achieving that dream I have to start somewhere. Today I am pleased to announce that I am taking the first step in that direction.

I got a teaching job!  Let's be clear, a job teaching quilting.  Okay to be even more precise, a job teaching Improvisational Piecing.

A month ago I took an afternoon off work with the nanny at home with the girls.  I pressed my sampler, prepared some pitches, and hit the stores.  And the first one bit!  I actually pitched three classes and they picked up Improvisational Piecing.  How cool is that?


So, if you are in the Calgary area in late November, please sign up and I'll do my best to educate and entertain you. To register you can do so at Along Came Quilting.

Here are the details:
November 13 and 20
1:30-4:30 pm
Along Came Quilting
Unit 12, 1220-59 Avenue SE
Calgary, Alberta

See you in November!

Another Form of Improvisation

Just in case it wasn't obvious in those photos of the water layouts, here is my current design wall. It's our brand new fence.  Gates optional at this point. It sure works well as a design wall, with one of our old white sheets thrown over it.

I haven't had a chance to work on any more layouts for the water quilt. And sadly now, some late summer rains are here for a few days so I'm not sure I'll get to them these weekend.  At least with the rain it means I am let off staining duty on that fence!

In the meantime I'm plugging away on the quilting of the grass quilt.  Over half done now.  And when I'm not quilting I've been trying to gain some order in the house and find another nanny. Our wonderful nanny decided to go back to school in September.  I've known  for a few weeks but Hubby was out of town and I couldn't motivate myself to do anything.  Despair is setting in. Good thing I have some vacation time to use.

There is more quilty stuff to come in the next few weeks.  I have a couple of announcements and bigger projects in the works.  Stay tuned! 

Water Version 3

Look at me changing things up.  This time I got rid of all the small pieces in this one.  And after so many of you liked them thrown into v2.

There needs to be some sort of transition between the short and long pieces, or could they simply be sewn together?  Thoughts?

And because I anticipated the comments, here is the same layout, flipped 90 degrees.  Water is horizontal, not vertical, so many of you said.  So here is this layout another way. Ah, the joys of photo editing software.
PS  Like so many of you I am really starting to see some of those more yellowy greens. Not sure what I'll do about that yet.

Water Version 2

Hmm, some very good and frank comments yesterday.  Thank-you so much. There is already more for me to think about.

This is v2.  v1 did not include all the pieces I made.  You can see that this version has those sections of more random, smaller pieces in the middle.  This design builds out from those pieces.

Oh, and to answer a question from yesterday, these layouts are probably about 70 or 80 inches by about 50-60 inches.  I'm just estimating.

So, thoughts on v2?

Water Version 1

What do you think?  Seriously, what do you think?

I had some time yesterday to play with layouts for my water quilt.  I want your opinion.  Every day this week I will post another version. Please tell me what you like and don't like about it. Tell me if it works or if it is complete crap. I've got very thick skin, so please be brutally honest. I have some preferences, but I'm not going to tell you what they are.  I'm looking for other opinions.

A couple of things to keep in mind.  I'm not tied to using all the pieces I made, nor am I opposed to making new ones to fit in. If you have other ideas for layout I would be happy to hear them. And just so you know, none of these pieces are trimmed because I do plan on joining them together as I pieced them, with wavy lines.

So, v1.  What do you think?

No More Whining

Okay, there has been far too much whining here of late.  I could continue on - life's just beating me down these days - but it is time to move on.  Seriously, I need a kick in the butt and some perspective.  Don't let me whine anymore.

Instead I will share some good news and some quilt photos.  Other than the gates, our fence is done!  We can also now run around and play on the new grass.  And speaking of grass, I finished my grass inspired quilt.

I should clarify that this quilt is more inspired by the intended patio in our newly landscaped yard.  The patio is still a month or so away from being completed.  Maybe that's why I wanted to do this quilt - letting my imagination run wild while I stare out the back window.  Or compensate for the lack of patio?  Oops, I said no more whining.

The top is made entirely from scraps.  Okay, maybe the whites technically qualify as stash, not scraps.  But they weren't big pieces.  All the greens do come from the scrap pile.

The white squares are 12.5 inches and the pieced sashing in 4.5 inches wide.  Those are unfinished numbers.  I made the sashing pieces by trimming my green scraps - those that were big enough - to about 13.5 inch strips.  After dividing them into dark/medium and light piles I sewed two strips together.  I then trimmed them, often on an angle, to 12.5 by 4.5 strips.  The cornerstone pieces were made from smaller scraps, sewn together into a simple four patch and trimmed down.

Initially I thought this would be a great picnic quilt, but Smilosaurus is way too messy for that this year.  The quilting will be a challenge - at least to me.  This is where the grass inspiration will really come in.  Stay tuned.

And speaking of perspective, I wanted to share with you some good news.  Do you remember this quilt?  My colleague and old boss finally got his new heart on Friday.  We heard yesterday that he is already recovering quite well.  So when I'm whining about the state of my house and busyness of life, remind me that heart matters more.

PS  This last pic includes fabrics from that Inspired Improvisation quilt - and one of the many aphids hanging around these days.

Now What?

I have my Hubby to thank for getting some quilting done this week.  No, he didn't magically win the lottery so I could quit working, nor did he take the girls out every evening so I had no interruptions.  But he had a busy week at work, so he was too bagged at the end of the day to do much work on the fence.  That meant I didn't have to work on the fence.  As much as I would love a fence, I really appreciated the quilting time.

With The Monster's birthday behind us we had a bit of breathing room this week, beyond the yard work.  So I actually got to sew during naptime today (I don't work on Fridays).  I got all the strips sewn for the water quilt.  Well, I say that they are done, but I'm not sure of that yet. I've got all these strips, now what?

Just to get an idea of the potential size of the finished quilt I laid them out on the grass in the park across the street.  Eyeballing it I would call this a large lap size at this point.  Maybe 60 inches square, depending on layout, or even up to twin sized.  The layout above with very random and done without any thought.  But it does make me happier with the project overall. It has the general feel I wanted.  I think it will come together into something interesting.

My next few posts are going to be photos of potential layouts.  I would appreciate any opinions or input.  I'm sure I'll have more stuff to piece and bits to cut out along the way.  And I have a few ideas for how it could all come together, but we'll have to see.  In the meantime, the grass across the street will be decked out in fabric.  I've got no design wall currently so that is the only place I can spread things out to see.  Let's hope there is no wind or rain in the coming days. Oh wait, if there is no wind or rain I'm on fence duty.  Crap.  Quilt or finish my fence and get a yard again? Rock, meet the hard place.  

Isn't this a cool photo?  A grass-eyed view of the quilt.

I Used to Quilt

This about says it all.  A bunch of strips sewn together and just sitting there.  Just sitting there.

Phew, this was an exhausting week.  Work was hell.  The only thing getting me through the week was the promise of a drink with an old friend.   We haven't seen each other in over a year and in two short hours reconnected. Beyond work I had some heavy deadlines for Quilt Canada, I donated blood, and had to pull off a picnic for over 30 for The Monster's birthday this weekend.  Needless to say, I didn't get a lot of quilting done.

This water quilt is a work about process.  That is, I don't have a final design in mind.  A general idea of what it might look like, yes, but no final picture.  I've been sewing strips together in varying thicknesses and lengths.  At some point I'll lay them out and see how they look.  It could be complete crap for all I know.  So far, however, I do like the combination of fabrics.  It is soft at points and bold at others.  Serene, but a bit wild.  A bit like the ocean and only kind of like me.

Here's hoping that once I recover from the fact that my Monster is three (or rather, that I've been a mother for three years) and get the invitations out for my sister's baby shower and help Hubby build a fence and lay sod, then I can get more quilting done.