teaching

Diamonds, not Squares. Plus, a new Improv Log Cabin Class


There has been a jelly roll of Doe fabric and a stack of screen prints patiently waiting their turn to be used. Every time I opened up my stash closet they taunted me, asking to be used. But I needed to clear space - mentally and physically - before I starting something new. I finally felt prepared to do just that this week.

A few hours of play and experimenting with a new shape and I'm very happy.

Diamonds. Not squares turned on their sides like a certain cereal marketing campaign of a few years back. Actual diamonds. It all comes down to the first shape you start with. Just a slight change in the angles on the corners and a whole new world opens up.


Playing with basic techniques in new ways is a wonderful way to explore improv. Log cabins are one of the oldest techniques in the quilting handbook, but that doesn't mean your log cabins quilts have to look old.

I'll be teaching Improv Log Cabin Variations at the Wonderfil Threaducation Centre next week. Come out to play, explore shapes, and dip your toes into the improv pool.

June 24
6:30-9:30 pm
Call 403-250-8262 or register here.

Even the trimmings are pretty. I have a friend who makes mixed media collage and she periodically takes my little trimmings. She's already got her eyes on these.

Lilac Lovely - Improv Curves


Not a spec of white in this quilt top! In fact, quite the opposite of low volume for me. It is so rich and saturated in its colour. I absolutely love it.

As much as I love a perfect circle, I adore improv curves. Then again, improv is my language. There is something absolutely freeing about cutting a random curve and making it work. It requires letting go of sewing expectations. Frankly, that is the best part, in my opinion.

This particular quilt top started with a stack of 20 fat quarters, a rotary cutter, and a large ruler for squaring up. It comes together much faster than you think it does.

If you are interested in learning more about this technique join me at My Sewing Room this summer. I'm scheduled to teach this a few times and would love to have you join me.

July 10 6-9 pm
August 9 1-4 pm

Call 403-252-3711 to register.


Letting Me In - Benefits of Being a Quilt Teacher


We sat laughing and secret sharing around a nondescript table in a junior high Home Ec room. Stories of siblings, child birth, and road trips. After a particularly racy story one of the ladies leaned over to me and whispered, "I hope you won't tell anyone this."

When I am invited to teach to a guild, in particular, there is something very special that happens. These are generally a group of women that know each other well, have spent many a Saturday or evening together sewing and chatting, and likely know a few secrets about each other. At best, they are there for each other when things are bad and celebrating together when things are good. At worst (and it really isn't worst) they know each other's fabric preferences and what kind of sewing will make them jumpy. Then there I am, a stranger thrust into the group.

Yes, I'm invited. Indeed, that is the reason I am there. They want to learn, to glean from the information and inspiration I can share. It is my job to be there and make sure they have a good day, with some challenges and more than a few a ha! moments.

The other people in the room are there because they chose to be there. Maybe they want to learn from me specifically? Or perhaps they sign up for every course the guild offers because they like to take classes? Sometimes they just want the day to sew and a class gets them out of the house (and away from family!)? Either way, they are taking time out of their lives to gather and sew. More than that, They are gathering together in a group that likely knows each other. Some better than others, but in a guild class the students generally know each other and I am the stranger in the room. It is a privileged position.

Conversations happen over the machines that will not happen anywhere else. Sometimes I am included in them, other times I am the observer or even the interloper. It is part of my job to judge when I am welcome in the conversation as much as it is to teach them how to make a perfect circle. And it is definitely part of my job to keep my mouth shut when we leave the room. The classroom is essentially a sacred space. Like an AA meeting, or a stitch and bitch at home, what is said there remains among the people there. As the teacher, I must respect that wholeheartedly.

As the teacher, I also see it as my role to create that special space. In a store or workshop setting where students don't necessarily know each other I like to build an atmosphere where there is chatting, sharing, laughing, and even a few secrets as we sew. If you know me or have ever taken a class with me you know that I am not one for keeping silent. So even if you don't talk, I will! It isn't about filling air time, however, it is about building trust and sharing. I want to invite you into my world so we have a shared story at the end of the day, not just some quilt blocks.

This is one of the reasons I love teaching so much. Of course I love to get people inspired and spread new techniques across the land. But it is the notion that I am invited in to a shared space and there is immediate trust that makes my job special. Knowing that people trust in me and feel so comfortable with me is a mark of success in my eyes. So no, I won't tell anyone what we said, no one at all.

Quilt Storage Solution


Forgive me for being cocky, but I have too many quilts. My husband has been saying that for years, but I'm finally cluing in. There are only so many beds in the house, so many forts to be built, so many little legs to cover. I do give away quite a few quilts too, but the supply at home continues to grow. There is just no stopping the compulsion to create.

Over the winter the spot to store the quilts became the table in the family room. It is supposed to be a table for playing games, doing puzzles, and gathering around as an alternative to the TV. We've used it as a fort or secret TV watching space as well. In truth, it's main function was to hold the precarious stack of quilts.


Nothing was functional - including the quilts themselves.

Then I discovered these racks. Long story short, I found myself with unexpected free time and a case of the grumps. So I went to Home Sense, which is a discount home wares store along the lines of TJ Maxx or Marshalls for my US readers. I went in hoping to find a little table for my son's room, but found these racks instead. I picked up the two they had to test out at home.

(See, I thought I had a genius idea for quilt racks that my husband could make, but I also wanted the quilts off the table before 2017. His business builds cabinets so he has all the tools, but not the time. We are the cobbler's kids with no shoes.)

The racks are PERFECT. Each one easily holds 10-15 quilts. I was so pleased with them that I drove across the city (something I hate doing) to another HomeSense, fingers crossed, to get another one. I'm a firm believer that instead of getting more and more storage one should have less stuff, so three will be my maximum.

As for the brand, to direct you to get your own, if so inclined, I can be of no help. They simply have 'Organise' on the label. I've done a quick search on line and can find nothing. Maybe you will have better luck. For reference, they seem to be a painted or powder coated lightweight steel.


There are currently 32 quilts on these racks.

I should address the sheer volume of quilts. As soon as your write books, have trunk shows, and teach, the quilts pile up. And you can't give them away because you need them. Not always, but enough to need them readily accessible. There will come a time when I don't need to pull out every single quilt from Sunday Morning Quilts, but for now I still need all that scrappy goodness around.

Not to mention that I'm still making, still trying new things. And we won't mention what would happen if I actually finished the quilts on my Quilts Under Construction list!

Values Plus Quilt


Values Plus
36'' x 48''

Such a fun little quilt. And the only reason it is little is because Amanda Jean talked me out of going bigger. She was right, especially considering this is a class sample. Let's face it, it is much easier to travel with a smaller quilt.

I did find myself quite addicted to making these little blocks. It was made purely from scrap strips. The only decision I made in making the strip sets was making sure that I had value contrast in the pairs. After that it was anything goes! The real fun in playing with the layout.


In the end I went with this colour focused layout. Four patches where the dark fabric was all the same colour, forming a wonky plus sign. The result is bold, colourful, and far more organized. Because the blocks are small (3 1/2'' square) finding order was important. It also makes the value contrasts pop a lot more.

This quilt is a sample for an updated Values class. We've all seen - to great effect - the values quilts based on half square triangles. For this I wanted to play with a different shape and show what can happen when the effect is a bit more subtle. Then, how we find order and design in it.


This was the first quilt I quilted using a stitch regulator. Not sure about it yet, it will take some getting used to. But no one is perfect right out of the gate! With all that pattern I went for a simple stipple in Aurifil 2600. You aren't seeing the quilting on a quilt this busy as it is.

I totally lucked out with some leftover binding. There was just enough to get this quilt done. A little bias fun to complete the quilt.

Playing With Pinwheels in Quilting - On CreativeLive


When was the last time you played? I don't mean get on the floor and play with the kids or grandkids? I don't mean kicking around the soccer ball either. No, I mean going into your fabric and making something for fun; quilting without a quilt a mind?

I'm going to venture a guess that it hasn't been lately. For all the things I start - and I do start a lot - they almost always are started with a finished quilt in mind. I'm not sewing for the sake of sewing. I don't experiment or play much. And this is so, so wrong.

That's because we learn so much when we play. Taking away the play instinct for a child isn't a good thing, we can all agree on that. So why do we think it is okay to do that for ourselves? By playing as quilters we get the chance to explore colour, construction techniques, shapes, lines, negative space, secondary designs, and our own challenges and joys. Instead of trying a new quilt pattern to experiment with just one or two of those things, just play. See what happens when you let go of the idea that everything has to be a quilt.

It is the move past this idea that everything has to be something that has to be tackled first. In this CreativeLive class, Playing with Pinwheels in Quilting, I want to help you do just that. We take a simple, common block - the Pinwheel - and turn it into so many different things. There is one basic way to do it, and then a million other ways. While I preparing for the class I had a hard time stopping. One idea begets another and another. Even while teaching the class on set I had even more ideas. 

Guess what? Playing is FUN!

Now I feel like I could take so many of the ideas from the class and turn them into quilts of their own. The blocks I made may or may not turn into a quilt as they are. I, frankly, don't care. They represent my own little quilty playground. Not to mention design opportunity. For now, they are on my design wall to remind me that play is fun, that exploring an idea or a shape is worthwhile, and that sometimes things are simply pretty.


If you have any questions about the CreativeLive class, don't hesitate to ask. And all feedback is welcome. They are new with quilting classes and constructive comments can only help. Did you know there are free previews of all the classes? 


You can also share reviews and your inspired work with the CreativeLive community. I keep up with the course pages, so please share your work (in addition to blogs and social media if you are active there).


Improv Quilting Basics - On CreativeLive


Oh, Improv!

After years of teaching improv to quilters I know firsthand that it isn't something that comes instinctively or easy to many. I also know that it isn't as difficult as many believe either. It is a technique that can be taught and learned, if you embrace it and not fight it.

My latest CreativeLive class is all about Improv Quilting Basics. I walk you through all the steps from preparing fabric to turning blocks into a quilt top and even quilting tips. So often I see improv discussions that talk about the process, but they never move beyond making a block. There is very little public discussion on how to actually turn those efforts into a quilt. That discussion is precisely the bulk of this class.

Whether you want to go with total improv, are looking for more structure, or just want to play and see what happens, you can get direction for all that from this class.

The studio students worked on two different projects in teams. You will see how they went from a pile of fabric to this small tops/start of big tops in just a few hours. The first group - Karen and Tracey - worked with some neutrals. It was a collection of solids and near solids that I put together with some fabrics from the Calligraphy challenge on Spoonflower, hosted by Uppercase Magazine. (In my head it was called the Ink quilt.) They worked from a pure improv standpoint - they cut up fabric, sewed it back together, then puzzled it to turn it into a quilt top.

Nicki and Michelle worked on a stack of low-volume fabrics (a nice follow-up to the Quilting with Low Volume Fabrics class) with pops of red. The combination was from a student in Inuvik and I'd wanted to see it in action again. In their case they built up their improv blocks and we squared them up. In the class we talk all about the tips and tricks for building improv slabs this way and considerations when putting them together. And look, they've finished what they've started too!

The whole time the students were sewing I was playing myself. You get to see that too. I show yet another way to put a quilt top together and discuss more options. Not to mention a tiny trunk show of some of my favourite improv quilts.

At the end of the day I want my students in Improv Quilting Basics to feel totally comfortable working improvisationally. That means different things to different people. But having improv in your skill set can mean so many things. It doesn't just have to mean that you make slabs or totally improvised quilt tops. It is about embracing a spirit that means you don't freak out when you run out of background fabric, or gives a you language to translate your inspiration. Improv means trusting the process.

Oh, and in case you were wondering, I let the studio students keep the work they made. I only asked that when they finished that these quilts be donated to charity.


Translating Inspiration in Quilting - on CreativeLive


Oh, the elusive inspiration. Or the overwhelming inspiration.

As quilters there is inspiration everywhere - other people's quilts, fabric stacks, a pattern jacket, books, and even the buildings, flowers, and colours around us. It is one thing to see and feel all this inspiration, it is quite another to turn it into a quilt.

As a teacher and long term quilter (coming up on 17 years now) the way to turn inspiration into a quilt is a frequently asked question. It can't, however, be answered in a FAQ section on the blog. It can be taught. Rather, the tools and steps it takes to turn inspiration into a quilt can be taught. That is precisely the point of this class on CreativeLive.

If you've taken a webinar with me or a class on intention, this is a more literal interpretation of the process. In this class I break down the steps required to go from idea to quilt. Better yet, there are tonnes of examples - from me and the studio participants. It was great to work with the ladies in the studio with me at play with their ideas. Watching the class, you get to hear and see their thought process. It feels more like a workshop session where we feed off each other as opposed to the teacher at the front of the room.

One of the examples I brought to class was all about a bridge. We have an amazing bridge here in Calgary, called The Peace Bridge. I've loved the lines of it every since it was announced. Not surprisingly, it is often photographed! During the class you can see where my thoughts went and how I played with fabric. You will also see that I never quite landed on what I want. That is totally part of the process though - translating inspiration is an iterative process. So some day soon I will revisit those blocks again and see what it needs to be.

In the meantime, don't hesitate to check out the free preview of the class on CreativeLive. This is such a treat, to see exactly what you are signing up for in this detailed first lesson. 

And speaking of bridges... Random aside from my trip to San Francisco to film the class. Totally cliche, but I walked the Golden Gate Bridge and it was really cool. Even when I got caught in a windy downpour just as I hit the other side.


Knits, the Linden Sweatshirt and Thoughts from a Beginner Sewer


If you've read this blog for a while you will remember that I've said many times before that I don't sew clothes. I'm a quilter, not a sewer.

I stand corrected.

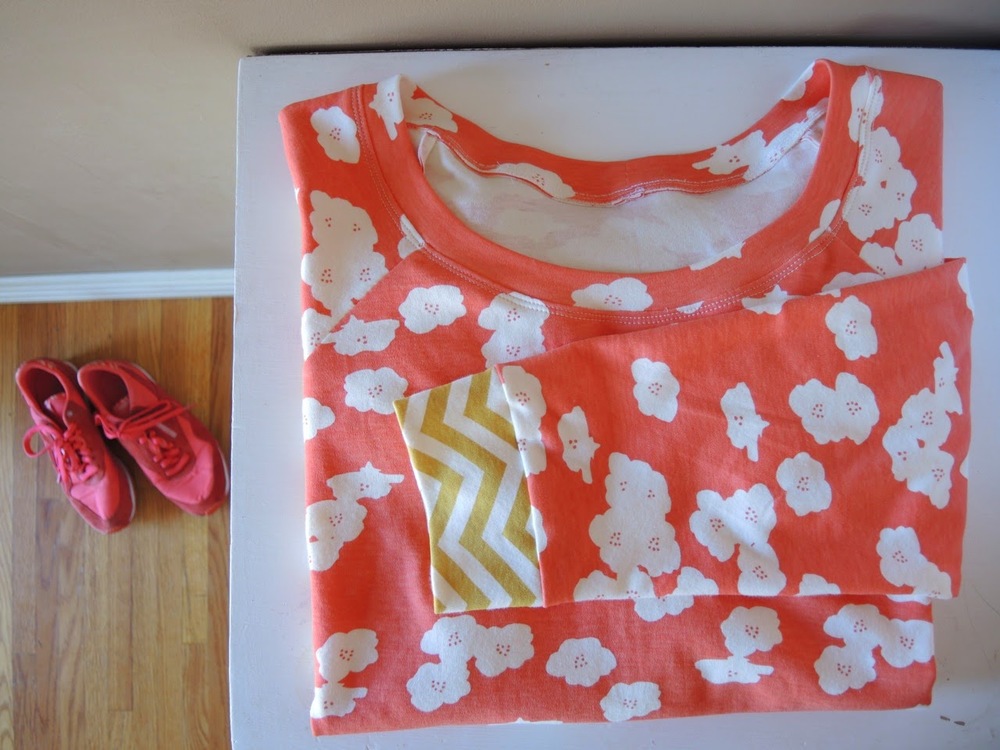
Behold my first sweatshirt. When I told my SIL that I was sewing a sweatshirt for fun she commented that she hadn't even seen me wear a sweatshirt aside from a hoodie at the campfire. Quite true. But I picked up this dressy one from J Crew last year and fell in love. Then, at QuiltCon, I finally caved on some gorgeous Nani Iro double gauze I've been admiring for a few months online. Those two loves collided when a friend pointed out to me that they just saw a Grainline Studio's Linden sweatshirt in double gauze. Sold!

Not only was I keen to make this sweatshirt, it was actually serving as my reward. Some selfish sewing after basically 2 months straight of work. Something is clearly wrong with me.


Okay, so this pattern is rated for a beginner. While it is true there are not major technical skills required to make this, it certainly reminded me that I am indeed a beginner when it comes to garment sewing. A few Staple dresses does not make a seamstress. The last time I sewed with knits was a pair of sweatpants in junior high Home Ec.

The pattern is pretty straight forward and well illustrated. It provides a few hints and tips on sewing with knits, like what stitches and needles to use. I felt much more prepared, however, after spending some time on line searching out more tips, tricks, and guides for sewing with knits.

There were a lot of little things that flew under the radar. An experienced sewer would probably just chalk them up to common sense, but it was spots that a beginner would perhaps struggle with. For example:

- Knit is stretchy, this works to your advantage when attaching your cuffs and bands, but against you when cutting.
- When attaching the wrist cuffs, take off the table around the throat of your machine, it pretty much made it perfect for attaching the cuffs. If you don't, you are trying to manage all the material, the stretching, and a good seam allowance without catching the other side of the cuff as you sew.
- If the fabric isn't moving for you under the presser foot, you can raise it a bit.
- There are different settings required for your machine, very different ones if you are used to quilting.

I spent a lot of time trying to figure out stitches, speeds, and settings on my machine. In fact, the machine was my biggest frustration. Rather, my ability to work it with this material. With the help of a strong Campari and Soda I found the patience and the rhythm required.

It really got me thinking about beginners and the assumptions I make regarding terminology and basic skills. I write patterns and assume a certain level of knowledge. Now I realize I can't write for every audience - if I broke absolutely everything down the more experienced quilter would be driven bonkers by the detail. There is likely more of a middle ground, however. Especially when marketing to beginners. Definitely something to think about.


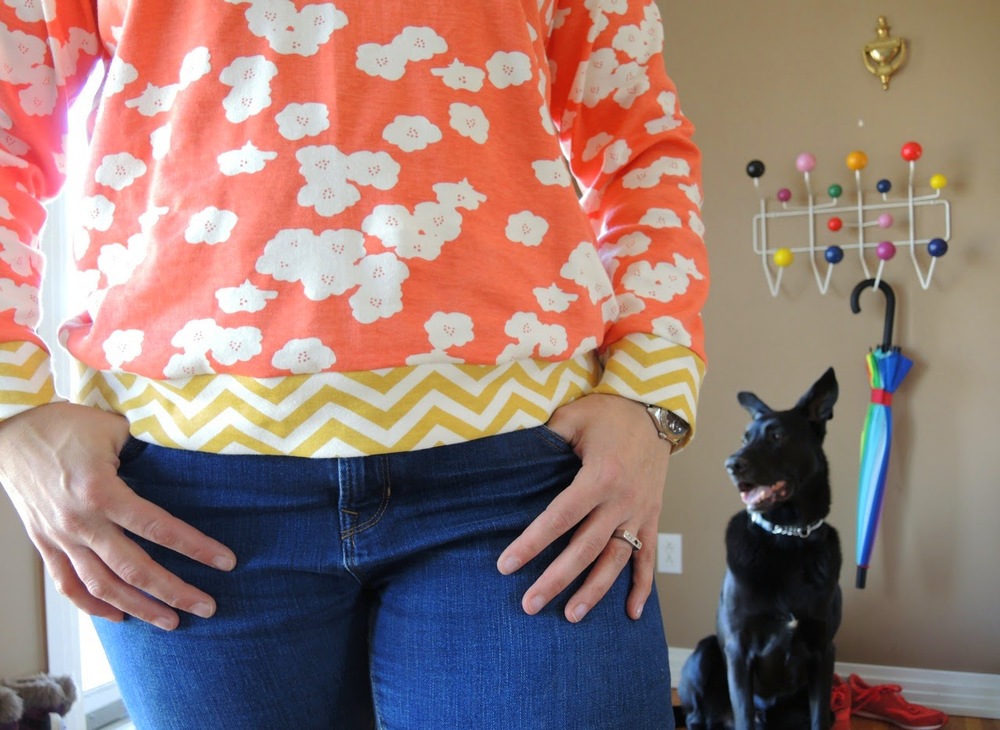
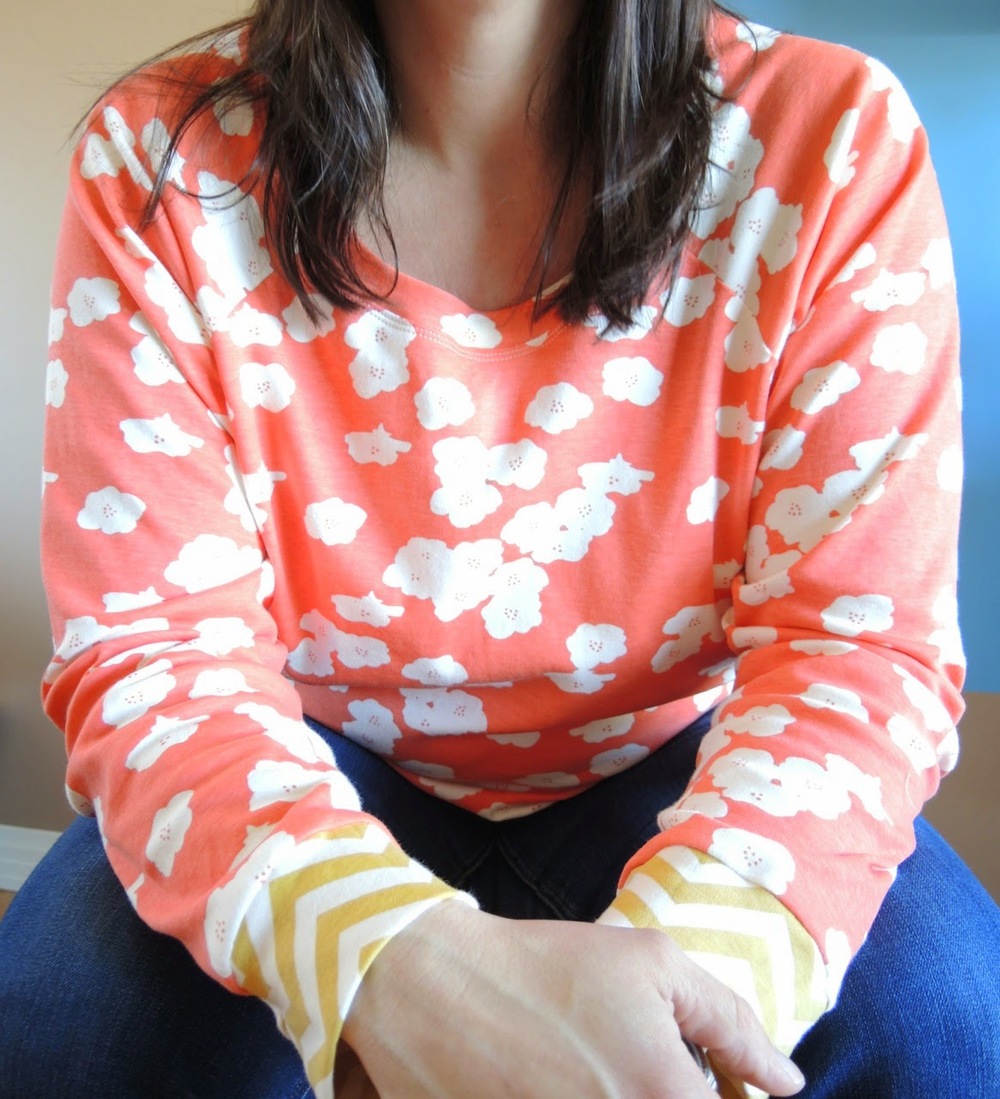
I love, love, love this sweatshirt. I like the fit on me. I went for a size 16 based on the pattern measurements and adjusted nothing other than the length of the neck band piece. (I found I liked the wide opening and wanted less of a gathered feel, so I added a few inches to the band). The sweatshirt is loose, almost blousy.  The bottom cuff doesn't get tight around my hips, which I prefer to the alternative. If you wanted it tighter you would just have to make the band a bit shorter. The arms are pretty much perfect for me. This will be a good layering piece as we head into spring.

The material is from Birch Organics, the Elk Grove knit line. I picked it up at a local store. Selection was limited locally to a lot of cute little prints, but I don't do cute on my clothes. So ridiculously soft, the flowers were worth it. I was paranoid about stretching it out before I finished sewing so I was super careful, then someone else commented on an Instagram photo that it wasn't very stretchy! Perhaps it was just paranoia on my part?

Now I am very excited to tackle a double gauze version. For that one I am going to lengthen it a bit so it is extra slouchy. I need to pick up a knit or a ribbing for the wrist cuffs and bottom band. Hopefully I can find something that coordinates nicely. I may switch out the neck band for a bias binding, but I haven't decided on that yet.

Look out world, I'm a sewer now.

Quilting With Low Volume Fabrics - on CreativeLive


Let's talk Low-Volume. (You can whisper if you want to, I am.)

Low volume fabrics remain trendy. You see them popping up in fabric collections, shop bundles, and in quilts. When I pitched A Month of Sundays nearly 4 years ago the term and the fabrics were just starting to emerge into quilters' consciousness. Now, you can hardly look anywhere without seeing these gorgeous fabric options.

There are so many people, however, who stop me to ask questions about just how to use them. Some people think low volume can only means black and whites, or only tone on tones, or only colours. Some people only think you can use low volume prints as backgrounds as a completely scrappy look. Some still believe that low volume only means light fabrics or that there is no contrast in a quilt made from low volume fabrics.

In both A Month of Sundays and my CreativeLive class, Quilting With Low Volume Fabrics, you can learn that all of these things are small little pigeonholes in the possibility of using low volume fabrics. By following along we learn that the principles of colour, value, scale, and texture still apply with low volume fabrics. We learn that while there are no wrong ways to use these fabrics, there are better ways to use them in order to enhance your quilt design.


In the class you can also sew along with us. I chose the famous X-Plus block as our exercise. We go through different fabric combinations to illustrate all the lessons of the class. The studio audience is learning right along with you. That means you get their insight and A Ha! moments too. It truly is a learning by doing exercise.

At the end of the class you will be very comfortable using low volume fabrics effectively in your quilts. You really can't go wrong with these fabrics. They are a great alternative to white, cream, or grey backgrounds, but they are so much more. Knowing how to pick and use them means that your options for fabrics opens up tremendously.

This was my goal in A Month of Sundays as well. But for those of you who learn by doing or watching, grab the class. Then you can hit the book for some inspiring quilt designs.

Oh, and all the Craft and Maker classes are on sale at CreativeLive until March 15. That means you can grab any of my classes for just $19.

Announcing My CreativeLive Experience


It's been a few weeks since I filmed my CreativeLive classes. It was such an intense experience prepping and filming. I wanted to deliver classes that you've not seen from me before. Some are an extension of things that I do and have done, but with more details or a different twist. Some are totally brand new. That's what made the prep so much work. Totally worth it though, I think these classes are awesome. If I may say so myself.

If you've ever met me or taken a class from me you know that I can talk. But wow, filling two straight days of airtime was tough. That means you get a lot of stories from me throughout each class, on top of my direction, tips, and lessons.


CreativeLive is a well oiled machine. They know what they are doing in filming and delivering classes. It was quite phenomenal to work with them. Commitment, enthusiasm, and professionalism. From my producers to the camera operators to the assistants who kept me in tea and my voice cracked, everyone was wonderful.

If you've not heard of CreativeLive before I think you will be very pleasantly surprised by what they have to offer. Most of their classes are first broadcast live. And when they are live they are free to watch. You can then purchase from their catalog if you want to hold on to the class. 

And the catalog is filled with some amazing classes. Their Craft and Maker section is growing, but don't hesitate to check out the Photography and Money & Life sections (my favourites) too.


Oh, make-up! I'm a mascara and lip gloss kind of girl, when I do get dressed up. So having my hair and make up did was quite the treat, if not adventure. But I had a great make-up artist who made me look just a little bit more so. Such a simple thing, but it was nice to know I didn't have to worry about my looks when being immortalized like this. Such vanity, but definitely a part of the stress. I won't lie about that. Much thanks to my best friend here at home for helping me pick my outfits.


One of the really fun things about CreativeLive is the studio audience aspect. As a quilt teacher it can be really difficult to teach without the response from students. For my classes I had 4 incredible women join me in the studio. Karen, Michelle, Nicki, and Tracey were all from the Bay Area and took time off work and their family schedules to join me in the studio. I had so much fun with them! Such enthusiasm and they really embraced what I was trying to do both in the studio and for everyone watching at home. 

The other great thing about having an audience is that all the concepts I teach get demonstrated different ways. So it isn't just my work that you see. I really find that we feed off of each other in a classroom environment, so getting to see their work helps everyone who watches.

(And that is Kris with us up there. He was a lovely director!)


Aren't these lovely? Michelle made a crane for each class we filmed. It was such a lovely feature on the set. While I didn't get a chance to take many pictures throughout, I couldn't resist snapping this pic before everything got packed up at the end. A perfect end to our time together. A perfect reminder to let your creativity take flight.

In the coming weeks I will talk more about the classes in detail, but you can still check them out now.


Upcoming Hand Applique Classes


With two heavy weeks of travel behind me I am so happy I have hand appliqué to keep me company. Long plane rides, lonely nights in a hotel room, and an overwhelming need to sew something. Applique keeps my company through all that.

If you've not embraced the power of hand appliqué (and you live in or near Calgary) you can learn the basics from me at My Sewing Room.

I chose the Park pattern from Carolyn Friedlander for the class. It allows us to get a block prepped and basted and get to the appliqué. When we are learning the appliqué we cover the basics of needle turn as well the tricks for sharp corners, smooth curves, and finishing. This block has them all. (And it looks really cool.)


Last month I was basting this block in an open house at the store. So many people commented that they liked the block but would default to a zig zag stitch to get it done. Nothing wrong with that, but I think it misses the point. Hand appliqué isn't about getting it done fast. It is about the process for sure. But it is more about slowing down to sew and, frankly, the portability. Having an on the go project with no end in sight gets us sewing anytime, anywhere. And forces the deep breathes we all need more of as we move through the day.

To register for the class call My Sewing Room at 403-252-3711 and check it out in March, April, or May.

Values Plus


We've all seen a million half square triangle (HST) Values quilts. I, for one, don't get bored of them. I think that is because no two are the same - from the fabrics to the layout. However, I wanted to try something different. I was actually prepping for my upcoming class - Values Plus. In that class students will play with values and more than just HSTs. The class is about experimenting, not just creating a HST quilt.

So I dug into my jars of strips and strings. All random fabrics, random sizes, and only paired up by value. That is, as I grabbed strips I made sure that they had a value difference. Sometimes it was subtle, sometimes it was bold. That's generally how I approach pure value work. Subtlety makes it a bit more interesting.

After sewing the strips together I picked a size to trim to. It was mostly dictated by the width of most of the pairs. So 3 1/2'' square it was! And then I kept sewing, and sewing. And trimming and trimming.

I played with a number of layouts. More of a rail fence setting? Totally random? Strips of light/dark? After a long chat with Amanda Jean I went with this final set up. I also decided to create these little groupings on colour, a four patch.

No word of lie, it wasn't until I was posting these photos here that I realized that they looked like plus signs. For my Values Plus class. Get it?

I'm such a nerd.


Great New Local Gig

My attempt to have a quieter fall has been thwarted by a few things. One, the snow that is still here! Two, a community project stealing all my weekends. And three, a full slate of teaching.

Join me at My Sewing Room for a whole slew of classes.


Slab Workshop
September 18 and 25 10am - 4pm
(If you've taken a short slab workshop from me before, this will still be a great class as you have plenty of time to sew and a lot of input from me as we put the technique into a whole quilt top.)


Values Quilts
September 23 and 30 6 - 9 pm
Full of tips and tricks for mastering value when choosing fabric, using half square triangles to play. Will also include a demo of a brand new values technique.


Beach Grass
October 14 and 21 10am - 4 pm
This is a great quilt from A Month of Sundays. Very fat quarter friendly too!


Sunday Morning
October 16 and 23 6 - 9 pm
Maybe one of the most popular quilts from Sunday Morning Quilts. We'll make blocks and assemble a top. Go low volume like the original or change it up. Watch for my new samples for other colour ideas.


Scrap Management Workshop
November 22 and 23 10am - 4pm and 11am - 5 pm
Show up with a suitcase or laundry basket or whatever filled with scraps. We'll tackled sorting, storage, and get going on your own individual quilt. Make one of the designs from Sunday Morning Quilts or be inspired by your scraps in a whole new way.

To register for any of the classes call My Sewing Room at 403-252-3711

Sherbet, Take 2


Last month I had the privilege of teaching at Quilt Canada. This is the national event of the Canadian Quilters' Association. I've already spoken about my amazing experience in my Improv class, but I also had the chance to teach my Sherbet quilt.

Sherbet is a quilt from A Month of Sundays. It is a straightforward quilt design, but it takes a few steps to get there. Strip piecing, cutting, sewing together, long strips. A day wasn't nearly enough to get the whole top together, unfortunately. But my students sewed and sewed and cut and cut. I pressed for them and cut for them (I'm a hands on teacher!). And we chatted all day. I had a lot of fun, I hope they did too.


The quilt that I cut is destined for one of my nephews. He's a bright, energetic kid who loves colour. So we went quite the opposite of low-volume for him. Not to toot my own horn, but this just goes to show that just because the quilts in the book are low-volume, it doesn't mean you have to stick to low-volume fabrics to make them yours. Turn it up!

Check out the fabric choices and work of my students.


This one is destined to be a king sized bright and pretty version. We played with the math of the pattern to size it up, making the columns a bit longer and adding some. But I can't wait to see a finished top from this!


My modern quilter in the group had an amazing fabric selection for her quilt, paired with this grey. The longer I am in the industry the more excited I get when I see people using friends' fabric in quilts. She had so many fun fabrics and the purple, navy, pale blue, and grey combo was dreamy.


Bright fabrics in candy colours with a pale blue background. This comes very close to my original inspiration for this quilt. I saw a store window from a cab. I couldn't say exactly what was in the window, but the bright colours hanging down are what caught my imagination.

I am a total sucker for a green and white quilt. That's why there is one in Sunday Morning Quilts and one in A Month of Sundays. Needless to say I was thrilled when this student started her quilt! What a great version of the design.

Sherbet is a bold quilt. It isn't difficult so you get great impact for straightforward techniques. But it takes a bit of time. Now that I have all my fabric cut, I just need to sit down and sew. That's the best part anyway!

Improv With Intention - Modern Quilt Guild Webinar

When it comes to Improv one of the approaches is to throw a whole bunch of fabric in a bag, and along with it, any decision making. Just grab and sew. This is an awesome technique. But sometimes you get an idea or want to use Improv to translate an inspiration. Knowing and understanding that you can do this is truly liberating.

Join me for a discussion of on Improv With Intention, a Webinar hosted by The Modern Quilt Guild.

July 30, 2014
7-8:30 pm MST

It is free for all Modern Quilt Guild Members. And if you can't make it for the live show, a recording will be available on The Modern Quilt Guild site 48 hours later.

During the Webinar I will be discussing step by step, how I use Intention to guide my Improvisational Piecing. I'll be using examples from multiple projects to show a range of approaches. You can ask questions and chat while I talk too. And if you've got questions but can't make the show, you can submit them in advance to The Modern Quilt Guild.

Oh, and I'll be debuting my Sewing Machine Quilt, all finished, during the Webinar.

More Circles! This time for Lucky Spool's Essential Guide to Modern Quiltmaking


Do you know what these are? Just some of my favourite tools in an arsenal of circle making things. Front and centre is my compass and elementary school geometry set. School supply nerds take note! You can find out about these and how I use them in the new book from Lucky Spool, The Essential Guide to Modern Quiltmaking.

This great book is like taking a workshop from each of your dream teachers - Jacquie Gering, Denyse Schmidt, Penny Layman, Angela Walters, and more. If you can't be in the classroom with us, this might be the next best thing! Each teacher has a chapter devoted to a specific concept or technique. You get the benefit of their experience and all their Quilter to Quilter tips. And then you get a pattern that uses those techniques.

At the end of the book is a phenomenal gallery of modern quilts. Some serious eye candy there.


My quilt in the book might be a new top favourite of mine. It comes with my chapter on Circles and Curves. You could probably call it a sampler of the techniques, but it is more than that. Inspired by two favourite fabrics it takes geometric block design to a really fun place. You could make the pattern as is or you could change up the layout to suit your own preference. Or maybe make repeats of your favourite blocks for a completely different look.

I debated long and hard about the colour selection for this quilt. It needs high contrast and I really wanted to keep it to two colours. But it is me and where one fabric will do I will pick 10! You could say this is a pretty masculine colour combo with just navy and gray, but I call it calming. Despite the bold geometry of the quilt, it has a very serene quality. Keeping the background fabric to a single choice really helps with that. 


To check out the other contributors and see what they are saying about the quilt, you can follow along with them.

Kari Vojtechovsky teaches on The Principles of Color
Alissa Haight Carlton teaches on Working with Solids
Dan Rouse teaches on Working with Prints
Denyse Schmidt teaches on Improvisational Patchwork
Jacquie Gering teaches on The Alternate Grid
Penny Layman, of course, teaches on Paper Piecing
Heather Jones teaches Large Scale Piecing
Angela Walters teaches Modern Machine Quilting
Heather Grant then takes us on a Study of Modern Quilts.


Lucky Spool is a new publisher on the book scene for quilting. Led by Susanne Woods (formerly of Stash Books and Craftsy) they are bringing a number of exciting books to the market. Their Essential Guide for Modern Quiltmaking looks like it is going to leave its mark for quilters everywhere.

Right now you can get the book on a great discount from Taunton Press (Lucky Spool's distributor). If you buy it from them get a 20% discount between now and July 21.

Click here. Use the discount code EGMQ20
UPDATE: the correct code is EGQM20. My apologies for the typo.


It's Over?

Yes, it is a question. But my slump may be over. And I have to give all the credit to my students at the recent Quilt Canada workshops.

A few weeks ago I had the pleasure of attending Quilt Canada in St. Catherines, Ontario. This is the annual big deal in Canada, hosted by the Canadian Quilters' Association and put on by a different local organizing committee. It includes the National Juried Show (which had a modern category this year) and 4 days of workshops, on top of the fun things like banquets, merchant malls, and challenges. I had three days of classes, two days being an Improv workshop.

In our small, ridiculously hot classroom we played and played with fabric. When I teach Improv I like to teach a series of basic techniques via blocks. For an audience used to more traditional piecing I find it to be a good foray into the world of Improv. When I get multi-day workshops we then get more time to play.

And oh, did the ladies in this class play. They all embraced improv with open hearts and sharp rotary cutters. As we taped blocks to the wall, brainstormed possibilities, drew out more and more inspiration, and laughed a lot the excitement grew. I was completely caught up in the energy and inspiration. I'm not going to lie, I may have even jumped up and down a little.

At the end of it I was desperate to sew myself. But I had to rush off on a plane to be home for The Monster's 8th birthday. So I found some time in the following week to play. And when I did play I felt all the same excitement in my own little basement studio that I felt in that room. I felt grounded, I felt energized, I felt creative again.

Thank-you so much ladies, I owe you so much.


Here is what I played with. In the class we covered how to take an idea, and image, and translate it into an improv pieced block. Houses, letters, numbers, mountains, diamonds, they all came out that day. We also brainstormed other shapes and one of them happened to be a sewing machine. That idea planted itself into my head.

I think I may turn this into a full pattern as my mind is spinning with possibilities. And if it wasn't the last day of school I could tell you for sure that I would be sewing more of these every day. Yup, the slump just may be over.


High River Handicrafts Guild


Last week I had the tremendous honour to teach in High River. You may not know or remember that High River was one of the communities devastated in last year's flood. It is a small town south of Calgary. The Highwood River runs through it and during the flood that was a bit of an understatement. The Highwood River barrelled over, under and through it.

A few months back I got a call from a quilter from the High River Handicrafts Guild. Would I be interested in teaching Slabs to the Guild? How they found me is the best part.

One of their members received a donated quilt after the flood. She loved it so much she started researching it. And it contained slabs! But the story goes further back than that. The quilt was made by someone else that I taught slabs too in one of the other local area guilds. She turned her slabs into a quilt, then donated it. Shirley, in High River, received the quilt. Shirley told me that the quilt has become her 'blankie'. Providing all the comfort that the word implies and then some. 


On top of that, I know the original quilt maker outside of quilting because her grandkids and my kids are friends, we live in the same neighbourhood and they go to school together!

It was crazy!

Not nearly as crazy as the flood and the fact that the community is still dealing with the aftermath. The centre where the class took place is a block from the river. The houses and apartments surrounding it are either still empty or you see the evidence of recovery in the form of new windows. Crews were moving earth and rocks outside to fortify the shoreline as we head towards spring run off. All morning phones were going off with alerts as they were doing emergency services testing in the community. 

Then were the quilters telling me about living in hotels for 6 months or more, the stress on disabled family. How they were just getting carpet installed that day. How they couldn't go home. What the wall of water was like. And about the generosity of other guilds in donated fabric and machines to replace all that was lost. How they themselves decided to give back as a first project once they could sew again.

The entire morning was humbling. There were tears and a lot of laughter. And so much sewing. 

Thank you to the High River Handicrafts Guild for having me.

And I can tell you this for sure, I am super motivated to get the last of the Just One Slab quilts done. There are about a dozen in various states of completion at my house. The rest have or are being finished and donated. All will be in by the flood anniversary.

Inuvik Part 2


When I left for Inuvik I had to temper my expectations. I've read far too much Farley Mowat, Pierre Burton, and anthropology texts about the Arctic. I had romantic expectations, for sure. The North was going to change me, that I knew for sure. But I told myself to calm down, that I was setting myself up for something that was likely not going to happen. I was, after all, only going up there to teach quilting. It's not like I was on some dog sled through the cold Arctic adventure. Or paddling the MacKenzie. Or hunting a seal. I was flying on a plane to sew. Let's be realistic.

But it did change me. The class itself inspired me as a teacher. The community infected me with a spirit I've never seen before in a community. The cold did not feel all that cold, well, except for one day. The sun shone in a way I've never experienced. And I heard snow unlike the crunch or swish I'm used to. Seriously, that hollow sound of the snow in that one spot in Tuktoyaktuk will haunt me. It's all a part of me me now. I'm not a different person, but I am a changed person.

It's subtle. I feel a quiet. I look for a quiet. At the same time I find the laughter, even when it doesn't seem to be evident. I seek friendship and the joy of people because they do make life brighter. Oh, and I will never look at a river the same way again. And do you realize just how many shades of white there really are in the world?


This greenhouse allows residents to have a normal growing season for everything from herbs to berries to veggies. It's converted from the old hockey rink. Yarn bombing awesomeness too.


Nothing slows down Inuvik residents. The paddling team at the rec centre, prepping for some summer races and endurance events. (Including my host, Shona.)


So many buildings in Inuvik are painted bright colours. These are known as the Smartie houses. But the day care, the arena, and many other public buildings are in so many colours. In a landscape of white, with few trees, these are a welcome respite for the eyes.


Ice Road Adventures! Seriously, a road plowed on a frozen river. Then, eventually, the frozen ocean. Absolutely wild when you think about it. Then again, it might be better not to think about it. 


Pingos. Hills made of permafrost thrust upwards by underground water. In the winter they looked like random bumps on the otherwise barren landscape.


The end of the Trans Canada Trail. There is a marker at the tip of the hamlet of Tuktoyaktuk. It is weathered and looks about four times as old as it is. My husband's grandparents once bought sections of the trail for the whole family, so this was rather special to see.


That's me, standing on the edge of the Arctic Ocean. In the past year I've now been to all three coasts of Canada. That kind of blew my mind. And all for quilting too.


One of the more unique experiences I ever had. At the bottom of that hole and frozen ladder is a community freezer. Residents of Tuk dug it out back in the 50s. Before the electric deep freeze this is where the community would keep it's haul of fish, seal, whale, and caribou hunted to keep the families and dogs fed throughout the winter.


Ever seen Ice Road Truckers? This was the only transport truck we saw on our 5 hours on the Ice Road.


Sunset, back below the tree line. Our trip up and down the Ice Road was surely an adventure as the truck nearly lost a wheel to cracks in the road. So being back where the trees were was a relief, for sure. That was a welcome beer that night as we finished watching the sunset.


The northernmost mosque in the world. This makes me love Canada so much.

During the trip I kept thinking about my friends around the world. Those who would have had their breath taken away by the cold. Those who might have been uncomfortable with the amount of fur people wear. Those who would do anything for a trip to this part of the world. I'm sharing these pics with you. I never thought I'd get this far north in my lifetime, so live vicariously through me, if you like. And from this point I will too, in case I never get back there again.


Again, thank-you to the Inuvik Quilt Guild and the NWT Arts Council for this opportunity.