More Scrap Sorting By Colour


Sorting scraps is a constant thing. You can't just do it once and expect it to perfectly maintain itself. Unless, of course, you are awesome and put every single scrap away the second it becomes a scrap.

I will always advocate sorting by colour. It is what Amanda Jean and I encourage you to do in Sunday Morning Quilts. By far, it is the easiest method not to mention the most inspiring. We also talk about having a special category or 3 for uniquely sized pieces like strips, little snippets, or triangles.

While teaching a Values Plus class recently I, with my students, decided to try piecing based on colour as well as value. I was so excited by the results I took my scrap sorting to the next level. I took my big bag of strips and started sorting them by colour too.

The process started on the front steps, while the kids rode their bikes in the evening light. My little guy decided to stop his maniacal ride to help me. But he was so, so tired that he had to do it laying down. Hence the piles of colour radiating around him. Awesome kid.

And now I have one more section of scraps all sorted by colour. It really is a good thing.

Peacemakers/Piecemakers


"Mom? Who was the lady on the bus again?"

We're driving down the road to get to swimming. I've felt busy all day long with wonderfully middle class privileges of baking snacks from scratch, walking the dog, and trying to get some work done at home. The kids, picked up from school and play dates, are in the back of our large wagon and we are chatting about their days. The Monster is telling me about the unit they are doing on Peacemakers. There is Craig Kielburger from Free the Children, Malala, and the lady on the bus. She just can't remember her name. Or, frankly, why she is a peacemaker.

This one bit of information is all she gives me but I know exactly who she is speaking of: Rosa Parks.

For the rest of the drive we talk about segregation, racism, The Civil Rights movement, the role of children, all their friends of many colours, and just why Rosa Parks is a peacemaker. The girls thought about their school and imagined life without some of their friends, without learning about the places we've all come from. I thought about the same thing. We were all very sad. I had to explain that despite all the work that there are still ugly people doing ugly things to people just because of the way they look or who they love. Again, we were sad.

But then we talked about the peacemakers. The people who were willing to stand up for the good and the right and the just. The people who fought for those who couldn't fight. And I was proud. Proud of them for understanding the importance of that action, for getting exactly what injustices they were/are fighting, and for wanting to fight themselves.

A quilt can be a statement. It isn't a call to arms nor is it going to change the world. It really might only be for me to process and remember the peacemakers. Regardless, it needs to be made. I need to make it. And I will share it with my kids and you, for the lady on the bus.

... I went back to these blocks a few weeks ago, on the anniversary of the 16th Street Church bombing in Birmingham. I added skirts, I changed directions. Now I think I know where I will take it. There will be, appropriately, a Courthouse Steps final layout. There will be some peace with my piecing.

Sanity Sewing


Sometimes you just have to get 'er done.

This quilt has been in the works for a few years now... And I got on top of finishing it a few months ago (well, finishing the top). I was making good progress with some commitment when I hit a snag. I'd made a mistake. My very last block in the very last row was the wrong one. There are two block styles in this quilt and I used the wrong one in this spot. And all I had to do at that point was sew the rows together to finish the top. Annoyed with myself and frustrated, the quilt top sat for weeks at that juncture. Because all I had to do was make a slab, draw a foundation, sew a new block, remove the old one, attach it, and then sew the rows together. It sounds like a lot of work, but it wasn't. I was just in a mood about it.

This week I found myself in a real need to sew. After a few weeks of a bad cold that wouldn't go away I longed to get to the machine. Those are the moments when I usually start something new or default to random improv. Instead I forced myself to make that last block. And it took me about 30 minutes, if that. Not counting a break for Hot Wheels with my boy.

Then I was struggling to get the rows sewn together. With all those slabs, the angles, and some skinny bits on the edges each row is bulky and lining things up was tough. Not to mention that I kept the freezer paper foundation on each block because of the crazy amount of bias edges. Then I caught Bari J. Ackerman on a Periscope broadcast extolling the virtues of glue basting (a la Christie Fincher). Bingo!

I've used glue basting before for Paperless Paper Piecing in a class with Christie. And I've heard of other people glue basting for regular piecing. It did not occur to me to use it this way. I'm so happy I saw that Scope because it totally made it easy to get this top together. A thin line of glue in the seam allowance instead of pinning (or hoping for the best) holds the fabric in place, once heat set. Then you can go ahead and sew your seam.

And get the quilt top done.

Right now this top has the temporary name of Shh....


Quilts Under Construction - 3Q Update


The quarterly check-in. I'll be honest, I had hopes of moving things through this list a lot more. I didn't really start any quilts. But there was summer, frustrations with my machine, a wasp nest, a new school year, and being sick. Excuses, excuses.

It is what it is.

We no longer have a babysitter two days a week. That is really making a difference. Not because I quilted when we had the babysitter, but because it meant I got all the other stuff done so I could quilt once the kids went to bed. Now that time is spent returning emails from the day and planning for the next one. Mornings are for the creative work and my one early riser.  We've also entered that time where the kids' activities take up a lot more time. And with a maniac for a 3 yo there is little sitting and watching time while the girls do their thing.

As I said, it is what it is.

Quilt Tops Ready for Quilting

1. Cosmos Blocks
2. Improv Sampler
3. Checkerboard from Sunday Morning Quilts
4. Slaveship Quilt
5. The Evil Genius' Triangle Quilt
7. Giant Hexagons
8. Lilac Lovely - hanging at My Sewing Room as a sample for my Improv Curves class.
9. Cirrus Solids Pinwheel top
10. Solid Sunday Morning
11. Oh Canada Quilt in Red
12. Circle Lattice
13. Low Volume Rainbow Mini - I don't think I've ever shared this, but I came across it this summer.

I'm really hoping to find a day or two on a long arm to get some of these done. Or a friend to help me baste because that holds me up more than anything.

Quilts Being Quilted

14. Low Volume Circles - Ugh, hand quilting holding me up. Maybe this winter?
15. Antonio's Quilt - So close, yet I don't finish it.
16. Smooch - on the machine right now and about half done.

Waiting for Binding

Nothing in this pile.

Blocks and Process

17. Low Volume Shoeman's Puzzle/Slab blocks - So, so close on this one. I was all set to sew the last rows together and I saw a mistake I made. Just haven't been motivated to fix it.
18. A values quilt in neutrals - I know I said I wasn't counting class blocks, but I now have enough blocks to turn this into a quilt.
19. Green/Yellow/Orange Improv blocks  - These have turned into an almost full set of blocks. About 8 more to go then I can put the top together.
20. Mid Mod Bee - Still wishing for a day or two to get this together.
21. Hand Pieced Diamonds - Is it crazy that I feel the whole top needs to be hand pieced together?
22. More Cosmic Burst blocks
23. Name quilt for my daughter - I think this become a backing more than anything...
24. Chandelier quilt - requires some unsewing and I'm just not motivated to do this.
25. Liberty Circles
26. Respite - a project started in a Bill Kerr design workshop
27. Pieced Stars
28. The Water Quilt
29. Edges/Studio Stash Play
30. Beach Grass Take 2
31. Y2K quilt - Maybe up to 20 rows now.
32. Another leaders and enders project, intended to be like Up, Up, and Away from Sunday Morning Quilts
33. Round and Round blocks - Up to 16 of these now. Still here.
34. Snippets on Dates - Haven't touched these since the last time, but I have sewn pairs together randomly..
35. Leftovers from Modern Paris
36. Gee's Bend inspired blocks after my trip to Alabama - I worked on a pile more of these blocks, but now debating final layout options before I make more.
37. Paperless paper piecing block from my class with Cristy Flincher. I think it needs to be the start of a medallion quilt.
38. The girls' clothes turned into a quilt with the Gee's Bend quilters.
39. Improv work with Cotton and Steel Fabrics that I started for my CreativeLive Improv Quilting Basics class.
40. Blue Improv - pulled out some class sample I've used over the years and played with them for CreativeLive Improv Quilting Basics. Now I think I have a plan for them.
42. The X-Plus blocks I used in the Creative Live Quilting with Low Volume Fabrics class.
43. A whole bunch of pinwheels that I'm playing with. Started as prep for my CreativeLive Pinwheel Play class.

Finished

Glitter Pen - technically it was finished months and months ago, but it was just published in the summer issue of Modern Patchwork so I couldn't share it earlier.
Aloha Kakou - a fun baby and mama quilt that was a secret project finally finished and revealed.
One awesome pincushion.

I am pleased that I didn't start anything new, well nothing new that isn't a class sample. But I was hoping for some finishes. I want to get things done, but there just isn't enough time in the day. You can't beat yourself up over that though, just do what you can, when you can. As long as you are enjoying it when you do it then you need not want for anything else.

Canadian Living Magazine (Weekend Reads)


Sure, I read Seventeen and then later Self and Shape. Sometimes I read Vogue like I understood it. And to keep up with my Dad I read Macleans and Time. But it was Canadian Living that made me feel truly grown up and special.

My Mom had a subscription for as long as I remember. I would wait until her busy schedule allowed her to read it first, but always sneaking peaks at the back page for the little personal essays and the recipe section. Of course, we made note of recipes we wanted her to make! The old issues piled up on our original IKEA book shelves, the weight of the information bowing shelf after shelf.

I would read the magazine from cover to cover, learning about diseases only known to a select few, wishing I could afford to dress and was actually old enough to have a style, and being inspired by Canadians everywhere. Canadian Living was a big part of my education in life, food, and magazines.

It is the 40th anniversary of the magazine. When I found that out I had a bit of a giggle as this is my 40th year as well. I, quite literally, grew up with the magazine. And I still buy it and read it cover to cover, relishing the tips and recipes and stories. It is a delicious Sunday treat. At the end of the issue I often have more dog eared pages than not, notes and recipes marked for reference and continued inspiration. You can have a great website (which they do and I use for recipe searching often) but nothing beats the paper in hand, a cup of tea by my side.

One day I will be published in Canadian Living. I don't think I ever thought way as a kid, even thought I loved to write then, but now it is a big goal. 40 brings on big thinking!

13 Reasons to Hand Baste With Needle Turn Appliqué


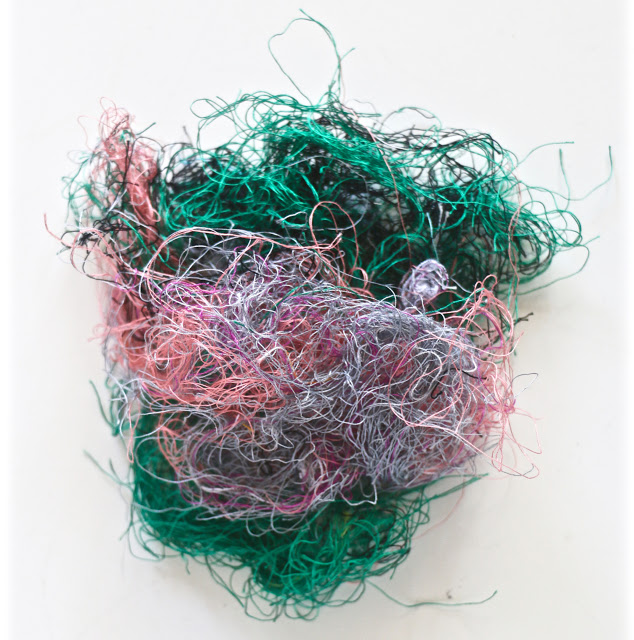
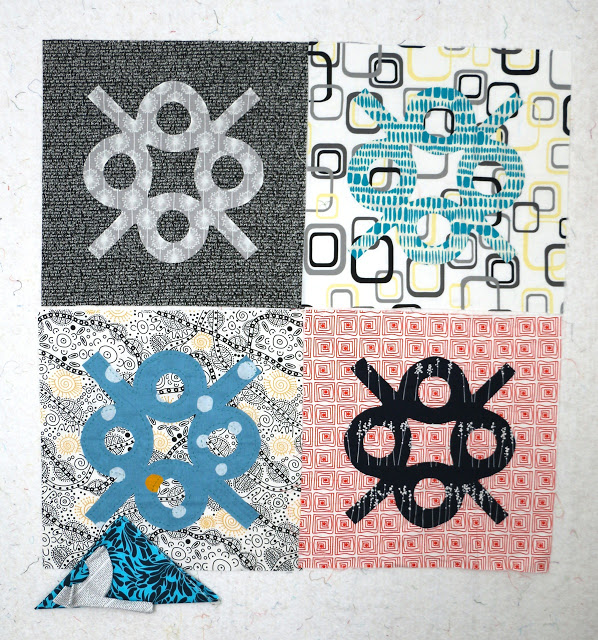
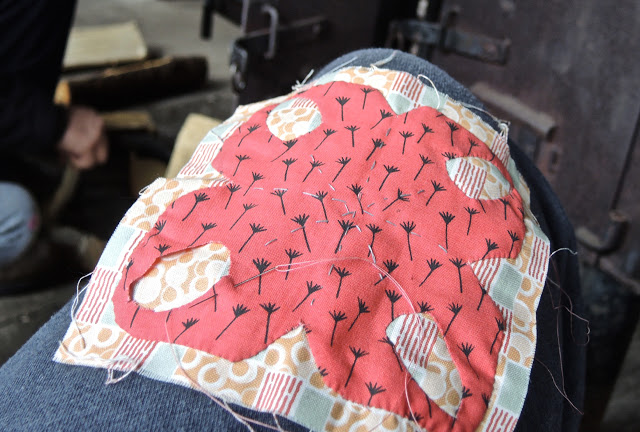
You might see an ugly mess of threads here. Frankly, that is what it is. But this mess of threads represents hours of work. Not work that I tore out in disgust or because of a mistake. Work that I intentionally put in then pulled out at the end of the process.

These are basting threads.

When I started sewing of any kind I, like many others, eschewed basting as a waste of time. Why baste if I can just pin and sew it? I thought basting was just an extra step that slowed down the entire process. And basting while quilting? Now that was just getting downright ridiculous.

Then I was proven wrong.

Basting is an absolutely integral part of hard appliqué. Taking the time to baste and baste properly makes a huge difference to your project - from process to finished project. A few months ago I was teaching a hand appliqué class and I had a student there for a refresher and simply because she loved the pattern. She was not inclined to want to baste like I was suggested but I encouraged her to at least try it for the class. If she hated it then she never had to do to again. By the end of the class, like me, she was a complete convert to a more detailed and time consuming baste. Neither of us are going back to the old way and here's why:

1. Basting holds everything in place so you don't have to worry about anything moving as you stitch. Your appliqué gets moved, manipulated, scrunched up, folded, and otherwise manhandled as you sew. If you aren't properly basted to start the appliqué won't stay where you want it to.

2. Because of the above, pins won't cut it. You can buy pretty little appliqué pins. They are usually shorter in length and with a small head. Super cute, but best used for holding your appliqué in place while you baste. All that handling of the block means a lot of pin pricks if you only use pins.

3. A few stitches to simply hold the appliqué in place doesn't cut it. That's because the appliqué will move along the edges ever so slightly as you sew. If you've only basted in the centre of the appliqué that means the appliqué rotates. In other words, it isn't staying where you want it to stay.


(Lesson learned on my Alturas blocks, they were always a little askew. Don't chintz out on basting.)

4. Baste on a flat surface, like a table, not in your hands or on your lap. This keeps the pin pricks to a minimum. It also makes it much easier to hold your basting threads in order.

5. Use old thread or bobbins that need to be emptied but you don't want to waste the thread. As long as it is not heavier than a 40W thread (the smaller the number, the thicker the thread, the bigger the holes left behind.)

6. Use a regular sewing needle, but not a huge one. I don't think it is necessary to use the tiny appliqué needles, but you could. But this is not the time to use a big embroidery needle just because that is what you can find. A Universal hand sewing needle is just fine. Again, the bigger the needle, the bigger the hole it leaves behind.

7. Double up your thread. I know, this makes it thicker. When you double up the thread you don't have to worry about constantly pulling your thread through the eye of the needle. If you are comfortable with a single strand, then go for it. I prefer to have it doubled up because that is easier for me.

8. Do not knot your basting thread. Just hold on to the first couple of stitches you make then they will be fine. Start from the back and do not pull all the way through, leave a tail about 1/2'' long to hold on to.

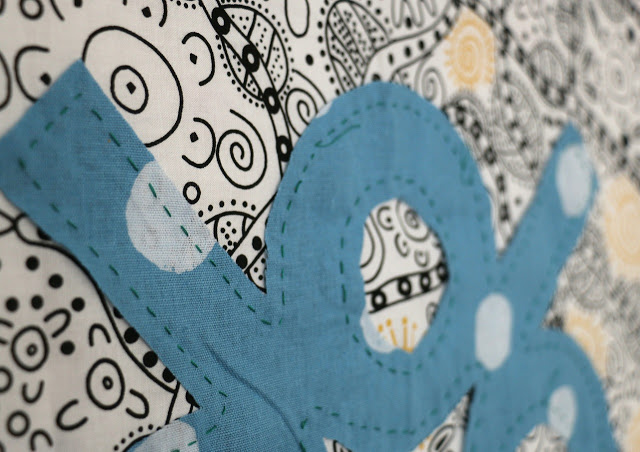
9. Use a running stitch to baste. Not a small stitch, but not huge either. So a simple up and down with your needle through both the background and the appliqué. If you are listening and doing this on a table top you can even turn that into a bit of a rocking stitch, taking 2-4 stitches at a time before pulling your thread.


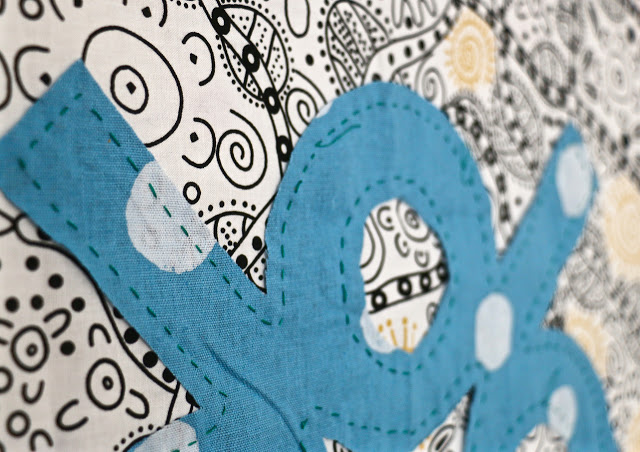
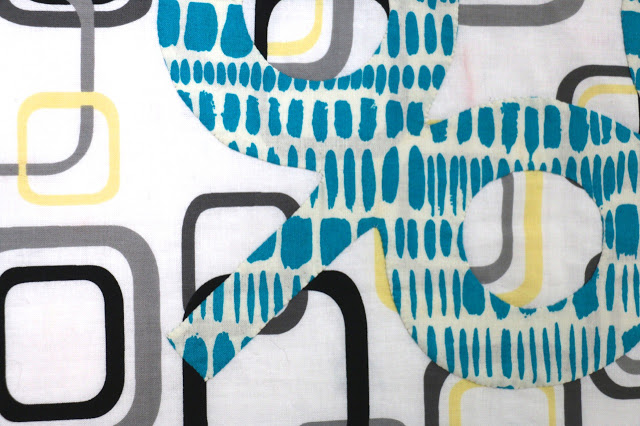
Run your stitches 1/4'' from the edge of the appliqué. Every single edge of the applique. If you aren't comfortable eyeballing the 1/4'' and have a marking pen you trust (that is, it comes out), mark the line first. I don't think this is necessary. And if you stray from the 1/4'' here are there, do not worry about it. This is a guide as much as it is a basting stitch, not a seam line.

This is the part that no one likes. It totally seems like overkill. Trust me, it isn't.

10. Machine basting seems like good idea. It does go quicker and you can easily get that 1/4'' line. But the stitches are way more difficult to remove. It might save you time up front but it more than doubles the time at the end. Plus, you still have pins while basting and they poke you even more. Unless you use glue, but that is another issue.

11. Glue. It seems like a good idea, but I hated it. You have to be very, very careful not to get any of it on the edges or else your fabric will not fold over. It also makes things stiffer. That isn't a big deal, but it reduces the tactile enjoyment of hand appliqué. Yes, that is a thing.

12. Remove your basting stitches. All those hand stitches add a really interesting element to your appliqué and it might be tempting to leave them in. Remember, however, that they are not knotted and therefore not permanent in the fabric. If you love them so much replace them with hand quilting. Hand stitching basting comes out so, so easily too.

13. Embrace the process. It takes time, no doubt. So does cutting out fabric, sewing it together, quilting, and binding. If hand basting feels like such a waste of time then maybe hand appliqué isn't for you either. This is slow stitching, it isn't meant for a quick turn around. So accept what it is, put on a movie, pour a cup of tea (or open a beer), and stretch your fingers.

As I said at the beginning, it is totally worth it to baste your appliqué this way.

First, your appliqué stays where you want it.

Second, and more importantly, the basting stitch acts as a guide for your appliqué stitches. The fabric folds under at the edge, to meet the stitches. This gives you a consistent seam allowance. That means your curves and corners go where they are supposed to in a smooth line. It is pretty much impossible to end up with points on the edge this way.

Taking the time to baste properly means your appliqué goes smoothly. And you can actually relax as you do it. Frankly, that's kind of the point, right?

I must give full credit to Carolyn Friedlander for converting me to this form of basting. She is an appliqué whiz and designs her appliqué patterns so well. If not for her I wouldn't be doing this hand work at all.


Circle Lattice Quilt Top Complete


It seems that big appliqué projects take me about a year to complete. My Circle Lattice quilt is no different. 

I looked back and realized that I started my first block in late September last year. When I cut that first block I only had the intention of making that single block. It finishes large at 34'' (if you cut it properly) so there is a lot of appliqué involved. But I completely fell in love with the fabric and the block. Quite early on I made the commitment to make four blocks.

Now the quilt top is done. These blocks have been to Alabama, Montreal, Las Vegas, Jasper, Arizona, Utah, Idaho, Minneapolis, Austin, Drumheller, and many more places. Seriously, that's the best part about appliqué, the portability. I would spend weekend mornings stitching and drinking tea while the rest of the family caught up on TV. It was my respite, even though I find the process of the block coming together quite exciting.


One of the most entertaining things - to me - is that this quilt top only has 5 fabrics in it. I don't think I've ever made a quilt top with so few fabrics!

There is a mistake in my blocks. Somehow I cut the first block wrong, starting with a 33'' piece of fabric instead of 34''. It only meant that the straight bits on the side were cut off. So I ended up making the rest of them that size as well.


There was some definite lessons learned with basting these blocks as well. Look for a post coming on that.

Now to quilt it...

Pincushion Party for Good Neighbors Fabric


This is the first pincushion I've ever made. And I would only do it for Amanda Jean.

I was thrilled when I got the news that she was designing her first line of fabric. I say first because I'm positive there will be more. While I couldn't automatically picture what she would do, without a doubt there would be red polka dots and versatility in the prints. And most definitely, there would be no purple.

Good Neighbors is the fabric line, available exclusively with Connecting Threads.

It is a mix of prints in sunny colours and they all play well with each other, and pretty much any other fabric you might have. Simple lines, pretty prints, good colours. Personally, I really appreciate the low volume prints, especially the diagonal stitch line. (Hello binding!) They work so well with others, hence the name.

It's been five years since Amanda Jean and I started working on Sunday Morning Quilts together. Five years. One of the questions I am most often asked at trunk shows is whether she and I are still friends after the process. People, we are better friends. I trust her implicitly, she encourages me like no other, and we challenge each other in healthy ways. Our friendship launched our quilting careers, but it is the friendship that matters more than books sold or classes taught. I would give all that up if I had to just to stay friends with her. (But I won't lie, I am extra happy that I still have it because then the times we get to see each other now are usually business expenses.)

When Amanda Jean asked me to be a part of her launch tour for Good Neighbors I jumped up. Not because I wanted to make a pincushion, but because I want to support this amazing woman. Bonus, I really like my pincushion.

Just a little house. One for now, but there should be another so that I can pretend she is in one sewing away and I am in the other, chatting through our open windows.


Check out all the other pincushions on the Pincushion Party for Good Neighbors fabric.

9/1/2015
Amanda Jean 
9/2/2015
Anna
9/3/2015
Mary 
9/4/2015
Svetlana 
9/5/2015
Debbie 
9/6/2015
Holly 
9/7/2015
Carla 
9/8/2015
Faith
9/9/2015
Vanessa
9/10/2015
Anna
9/11/2015
Krista
9/12/2015
Erin
9/13/2015
Lee
9/14/2015
Alex
9/15/2015
Cheryl
9/16/2015
Penny
9/17/2015
Amy
9/18/2015
Debbie 
9/19/2015
Anne
9/20/2015
Melissa Corry
9/21/2015
Amber
9/22/2015
Nettie
9/23/2015
Adrianne
9/24/2015
Cindy
9/25/2015
Amy
9/26/2015
Chase
9/27/2015
Rene
9/28/2015
Erin
9/29/2015
Nicole
9/30/2015
Teri


And go here to buy the fabric itself. Available exclusively with Connecting Threads.

Amanda Jean has also designed a number of patterns that work so well with the fabric. You can buy complete kits - with fabric and pattern from Connecting Threads as well.

You can also leave a comment here for your chance to win a charm pack of Good Neighbors fabric. Tell me about your favourite neighbour or what makes you a good neighbour.

Open to US and Canadian readers only. Sorry. You can leave an entry until the end of the month.

PS Do you know how hard it is to NOT put that U in Good Neighbors? Then my autocorrect adds it in anyway.

So You've Been Publicly Shamed (Weekend Reads)


Brilliant. This is a bloody brilliant book.

I had high expectations for it because I really like Jon Ronson. He has the best TED talk ever. He is a funny and engaging writer. This book is both. And kind of scary at the same time.

To be perfectly honest, I picked it up because I live in this here online world. I've chosen to share parts of my life, of myself, online. As a published author myself I know I live in the public realm. (Although, I write quilt books and my audience is small compared to most in that realm.) While I am very thankful to have not been the subject of any online shaming nor really had any awful experiences with trolls so far, I also know that it could happen at any time. I thought this book might provide some insight into the mentality that goes into those behaviours.

It strikes a number of chords. From the mob mentality of Twitter take downs, to the consequences of brutal honesty. It also touches on whether people feel shame or not and how that can have an impact on perceived shame.  At the same time he tells the stories of people who've experienced some awful shaming, and others who weathered what should have been awful shaming but came out relatively unscathed. What's different? (Hint: it often has to do with consensual sex.)

One of the storytelling elements he uses, quite successfully, is to be a part of the story. He opens with his own experience of having a parody Twitter account started in his name. This gets him thinking, interviewing, researching, and exploring the act of public shaming. It is always him in the story, talking to the players (all sides, where possible), trying to understand what the heck is going on. I got the sense that it was all very confusing and frustrating at times. Sometimes the subjects of the shaming did not necessarily see fault in what they did, other times the response far outweighed the inappropriate action that started it all. Both are frustrating. And he really is genuinely trying to find understanding.

It is very clear, no matter what, that we all have a role to play in managing ourselves online. Not only is it remembering that you are in a public forum that never forgets, therefore watch what you say. But also, watch how you respond. Think before you react. You see this all this time on Twitter or Facebook. Endless forwarding of things people have never actually read, gut level responses to public events, and the general forgetfulness that the rest of the online world consists of REAL people with feelings.

You don't necessarily need So You've Been Publicly Shamed to get that. And most likely the people who are going to be that shaming mob are not going to read the book. But it is a well told story of exploration into a fluid world that we are still only beginning to understand.

Bonus: Ronson has another TED talk on one of the stories from this book.

Sewing on the Dining Room Table, Again


We are back in the Dining Room Empire these days. I haven't really been in my sewing room for a couple of weeks. Why? Well, if you only follow me here and not on Instagram or you don't read my newsletter, here's the news: there is a wasps' nest in the wall of my sewing room.

The exterminator has been here and the wasps are pretty much gone, save for a drugged up one that emerges every day or two to die on my cutting table. We need to cut the nest out of our spray foam insulation and repair it. I could have been kinder to myself, my family, and the environment and gone for less pesticides, but I wanted a full on assault to deal with the nasty yellowjackets. As a result, however, the smell is quite bad in there. I have windows and doors open to air things out. And Hubby and I are trying to muster the desire to face the clean-up and repair.

In the meantime, I'm sewing on the dining room table.

In truth, that means I'm not sewing that much. Until two days ago there were no lamps in there, me having taken them in to get new shades and wiring. We're still fine at dinner, but it is now dark by the time the kids go to bed and I can sew. So I have light again. But I lose the energy to make a mess then clean it up again most nights. I've worked really hard the past few months to get rid of crap and keep our house tidy. I feel like we are finally not living under a mountain of stuff, that most things have a home to go to after being used. So having the sewing stuff in the dining room again is annoying me to no end. (At least it isn't this anymore.)

Thank goodness I keep most of my projects in bins or otherwise contained. So I only take out what I want. In truth, that has only been 2 projects to play with. I can tuck the ironing board into a corner, same with my smaller machine. And every night that I do sew I pack it all up so we can eat breakfast without the worry of milk and honey on a quilt block.

I will say, it is nice to be living up to the blog name again!

Hand Stitched Home (Weekend Reads)


A year ago the lovely Susan Beal asked me if I wanted to review a copy of her latest book, Hand Stitched Home and I never did it. I felt awful, especially after I'd agreed to do it. I pulled that book out this last week, as the weather turned decidedly to fall, and decided now was the time. Why now? Because I forgot how lovely a book this is and you need to know about it.

Hand Stitched Home is all about sewing with wool. It takes its lead from the famous Oregon Pendleton wool, but that doesn't mean you have to use Pendleton wool in the projects. It does, however, provide a short history of Pendleton that fans of the wool and more will like. Then it provides tips and tricks for working with wool. As a quilter who lives in the land of cotton, this section is very much appreciated.

Projects range from coasters to quilts, from home decor to garments. There is, quite literally, something for everyone. I'm quite smitten with two particular projects: The Jacquard Cube Ottoman and the Winter Cape. The bags look nice too, but I don't really make bags (yet).


Seriously, do you think I can pull off this cape? I'm not sure I am young or old enough for it, but I love it so.

Susan provides clear instructions, illustrations, and templates for everything in the book. Some templates will have to be enlarged, so you will have to make a new friend at the local copy shop. In all honesty, I've not sewn anything from the book, but in carefully reading a number of the instructions it seems that things are quite clear and easy to follow, especially with the amount of illustrations including in each project. Each project also comes with a difficulty rating, measured in number of sheep. So cute.

There is even an index, something we don't see enough of in craft books.

And, as we are visual people, can I mention the photography? You can practically smell the campfire and hear the crunch of leaves. Because, of course, we think of fall when we think of wool. The photography provides us with that sense of place, but it also highlights the patterns and texture of the Pendleton wool.

West Coast Crafty is the online home of Susan Beal. Hand Stitched Home is her sixth book! She knows what she is doing is crafting a book that tells the story of her chosen material and subject. Personally, I love that her books are all unique and the crafty subjects vary. If you were at QuiltCon this year then you also know that she is currently keen on encouraging us all to label our quilts. I totally get this girl!

It may still be summer where you are, but as the cooler/cold months approach I recommend curling up with this book. And with school back in session I'm excited to be heading back to the books myself and relaunching the Weekend Reads series.

Aloha Kakou - a Tropical Version of Vintage Spin


Aloha Kakou 
52'' x 52''

A precious gift, finally delivered. I feel that way about so many things with this quilt and the reason behind it.


This is the baby boy of a dear friend. A woman who started out simply as a roommate in a creepy rental. That was 16 years ago and we're still friends, still laughing, still rolling our eyes at each other, still slightly wondering just how we got to where we are. Back in January baby S joined her life, our lives. Crazy munchkin.

When she was pregnant she chose to keep the baby's gender a surprise until birth. I love when people do that still, even if it does present an extra challenge to making a quilt. Then again, who says fabric has to live up to gender norms?!

My fabric selections started with some treats she brought me back from a trip to Hawaii a couple of years ago. I must admit, when she brought the fabrics I hesitated. Batiks and prints best suited to a middle aged man's Hawaiian shirt. But cut up? Perfect! I combined them with various prints and even batiks from my stash. Some of Malka Dubrawsky's original batiks, a Yoshiko Jinjenzi print, screen prints from Karen Lewis, as many organic prints as I had from Daisy Janie, Birch, and Cloud 9 (including the Lisa Congdon print for the centre squares), an old Denyse Schmidt, and quite a few more. It is an eclectic mix and totally perfect.


The pattern is Vintage Spin from Kathy Doughty of Material Obsession fame. It comes from her book, Adding Layers. It was the perfect choice to showcase the fabrics yet still benefit from the crazy combinations I put together. It does use a template to cut the fabric, and there are big scraps leftover after piecing. But I've gathered those and maybe they will turn into something else? The one change I did make was the use a square for the centre of the block, instead of a circle. A conversation with Rachel at 2nd Avenue Studio led me to try it and it works so well!


It thrills me to finally present this to my friend. I made it big enough to grow with S and for the two of them to snuggle together.

Copying a T-Shirt


Pardon me, but I'm about to get all cocky.

Not only did I make this t-shirt (I'm still totally amazed that I am making clothes). But I did so without a pattern. All I did was take a favourite t-shirt and copy it.

Now let's bring down the cockiness a bit. It is only 2 pieces, a front and a back. And it is merely hemmed, not finished in any fancy way. But still. I'm totally impressed with myself.

To make the shirt I took the original, folded it in half vertically, and traced the outline on a sheet of freezer paper. Then I added seam allowance and 3/4'' for hemming. Wash fabric, fold in half, cut, sew. I did get my machine even threaded with a twin needle, then nearly broke my machine trying to use. Needless to say, the hemming isn't great, but it is neat.

The best part? I will actually wear this.

Glitter Pen - New Pattern in Modern Patchwork


Glitter Pen
85'' x 85''

 This is a fun quilt with a long back story.

Part 1
Looking to fill some weekend afternoons during our long winter I signed up for Creative Bug. While my son napped and Hubby chilled out the girls and I took a few classes. Their favourite was Lisa Condon's Line Drawing class. Months later they are still sketching based on her techniques.

Part 2
I agreed to submit some quilts to Modern Patchwork. Up until then I'd only submitted articles, not quilts. Working with the editor (hi Vivika!) I agreed to use some fabric they wanted. Well, the original fabric they thought of wasn't available. In the meantime I went to QuiltCon and picked up some Modern Country fabric from Windham, just in case the other fabric didn't arrive in time.

Part 3
Upon my return home from Austin I was greeted with the fabric sent to me by Red Rooster. Cool fabric, for sure, but not right for the pattern I was supposed to be making. Hmm... Then my daughters showed me the their sketchbooks and what they did while I was away. One of them immediately jumped out at me and this new fabric would be perfect for it. So I contacted the editor and asked if I could make two quilts! In just a few weeks.
(The Modern Country fabric went into the Argyle quilt also published in Modern Patchwork.)


Part 4
I also contacted Lisa Congdon. While my daughter's sketch was not a literal interpretation of Lisa's work, it was definitely iterative. And I took it another step with the quilt. Especially because this was for publication I wanted to make sure she was okay with it. She, graciously and thankfully, said yes.

Part 5
Sewing like mad, I designed the pattern and finished the quilt. It is designed to take advantage of simple sewing techniques  - it is just a lot of long strips sewn together then cut apart into blocks. I think the pops are colour are awesome. In the end I added the bright coral fabrics to the original bundle of a line called Steel. And that text print is awesome. It is literally a text print, covered in numbers and texting short hand. Comes in both the mustard and black/white. (Must get more.)


Part 6
She won't take it off her bed.

I purposely designed the pattern to fit her double bed with a generous overhang. Perfect for cozying up. The pattern is available in the summer issue of Modern Patchwork.

It is hard to see in the photos but it is rather simply quilted. I stitched in the ditch between all blocks, then I quilted a saying, one letter for each block (minus the punctuation).

"All that glitters, glows, sparkle, shines is not 
as bright as the light of your eyes, shimmering in sun."

Looking for the Light


We often hear about people feeling more down from looking at the beauty in abundance now shared via the internet (and our phones) than inspired. I remember the first time I heard these discussions. It was in reference to Martha Stewart and her magazine. People tried so hard to emulate her and felt left down when they didn't achieve her level of perfection. They did so forgetting that she has staff and a whole lot of money behind her. When blogs were really big and now with Instagram this has grown. Sure, we might understand that there are real people behind our feeds, but we still think the grass is greener for them. Only now instead of money and staff we have filters and easy photo editors. And we forget that they are likely standing with their back to the mess and only giving us the good stuff.

Other people's lives haven't made me all that jealous or even grumpy with my own life. (Other things impact that, but I'll save that therapy session for another time.) I am, by nature, competitive. That means when I see the gorgeousness of other people's feeds I am, more often than not, trying to figure out how to make a shot like that or style like that. Full confession: I will certainly admit to jealousy over success. But other than a having a kitchen that isn't falling apart, I'm not jealous of other people's lives. No, I just want to be better or as good as them.

To that end, I do try to seek out beauty and aspiration. Not inspiration, but something in the way of technique, skill, or even eye that I aspire to mimic, learn more about, or learn from. So I still read blogs, I gather gorgeous magazines around me, and I seek out sigh worthy Instagram feeds.

Here are a few of my favourite spots of late.

Geninne... I learned about her when her first fabric line with Cloud 9 launched. Since then I am daily captivated by her Instagram feed.

Me & Orla... Sara first popped into my email via an automatic update I get for tags with A Month of Sundays, my book title. I won't lie, I was a bit annoyed at her Month of Sundays photo project, but that quickly passed. Instead I've been captivated by her style and approach to sharing. 

True Bias... My need to sew clothes continues to be fed. Up currently is the Mini Southport from Kelli at True Bias. I adore her honesty in making clothes, her style, and her patterns are so easy to work with. From this mostly beginner garment maker here I can say her patterns are incredibly well written.

Completely Cauchy... Chawne Kimber is a genius. I've had the pleasure of a too short sit down with her to discuss making statements with our quilts, otherwise I only know her genius from what she shares on line. You should definitely watch what she does with tiny piecing, making a statement, and simply being creative.  

What about you? What are the just beautiful spots on line that you like to visit? Not just informative, but gorgeous. Not necessarily sewing or even quilting, but the ones that bring beauty to life? Share the links in the comments. 

The Opposite of Grounded

Flighty.
Scattered.
Chaos.
Distracted.

Whatever you want to call it, that's how I've been feeling lately. It's been hard for me to focus on anything, let alone quilting. Yet I think it is because I haven't been quilting that I feel this way.

My best friend leads meditation and teaches yoga, among other things. She is a very grounded person. Quite often we've discussed the comparisons between a yoga practice and quilting. I get the same benefit as a committed practice from sewing. It is a meditative process, this sewing stuff. I calm down and gain focus. At the end of the day, quilting grounds me.

I found this definition from a random article. Regardless of the source, the sentiments describe the exact feelings I have. It wasn't until I was talking to my friend that I realized that grounding was what I didn't have.

"To me, being grounded means being fully present: physically, emotionally and energetically. It means your mind is not wandering or pulling your energy elsewhere. Your heart and soul are not searching somewhere in the past or looking into the future."
- Catherine Warner

The spring was quite momentous. I turned 40! You Inspire Me To Quilt came out! My childhood home was sold. So much going on. A lot to celebrate and enjoy. I spent so much time with friends and family, never have I felt more loved and happy.

Other than some hand sewing, however, not much has happened in the studio. Not only are the girls are on summer break, we helped my Mom move and went on a 2 week road trip. My soul is calling for a few days tucked away into my sewing room with no interruptions.

Too bad for my soul, it isn't going to get that. Instead I need to piece together little bits of time and put it in the schedule. The reality of 3 kids and summer break means there isn't a lot of time. Especially since my guy isn't in the mood to nap much anymore. So a little bit of PBS kids here, skipping the Daily Show... oh wait, and an early morning there to feed my soul and bring me back to grounded.

Quilting keeps me focused on the present, on what is right in front of you. In fact, if you don't pay attention you can seriously hurt yourself! And now that quilting is my business my mind is constantly on other things and I am forever planning, plotting, and perceiving things incorrectly. It has taken me away from the immediate process and the benefit of that. At the same time, my desire to quilt is taking me away from my family and the focus they deserve. Not to mention the state of my house.

Long story short, I need to get my s*%$ together. Clean and create a space both physically and mentally for all the things I need to focus on. Keep purging in the house to make the space clear of the extra, distracting things. Carve out a dedicated time for sewing and stick to it. Internalize my influences and inspirations for the time being. And hang on to my family now, laugh with them and make life epic all the time. Even if epic means nothing but playing with the sprinkler.

In the meantime, here are a few snippets of our recent road trip. Calgary to Vegas to Arizona (oh, Arizona!) and back. With stops in Montana, Idaho, Utah, and Wyoming for good measure.


Park Blocks


File this one under a class sample that will most definitely become a proper quilt. That will happen in that magical land called Someday. In the meantime, I'm quite enjoying building a collection of blocks.

The fabrics first came from a bundle of fabrics I sent to Lysa to paint. That was 2 years ago and once she returned them they sat there in a stack. She'd asked for my favourite fabrics from my stash and that is what I sent. I thought it would be appropriate to make something with them all together. When I put together the first few blocks for teaching hand appliqué I immediately turned to this bundle.

Unfortunately, only about half of the fabrics in the bundle were big enough to be used for the pattern at hand. So let's just say that the collection of blocks is inspired by that original bundle.


The pattern itself is Park from Carolyn Friedlander. She really does knock 'em dead when it comes to appliqué patterns. I'm sure, in time, I will make them all! In consultation with Carolyn I picked this pattern when I was asked to teach hand appliqué. It covers all the basics of prepping blocks, basting, and all the shapes, corners, and turns to master when learning appliqué. Bonus, Carolyn includes directions for turning a single block into a pillow sham, making it an easily finished project.

These blocks make a regular rotation in my appliqué tote (A Nest Egg Tote from Carolyn, of course). In the midst of the giant Circle Lattice it is nice to start and finish one of these in a relatively short time frame.

All the Doilies


These doilies were made by the most surprising of people. My Dad. My big, Eastern European, house building dad. He had meaty hands, ones I never would have guessed were capable of such delicate work.

I have the ones he made and gifted when he was going through chemo five years ago. And recently, while cleaning out my Mom's house in anticipation of a move, we came across a whole pile of much more delicate ones. They graced our living room furniture when that was the style, but they'd sat in a closet for years since. So we split them among the family and I have this collection.

It will be time to do something with these because I don't exactly have a doily on the sofa back kind of a style.


In the meantime, I wrote about my Dad's doilies in the latest issue of Uppercase Magazine. This particular issue has postage and lace as a theme. It truly is a pretty issue. Well, they all are! But this one feels nostalgic and cozy while still being visually invigorating.

If you have any links or suggestions on reusing/upcycling the doilies, please post and share.

All the Labels

At one point I used to be great about labelling my quilts. I planned and plotted my fancy label, carefully lettering and hand stitching it on. Then I got busier, faced deadlines and snotty noses, and frankly, got lazy. It is time to rectify the situation. I have a lot of quilts missing labels. Or, at most, they only have a name tag on them.


The label of the quilt needs to serve in place of you, the blog post, or the Instagram hashtag. If you've made the quilt well it could outlive you. If it is a gift it could travel to places you couldn't have imagined. The label should allow the story to move with the quilt.

What do you include on the label? Here are the basics I always have:

Quilt Name
Brief description of the why/how of the quilt. That is, who is it for? Why did you make it? Was it inspired by anything in particular?
Pattern credit or original design.
Materials in the quilt - batting and fabric and thread. (Are they 100% cotton or otherwise? Also brand of batting.)
Date the quilt was completed.
My name.

It may seem like a lot, but it isn't too bad. This is what one example looks like.

My preference is to print my label out on the special fabric that can go through the printer. That way I can have it smaller. At one point I used to print the label out on paper and trace it. That was a lot of work! Sometimes it is quick and easy, some notes on a piece of fabric and sewn down. My favourite product for labels is Printed Treasures. It isn't cheap, but I can get 3-4 labels on a sheet, making it more economical. And I've learned, the label looks better if you put it on before you wash the quilt because the Printed Treasures fabric shrinks differently than my quilts.


One thing I was taught early on in my career is to sign my quilts in a secret spot. This is especially a good idea when you are gifting a quilt. Labels can be removed and quilts stolen. For family in nursing homes, kids in dorms or camp, or anywhere there is common access having a secret little spot for a label is a way to identify the quilt if the label gets removed. I've seen people actually make their label before quilting and it is a permanent part of the quilt. Even silkscreening a panel with it and sewing it into the backing! If that isn't your speed, simple sign your name on the inside of the binding. Be consistent on which corner you do it, like lower left. If a label ever gets removed and ownership is contested you can undo a few stitches and your name is visible.

When I updated my goals the other day I should have added 'Making Labels for All the Quilts' to the list. Definitely need that on the list.

Circle Lattice Update


Wow, three blocks done. I'm pretty wowed myself. Even more amazing, I'm not bored with this block yet. Not at all. Considering the intensity of my time with it I find that surprising.

When I started with this particular block - from Carolyn Friedlander's amazing book Savor Each Stitch - I thought I would make one block. It was the one pattern from the book I was desperate to make right away. It was like Carolyn saw into my brain for the exact appliqué pattern I'd always wanted to make. One block was great, but I knew I couldn't stop there, the finished quilt would be far too small.

...
I should clarify that one of the reasons I always make larger quilts is that my husband really doesn't like quilts on a wall. I would rather have the opportunity to cuddle with a quilt then make a small one that languishes in a pile.
...


So now I am on to the 4th block. The fabrics for all the other blocks were easy decisions. I loved the contrast of the NYC print with the colours and patterns of the others. But I really hemmed and hawed on what to do here. Yellow seemed like a good choice, but I didn't have enough of any one print that I loved to use. Then I remembered some Stendig calendar fabric I picked up at QuiltCon. Just a little pop of yellow and much more subtle contrast. It is perfect. The calendar fabric, by Kokka, is a slightly heavier weight so it had to be the background, but that's totally fine.

Summer evenings, the rest of Le Tour, and car rides ahead of me. I will definitely be savouring each stitch as this last block comes together.