Lollipops, Wine, and Mexico

Taking advantage of the sale at our favourite liquor store led to Sunday dinner this week. One could also argue that the near constant desire for a lollipop by The Monster and her knowledge that they have them at the same liquor store also led to Sunday dinner. Regardless.  We shopped, we cooked, we ate.

Tasting a lovely wine yesterday (Walter Hansel Cahill lane Vineyard Chardonnay 2007) I was instantly brought back to our trip to Mexico. It wasn't that the wine reminded me of the cheap imports we got at the supermercado, rather, it was the instant pairing that popped in my head. I immediately though fish, peppers, and a bit of spice. 

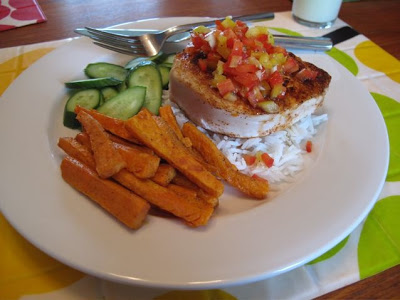
Sadly it was too late to get some fish for dinner last night, so we picked some up at the market today. And peppers, tomatoes, garlic, and some lime.  Sadly I forgot the cilantro.  Oh well, it still worked. I finely chopped sweet peppers, tomatoes, garlic and tossed them with a splash of olive oil, tequila, and a half a lime, juiced.

We served it with a quickly seared Opah. A bit of chili powder and cumin to season, and a few minutes per side. It would have been better grilled, as we did in Mexico (although it wasn't Sierra Mackerel), but my grill is currently inaccessible. On the side some sliced cukes, basmati, and sweet potatoes roasted with cumin and lime.

And in case you were wondering, I did not enjoy it with the wine.  One, it is an expensive wine, and two, I'm home alone with the girls so the last thing I need is a full bottle of wine to myself. Or maybe that's exactly what I need!

Five - The Pattern


Here is a fun, quick, and free pattern for you. This the Five quilt. It finishes at 36" square.

Materials Required

Two 1/2 yard/meters of high contrast fabric for top and bottom band
Two 1/3 yard/meters of high contrast fabric for middle band and accent
1/4 yard/meter binding fabric
1 1/8 yard/meter backing fabric
1 1/8 yard/meter batting
10 inch square of lightweight fusible
Coordinating Thread

- You will have a few leftovers, but we all love our scraps, right?
- Ensure that the fabric you use for the applique and the accent really stands out from the other three fabrics, both in value and colour.

Cutting Your Fabric 

Top Band and Bottom Band
One 24.5" x 8.5" strip each
Two 10.5" x 4.5" strip each
One 36.5" x 4.5" strip each

Middle Band
One 24.5" x 8.5" strip
Two 8.5" x 4.5" strip

Accent
One 10" square
Two 24.5" x 2.5" strip
Two 28.5" x 2.5" strip

-Cut the 10" square first, then cut your strips.

Assembly

1. Center portion - sew together the three 24.5" x 8.5" strips in your desired order. Press.

2. Outside pieced border - sew together two sets of the 4.5" inch strips. Keep the following order: top (10.5") - middle (8.5") - bottom (10.5"). Press.

3. Sew the 24.5" inch accent piece to the sides of the center portion. Press. Sew the 28.5" accent pieces to the top and bottom of the center portion. Press.

4. Sew the pieced border to the center/accent portion. Ensure that you line up the seam lines from the center portion to those of the border as best you can. Press.

5. Sew the top and bottom border pieces on. Press.

6. Iron your fusible to the 10 inch square piece of accent fabric. Remembering that your image will be reversed if you draw the desired shape on the fusible, trace and cut out the number or letter you desire.  Try a favourite number or a special initial. 

7. Float the number/letter a few inches from the accent border in the bottom right or left of the center portion. Be conscious of the seam between the bottom and middle background. You don't want to have a definite line right against the seam. Fuse the number/letter in place. Secure with a satin stitch around the number/letter or wait and secure with your quilting.

8. Baste your quilt and finish it as desired. I chose the loopy quilting in coordinating thread to contrast the sharp linear design.


10. Cut and attach your binding strips with your preferred method. Here's mine.

Et voila!

If It Wasn't For Her

Today it is all about my Nanny. And in two weeks it will still be all about my Nanny.

It may come as a big surprise to you, but I am not so independently wealthy that I get to do nothing but make ice cream and write blog posts. I only wish. Alas, I am in the office 4 days a week, freelancing and teaching on the side, and oh yeah, raising my two little ones. I could not do any of this without my Hubby, of course. And none of it would be possible without our Nanny.

Emily watches the girls while I'm at the office.  She is outside with them everyday, regardless of the weather, she brings them treats like ice cream bubbles, she cleans the house (even taking out the garbage), and most importantly to me, she bakes. Not only am I happy that my girls get even more time in the kitchen, but it is glorious to come home at the end of the day and have fresh cookies waiting for you.

The two most used cookbooks for cookie recipes are good ol' Martha and, more frequently, Julie's One Smart Cookie. The girls are never afraid to try a new recipe, despite The Monster's usual request to bake chocolate chip anything. When I came home the other day though, these raisin cookies greeted me at the door. My first question was which book they came from?

No book, it was Grandma's recipe.  And Emily has made it so many times she has it memorized. She graciously allowed me to share it here.

To be honest, I'd never thought I would obsess over raisin cookies. But these are moist, sweet, and chewy, with a hint of spice. A chocolate chip fan myself, I can safely say these are one of the best cookies I've ever had. Thank-you Emily, and thank-you Emily's Grandma.

Ridiculously Good Raisin Cookies
makes 4-5 dozen

2 cups raisins
1 cup water
1 tsp baking soda
1 cup butter
2 cups sugar
3 eggs
1 tsp vanilla
4 cups flour
1 tsp baking powder
1 tsp cinnamon
1/4 tsp nutmeg
1/2 tsp salt

1. Preheat oven to 350 degrees F.
2. In a small sauce pan boil water and raisins together for 5 minutes. Cool slightly and stir in baking soda.  Set aside.
3. Cream together butter and sugar. Add in eggs and vanilla.  Combine well. Stir in raisins then add in dry ingredients.
4. Drop by teaspoonfuls on a greased cookie sheet. Bake 12-15 minutes.

Workshop in Progress - June 2

So, tell me your pattern pet peeves.

Working in the improv style as I tend to do, I read very little patterns. (I also hardly ever cook with a recipe.) But, I promised a pattern for the Five quilt. I'm working on it and I wonder what folks love and hate about the patterns they use.

Sashing or no sashing? It is a common question in the workshop. What do you think about Lee's blocks?

Check out Tonya's blue and brown strip quilt! She was showcased in the Workshop last week for her process post. Now that quilt is done. And she's worried about the quality? Looks fantastic to me.

In teh interest of play time, I can't tell you how excited I am that Lesly found a wonderful tool on line. The Patchwork Pattern Maker takes your photos and turns them into a simple pattern.I realize we could all pixelate our own photos to do this, but this tool itself is so, so awesome.

And finally, somehow I missed this post from Katie a few weeks back. But it is perfect for our goals of sharing process. Man, I am so excited at how many of you are sharing doodles and sketches now. It is wonderful to see how we all think.


Lest I leave you photo-less this week, I am including this pic from our visit to Asparagus Festival this weekend. A small break in the rain/snow to run around in a field and eat asparagus!