"circles"

Improv Curves Within A Daily Practice

Improv Curves in Quilting, Top

My morning practice, is paying off in spades. It helps me focus and manage my emotions for the day. It acts in a very similar way to a meditation practice by centering me and filtering the noise. And on top of that - I finish quilt tops!

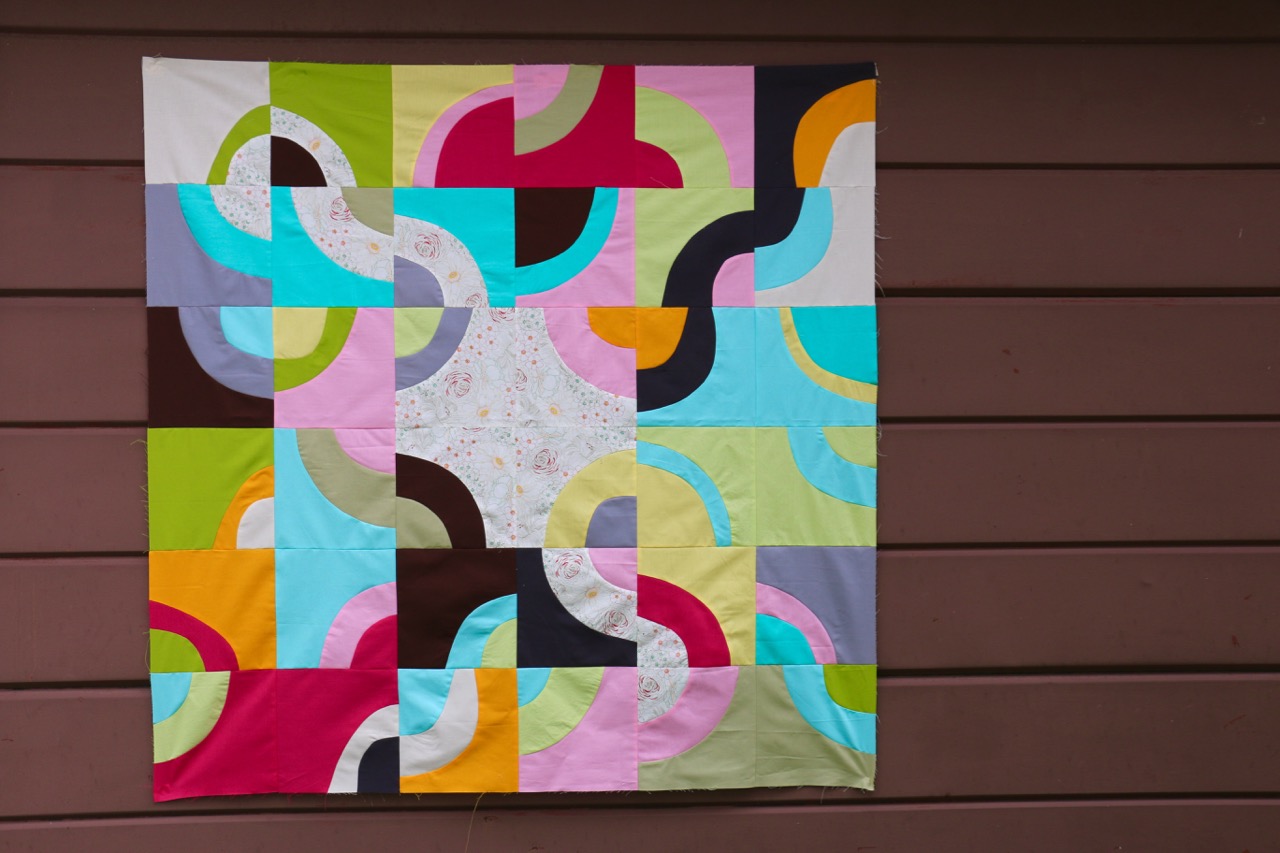
These blocks started as samples for teaching a class. One day I grabbed a stack of solids and just used them. Well then I really liked the accidental combination so I did some editing and adding. Over the course of a few classes more blocks were made. When I was pulling blocks for my daily practice I came across these. Perfect! It was quick to get the blocks done, it took much longer to figure out the best layout.

Quarter circles, like half square triangles, give you many, many, many layout options. Because I'd gone with an only somewhat controlled colour scheme I was trying layouts to give me order more than anything. Random is awesome, but sometimes it doesn't give you a good design. Because I'd included many colours, in both lights and darks, there was no clear cut way to get a successful design. For me, however, that's the fun. I LOVE the challenge of finding a good design.

If you follow me on Instagram you probably saw the many iterations for this quilt top. I wavered, I played, I experimented, I wavered some more. Finally I found my order by focusing on colour and the interconnecting of the one print in the quilt. This design may not be everyone's favourite, but I am in love.  

It's definitely going to be a fun one to quilt!

If you would like to know more about Improv Curves look for a class of mine near you (or book one) or check out my Inset and Applique Circles by Machine class on Craftsy, we cover it in one of the lessons.

Ring Tutorial


In my Craftsy class: Inset and Applique Circles by Machine I had a request for a short tutorial on making a ring, instead of a circle. It's an effective design and a great adaptation of a single technique.

1. Gather Your Supplies
Paper scissors, sewing scissors, compass, freezer paper templates, fabric glue, and fabric for the background, ring, and inner circle.
I've made this a 12 1/2'' by 12 1/2'' block. So my background fabric is cut to the same size, as are my freezer paper templates.

2. Make Templates
For this ring I've used an 8'' circle and a 4'' circle. You need two separate templates. From your 12 1/2'' by 12 1/2'' squares draw and cut out your circles.


3. Insert The Circle
For this block we are using the Reverse Circle technique reviewed in Lesson 3. This technique achieves the look of an inset circle with no headaches and consistent results. Use the first template, the 8'' circle, to start the block.
You can see in the photo above that I haven't trimmed my excess circle fabric after sewing it in place. Do so before you move on to the next step.


4. The Second Circle
Apply the template for your smaller circle to the block of the block, after trimming, from Step 3. Prepare for sewing the same way your did the first circle: cut out and opening - leaving seam allowance, fringe the seam allowance, press back, glue, apply fabric, then sew in place. Only this time your background is actually the first circle.


Here is what it looks like from behind, before trimming.


And after trimming.

What a great effect, right? Don't hesitate to adapt this technique. You could try off center rings, circles within ovals or vice versa, and maybe even multiple rings. The design possibilities are endless!


Love the example, but want to learn more about the technique? Don't forget you can sign up at any time for my Craftsy class: Inset and Applique Circles by Machine. Access it on-line, anywhere, whenever you want!


Graphic Circle Pillow - Or How I'm Using my Craftsy Step-outs


A simple pillow with great impact. Fun for my living room and I used up blocks, unfinished blocks, laying around the sewing room. Win-win!

I had these blocks from filming my Craftsy class. They were the step-outs from the Reverse Circles lesson. So I took a few minutes to finish all the blocks and turned them into this pillow. I can't lie, I chose the fabrics for the filming so that I could do this afterwards. These fabrics are a perfect match for my living room!


This Reverse Circles technique is one of my favourites. It achieves the look of an inset circle without the stress of doing a full inset circle. The finished block is clean, crisp, and flat. This is perfect for showcasing some really awesome fabric. (Mod Century by Jenn Ski, for example, with some Aneela Hoey.)

And the whole pillow is perfect for snuggles on the couch reading and for climbing adventures by the baby boy.


Details: 24'' by 24'' finished pillow cover size with a 26'' pillow form from Ikea stuffed inside. It's perfect this way. Just an envelope closure on the back with more Mod Century. Straight line quilting with Wonderfil Konfetti.

Full Circle Announcement


Look at those pretty circles. All sorts of Liberty goodness in my not-quite-patented process.

These are being whipped together courtesy of the new Liberty Lifestyle fabrics and my impending teaching schedule. I've got a Perfect Circles class coming up and guess where it is?


I am beyond excited to join the faculty at Quilt Con. Such esteemed company (Lotta Jansdotter, Denyse Schmidt, Jacquie Gering, Lizzy House, and more!) and what looks like to be an amazing event. You can come and take half and full day workshops, attend lectures, see a couple of quilt shows, and even shop.

My Perfect Circles class runs twice over the course of the event. We will run through all manner of circle techniques - from sizing, creating, placing, and sewing your circles. Circles, circles, everywhere! And we all know how I love my circles.

See the complete line-up here. Registration opens August 30, 2012.

And big thanks to Stash Books for sponsoring my class!