tips and tutorials

Playing with Scissors

It was Sunday morning and I didn't quite clue in to what she said. I was settling in to the comfy chair with my morning tea. The girls were all set with their new favourite show (Wild Kratts). Then the little one sometimes known here as Smilosaurus but more commonly known in this house Evil Genius says to me, with load of pride in her voice, "Mama, I cut that thing you use."

Sure, Babe, I thought, as I sipped my tea. Whatever you say. Mama needs her caffeine this morning.

Once the caffeine kicked in I picked up the quilt next to me. Thread, thimble, scissors, and needle threader all present and ready for some handstitching. Then I went to actually thread a needle. Hmm, those fragile, thin diamonds of wire were suddenly missing from both ends of my Clover threader. For 30 seconds I actually thought I wrecked them when I put it away the night before. Then... wait a minute, I remembered that random comment from earlier from that child of mine.

I called my kidlet over and asked her to show me exactly what she cut. Proudly she pulled out my needle threader. Somehow, I couldn't even get upset. (As I normally would, let's be honest.) When I asked her why, this is what she answered:

"Mama, I'm just like Curious George."

Sigh.

In honour of all of us quilters, artists, crafters, and creative folks I thought I would do a series of posts on trying to quilt with kids around. Tips and tricks for actually getting things done with kids around. I'll do a new post every Monday for a month. Please send in any tips or stories you've got, I'd love to share them too.

Stay tuned next week for my first post on setting up your space to work for you and your kids.

Ornamental Organic

You've seen snippets of this quilt before. It was my all organic quilt challenge based on Daisy Janie's Geo Grand fabrics.

Well, Fat Quarterly picked it up and the pattern is in the latest issue. Go here to buy your own copy. The pattern includes a discussion on my challenge in making this all organic. Here's a hint - I almost made it. This is a easy pattern - no curved piecing. The colour possibilities are endless!

And, if you are so inspired, make sure you share any projects you make with the pattern with me and on the Fat Quarterly Flickr page. I'd love to see what you can make.

Thank-you to Amy for sharing the prize draw for me, Jan for her gorgeous fabric, and everyone at Fat Quarterly, especially Tacha.

Conquering my Fear

Handquilting is something I've tried a sum total of three times. The first time was on my third quilt ever. And only because I was terrified of free-motion quilting. The second and third times were earlier this year. That makes a 10 year break between efforts.

I'm trying it again. I would be talking out of my ass if I didn't confront my own fears after that last post on Fear. In my case, I was afraid that I would mess up this project with bad stitching. And the wealth of excellent examples on-line seriously intimidated me. But I can't sit around in fear, I just can't. It isn't my nature, although it is certainly easier. But I would be a hypocrite to you, my faithful readers, if I didn't challenge myself.

I would also be a hypocrite to my kids. You see, The Monster is a very intense child. If she can't do things perfectly the very first time she does something then the world essentially ends for her. Last summer, at 3, she tried her tricycle for the first time. When she couldn't figure out the notion of pedalling in the first 30 seconds she quite promptly got off the bike, picked it up, and threw it.

She gets that from me.

So, if I am working every day with her and her sister to get them to understand the notion of practice, work, and simply trying something even if you aren't perfect at it, then I need to do that myself. Enter handquilting.

Each of the 27 circles on my low-volume circles quilt will be handquilted. This is in contrast with the straight lines I'm doing on the background. It seemed an appropriate approach since the circles were done entirely by hand shortly after I injured my knees in January.

Now, I'm only three circles in. And it certainly isn't pretty. But each one looks progressively better. Seeing improvements certainly helps the confidence level. Regardless, I'm committed to the process and the product.

Full confession though, I'm stabbing these stitches, not using the traditional rocking motion. I know that isn't the correct way, but it is working for me. I believe that counts for a lot. Besides, on my recent trip to Nova Scotia I had the opportunity to snuggle by the fire under an incredible handstitched quilt that was entirely stab stitched. That was enough to motivate me to tackle my quilt. I don't know if I'll ever be as good as the artist, but I won't know if I don't try.

Fear

Fear holds a lot of people back. Not only in life, but also in quilting. Fear of a new technique, fear of messing up, fear of being less than perfect, even fear of not being liked (the work, that is). I'm here to tell you to stop being afraid.

(I feel evangelical just typing that. Maybe I should be on a stage with a tiny microphone on my face and gesticulating calmly as I speak. You know, projecting a voice of inspired energy and turning you over to my side?)

This is a bee block. Just a simple wonky star with a twist was requested. I can get those directions, play around with the fabric given, and come up with something a bit different from the typical stars seen out there. For another person, those directions can simply stop them in their tracks. For one, saying wonky paralyses many. Must have a straight lines... And two, this begs for improvisation. Must have a pattern... Finally, what if the recipient doesn't like what I do?

For a long time I didn't understand these fears. In my case it was because I happen to like a challenge and actually sewing that way. But then people asked me to sew very precise things in their bees, with very specific instructions. Definitely not my go-to-choice for a project. But I'd made the commitment to the bee and my fellow participants. And I wasn't afraid so much as less than excited. But it's one block, what's the big deal?

But one block can be a big deal to a beginner, or to someone whose never made a triangle or not worked with a pattern. I don't want it to be a big deal though. I want people to look past those fears and relish the challenge. Why not try something new? Do you want to make log cabins or simple patchwork for the rest of your life?

Okay, maybe you do. Maybe you would be really happy churning out those quilts. And that's fine. But then stay away from on-line bees and expect other people to get bored with your work if you choose to share it with a very public audience. That's all good if you are happy doing what you are doing.

Looking for more, though? Feeling inspired by all you see on-line or at guild? Then it is time to set aside some fear. Here are some tips to get you moving past the fear:

- Join an on-line bee. This will force you to try new techniques and meet other quilters. Alternatively, join a round robin or guild bee.

- Play. You can just sew for the sake of sewing, it doesn't have to turn into anything.

- Don't blog about it. If you are worried about what people think, then don't share it.

- Blog about it. Push yourself to put it out there, flaws (perceived or real) and all.

- When in doubt about that one fabric, include it. If it still niggles at you once you've used it, then take it out. It is only fabric.

- Ask for help. Whether from an in-person friend or by posting on-line, seek input from others (like we did with the Workshop in Progress).

- Challenge yourself. Set up regular goals to try new techniques or colours.

- Stop reading blogs and books for a little while. It can be demoralizing for many to see so much inspiring work. That is, we think we can't be good enough or think it is beyond us. So take a little retreat for yourself and turn off the computer and stay away from the stack of books. Fondle your fabric and sew for yourself.

- Colour. Stuck when it comes to fabric? Then pull out the crayons, markers, or pencils and just colour. Even if it is just a colouring book, go for it. Give people blue skin, colour the trees purple, or make polka-dotted dogs.

Keep in mind that if you are stuck there is no need to make an entire quilt to move past the fear. Make one block, just play for a bit. This reduces the commitment and moves your forward one step, one block at a time.

What other tips do you have for facing the fear?

Just Playing

This has been a rough few weeks for our house. As a result, not much quilting is getting done. I just can't motivate myself. I'm picking away at commissions, but I hope the recipients understand. Did I mention its been a rough couple of weeks?

Two weeks ago we had to leave town for a funeral and that necessitated a 2 day road trip, in each direction. Just prior to leaving, feeling the need for some retail therapy, I went shopping at an art store. I'd decided it was time to get some dedicated sketching materials that were all mine. Up until now, if the notion of a quilt came into brain it was usually sketched in black pen on whatever paper I could find, or with my daughters' markers on their craft paper. There is absolutely nothing wrong with that, and it will still always happen. But it was time to treat myself a little.

And boy, could I have treated myself. I had no clue that fancy markers cost so much! I had it in my head that I would be able to get a set of about 50 colours for a pretty reasonable price. Uh, no. At least not at the store I went to. I had to settle for a set of 20, decent quality markers for a good price. I really wanted more colours, but I couldn't justify the expense, no matter how bad of a week I was having.

In the end, this was a good purchase. A smaller set means that it it all transportable. And all I really want to be able to do is to capture a notion of the idea in my head, not a precise pattern. Besides, nothing can replace actually playing with the fabric.

Then, this week, I was at the grocery store and saw a pack of 50 markers for less than $10. At first I sighed in frustration. But I've realized that the best part about my markers is that they are mine and all mine. The girls know they can't play with them.  That means I will never run out of the red.

Friday Favourite - Lint Tool


Okay, hands up. How many of you clean your sewing machine on a regular basis? And just what do you define as cleaning?

With the knees injured my machine was getting a bit of a rest. So I took it in for a little tune-up and deep clean. In the almost 4 years I've owned it there has been very little that has ever bothered me about it, other than the needle threader breaking. It may just be because it is a good machine, but I also think I take care of it rather well.

One of the things I do is clear the lint every single time I change a bobbin. Yup, every time. The bobbin case is out anyway, so I have a good clean view of all that lint! I used to use a Q-Tip with a dab of oil to do this. This was how I was taught to oil my machine. Then a swap partner sent me a handy little tool. With regular cleaning I've found that I only need to do a quick swab with oil once a month or so, depending on how often I've sewn.

Today's favourite is the handy little tool.  It can be yours for less than a dollar, or even free if you, like me, often have straws and pipe cleaners around. Ah, preschool crafts.

Take a roughly 2 inch piece of pipe cleaner and a thin straw. The little coffee straws work best for this.
Fold the pipe cleaner in half and pinch the ends together close. Insert into one end of the straw. Don't worry about glue or anything. A small straw will hold the pipe cleaner in place.

Open up your machine where the bobbin is. This is what mine looks like after a a bobbin's worth of sewing. You don't have to look too close to see the lint.

Drag the pipe cleaner/lint tool through the entire area, behind the bobbin housing, in the bobbin case, and underneath the throat plate. This is what came up for me.

Do this every time you change your bobbin and your machine will run quite smooth. Trust me, a clean machine saves you a lot of headaches and repair bills.

My Favourite Gadget


Do you know what this is? Hands down, it is my favourite tool for quilting. I'm not a gadget, multiple rulers, fancy papers kind of girl. But the day I discovered this was revolutionary.

To be fair, I think it was my sister or Hubby who actually discovered it for me. I remember getting it for Christmas one year. how I survived without it is beyond me. If you are a pin baster then you NEED this.  It's the best $20 you'll ever spend on quilting. The handy Kwik Klip saves your fingers and a heck of a lot of time when you are pin basting a quilt. It essentially lifts the bar of the pin to close it. Instead of you pinching it yourself. Finger saving, I tell ya!

I've seen these at every local quilt shop, but I've also found them on-line.

(If you do decide to search for them on line, be careful of your search terms.  If you only use Kwik Klip the internet seems to think you are looking for a specific gun accessory!)

Improv Sampler - Chopsticks

There really is more to improvisational quilting that wonky log cabins.  Of course, those are good too.  But this technique, which I call chopsticks, is the first step in some fun designs.

Start with a square that is roughly the size you want your finished block to be.  Or just start with a square in any size and see what happens.  Cut some strips of other fabrics, slightly longer than your square.

Slice your square on any angle - through the middle, close to the side, or even lop off a corner. Don't throw away either piece.  It is best to keep the pieces set-up as if you just cut them so you can remember how it all goes back together.

Pick up the piece on the left side and sew one of your strips to it, right sides together.  Open and press.

Pick up the remaining piece of your square and sew it to the edge of the strip, as if you were sewing the original square back together (but with the strip in between).  Open and press.

You can sew one strip or many.  The process is the same every time.  Start with the square, slice, re-sew, and press.  Your strips can be parallel, on an skewed angle, or even perpendicular, like this quilt.

Important tips for this technique:
- Don't start with a square that is exactly the finished size you want because you will lose bits as you re-sew.  Start larger and trim down.
- Try not to have strips less than 3/4 inch on the edges.
- Strongly contrasting fabrics work best, but you could get a subtle design with fabrics close in value or colour.

Thread Catcher

One of the annoying side effects of improvisational quilting is the constant starting and stopping when you sew.  Depending on your plan of attack it might be difficult to chain piece. That can leave a lot of cut threads, mess, and wasted time.  A good quilting friend of mine taught me this trick.

Take a scrap of fabric and double it up (or use two small pieces).  When you finish a seam, sew a a few stitches in to nothing, then sew in to your scrap.  You can then cut your piece from the scrap without a tangle of threads to deal with.  When you come back to your machine for the next seam just sew from the scrap piece, cutting it off when you go to press.

I usually keep two of these by the machine.  One for the start of my sewing and one when I finish the seam I'm working on.  That way you always have one handy to plug in to the end of your seam when you leave the machine to press.

Breaking Free

Improvisational quilting is not just about making wonky log cabins or wavy strip quilts. it's about not buying kits and patterns and fabric lines. In the spirit of Project Improv, and because I still don’t have a camera, I thought I could offer some encouragement for those just breaking into improvisational quilting.

Where do you start? Well, that depends on your goals and inspiration. Are you trying to make a baby quilt to match a room? Have you fallen in love with one particular fabric that you want to showcase? Are you simply interested in playing around at your machine? Heck, maybe it's all three.
For the nearly 50 quilts I've made or contributed to in my 10 years of quilting I can honestly say that maybe 5 were from a pattern - a straight out of the package or book pattern. I'm not one to be told what to do, so early on I started adapting ideas I saw, or creating my own to make my quilts. I would really call it an evolution of technique and effort, not a style.
The first foray into my own designs was simply taking traditional block patterns and putting them together without a pattern. I never understood how companies got away with putting together a pattern for a traditional block, like a maple leaf or churn dash, in a simple setting and convince people that they should pay $10 for it. Maybe it made sense before the proliferation of block patterns available on-line or in books? But you still see them in the stores. I digress.
My favourite places to search for blocks were here or here. If I was making a quilt for someone in particular I would try to pick a block that related to the person. For example, a Monkey Wrench block for a friend that likes to make furniture. Generally I would make a few blocks before I decided where I was going with the quilt. I almost never decide exactly what the quilt will end up as before I start. It is always an iterative process. Sometimes the settings were even quite traditional, with sashings and everything. It just depended on the recipient (if there was one planned) or simply what looked right.
Another favourite thing for a while was to take a block pattern and make it big. This works nicely for baby quilts. A 12 inch block translates nicely into a 36 inch block. This evolved into what I called jazz quilting: taking that original block pattern and repeating it in different sizes.
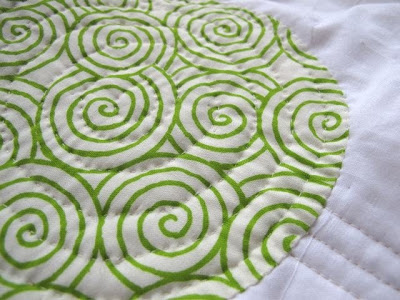
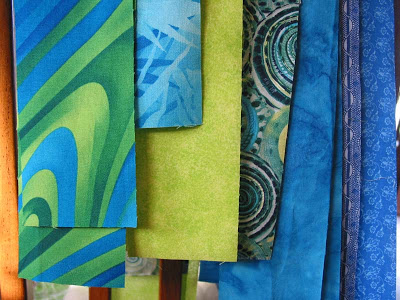
Then I got my new sewing machine. Thus started the obession with circles. I've made a whole shwack of circles quilts, all very different. The first one I did is one that still requires a label, but it already keeps Hubby warm on the couch in the evenings.

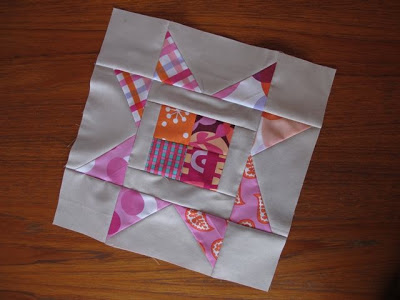
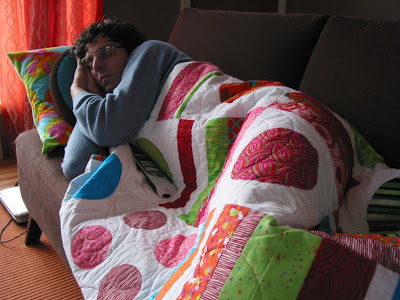
Subsequent circle quilts have included pieced backgrounds. This move then got me thinking about different ways to do these backgrounds and new shapes to applique. It's amazing how a simple shape like a half square triangle can look so different depending on what you do with it. Three of my most recent quilts all have half square triangles, but fabric choice and placement change the way they look. Often I cut the fabric first and make the blocks, then worry about placement and setting. Such was the case with this, this, and this quilt.

Along the way I've tried new things too. I had to get my Denyse Schmidt on and made this quilt a while ago.

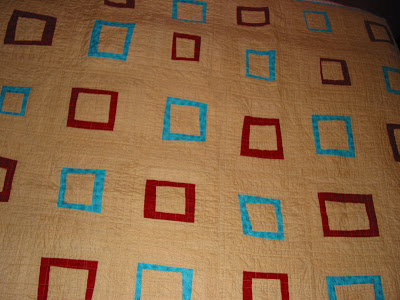
And I liked the idea of the popular Yellow Brick Road quilts. But again, I couldn't bring myself to buy a pattern for what looked so simple. Rather than try and copy it I drafted my own pattern. When I went to make the quilt I decided I didn't want the look of a whole bunch of squares and rectangles. So I combined the wonky log cabin look with the pattern I drew and came up with this.
(Sorry about the crappy photo, I could only find a tiny one. The original is on the old computer and that's packed away for the renos.)

My latest projects have been about shapes too, and a lot of seeing what happens as you sew. Cut some fabric and sew, then see what happens. It's kind of like what would happen if Jackson Pollack quilted. Sometimes it is more about the process and not the end product. But you can still make something beautiful out of it.

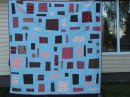
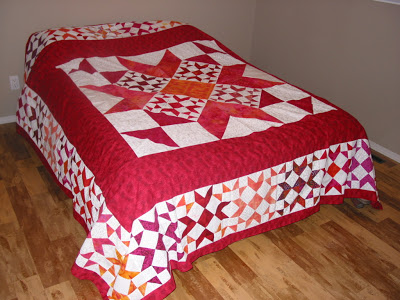
When you are looking to break free from patterns and kits, remember you don't have to throw out everything from traditional quilting. It is always still a good idea to use a scant quarter inch seam, press well, and trim your blocks square. You can still take those traditional ideas and make them into something new. Don't be afraid. Just start sewing.

Bindings - Attaching, Mitering, and Hand Sewing - A Tutorial

You've got your quilt squared up, you have your binding pieced and ironed, now is the time to attach the binding. First, by machine, and then by hand to finish.

To review, I use a double fold binding. Simply put, I iron a strip of fabric in half - wrong sides together - sew it down by machine on the raw edge, flip it over the edge of the sandwiched quilt, and stitch it down by hand through the fold. I do not do a continuous binding. Rather, I attach each side individually and mitre each corner once all the binding is attached.

In this tutorial I will show you how to attach the binding, especially at the corners, mitre the corners, handstitch the binding, and finish the corners and binding. Sit back and get a thimble, this one's picture heavy.

1. Sew down your binding, from corner to corner. Overhang the binding by at least an inch at the top and bottom - check your length before you start sewing. Line up the raw edge of the binding with the edge of the quilt top. Start sewing 1/4 inch from the top edge, thus leaving 1/4 not sewn down. Backstitch for a stitch or two. Using a walking foot or an even feed (like my Pfaff has) sew down with a straight stitch, using a scant quarter inch seam allowance. I don't pin the binding before I sew, preferring to hold it down and line it up as I go.

Stop your seam 1/4 inch from the bottom of the quilt top edge.
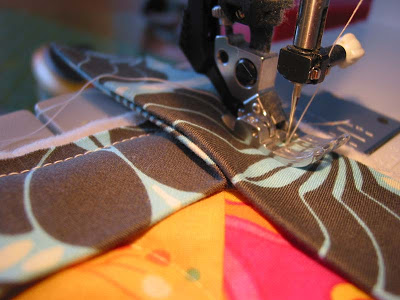
2. Go around the quilt, sewing all the bindings down. To attach a new piece, take the already attached piece and fold back the end at a 45 degree angle.

Pin the new piece to be attached, with overhang, on top of the folded back piece. I like to put the pin in at 1/4 inch from the edge so I know where to start sewing.

Start sewing 1/4 inch from the top and 1/4 inch from the edge. Sew down the binding as you did your first piece.

Finish the final seam the same way you started. Fold the underneath piece back at a 45 degree angle and sew to 1/4 of the edge.

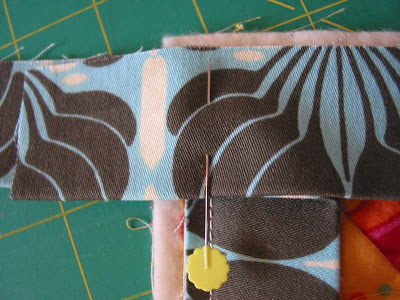
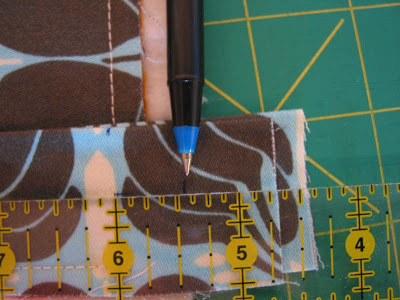
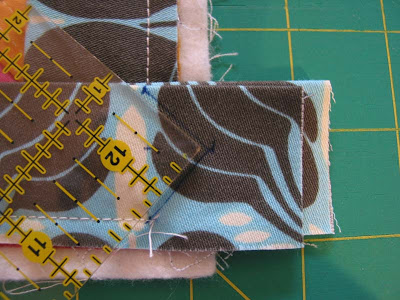
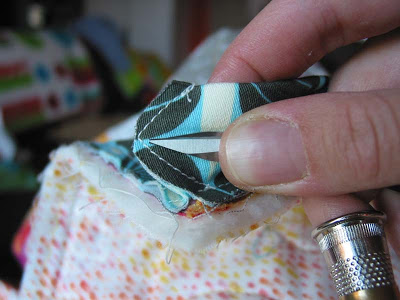
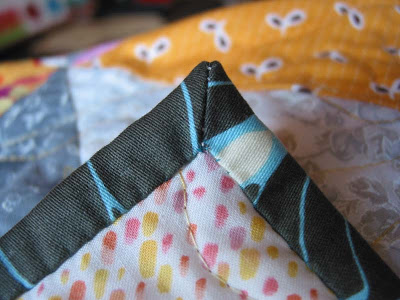
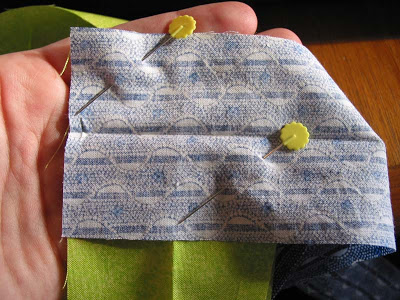
3. Mitre the corners. Measure from the folded edge of the binding to the seam. This measure will change from quilt to quilt depending on the thickness of your fabric and how large you cut it. Divide that measurement in half and make a mark. Don't worry about what you mark it with because these marks won't show. Well, don't use black felt on a light coloured fabric, but otherwise don't worry about it.

From that mark measure the same distance straight up. By up I mean perpendicular from that first mark towards the dangling ends of your binding strips. Mark this spot as well. For example, my overall length was 9/8 of an inch. I made the first mark at just over 1/2 inch. From that mark I measured and made a mark at just over 1/2 inch up.

Now, draw a line from the folded edge of the binding, in line with the seam, to the second mark you made and back to the seam. It should look like a right angle triangle.

This is now your sewing line. Stitch on this line, backstitching for a stitch or two on each end. When you get to the point of the triangle stop with your needle down, lift up your pressure foot, and pivot the quilt. Be sure to fold back the quilt itself so you don't sew through that.

This is what it looks like when you're done. Repeat with all four corners.

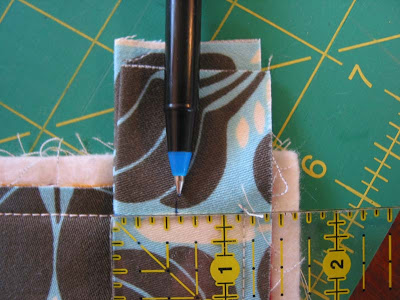
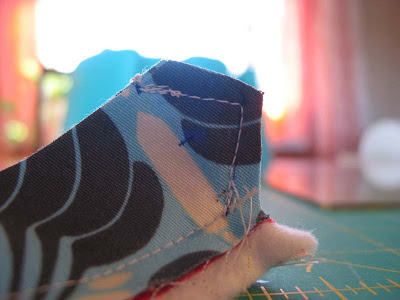
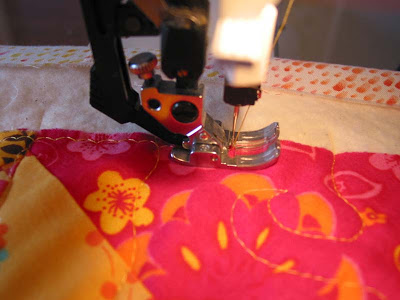
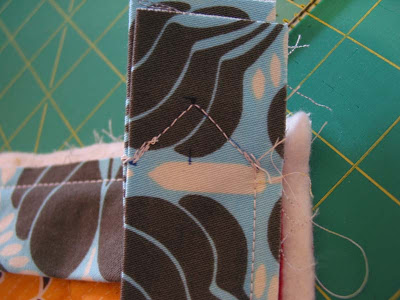
4. Handstitch the binding down. First, thread your needle. This is the best way to do it, leaving you with a single strand thread on your needle. The goal of your first stitch is to hide the knot underneath the binding. I make the stitch inside the seam line of my binding - the straight stitch in the picture below. (The zig zag stitch is from squaring up the quilt).

Pull the stitch through the fold of your binding. First stitch done!

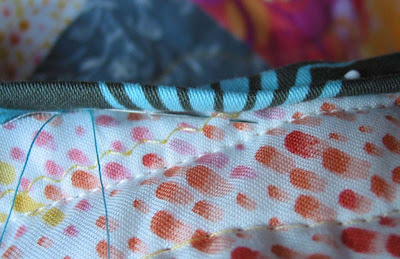
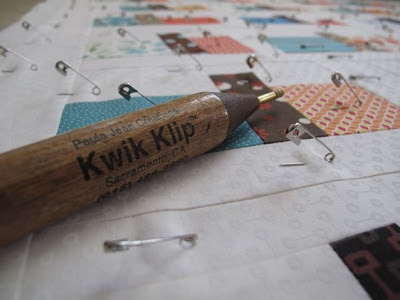
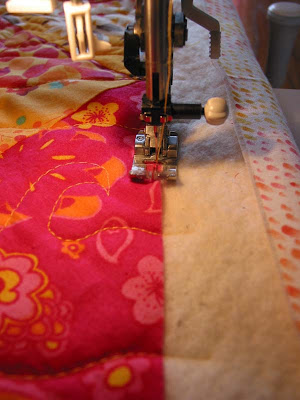
It goes without saying that you should pin your binding down. Do not pin the whole way around, rather pin a few inches at a time. Move the pins as you go.

Here is where it might get confusing for some. I do my hand stitching (and hand applique) backwards from most. I sew right to left. I was taught left to right, but it never felt natural to me. If you are having troubles with handstitching try switching directions and see if that helps.

Put your needle in the backing fabric, at an angle, just catching a few batting fibres. Come out in the fold of the binding. I keep my stitches small, so they are about 3 millimetres apart. Start the next stitch directly below where your previous stitch ended. In other words, right below where the thread lies.


Continue around the quilt, moving the pins as you go. I like to have at least an inch pinned down in front of where I am.

5. Sew down the corners. First, trim the excess fabric. I tend to trim to about 1/8 of an inch seam allowance. You want to minimize bulk in the corner.

Now you need to turn the corner right side out. I take my small applique scissors, but anything with a blunt point will work, like a pencil or a stick. Place it in the point of the corner and push it through, turning the fabric right side out. Use your turning object to ensure all the fabric is flat and the corner is as sharp as you can make it.


Pin the corner down and sew down as you've done the rest of the binding. I put a few extra stitches right in the corner.

6. Last stitch. For the last stitch - and every time you finish a length of thread - this is what to do. It hides your knot yet is quite secure.

Start your stitch as normal. Before you pull it through wrap the thread around the tip three times.

Pull the needle through, holding the thread against the binding fold. The knot should end up snug against the fold. Clip the thread right next to the knot and it will end up being virtually invisible.

And you're done! Personally, I find putting to the binding quite satisfying. The quilt will still need a label, but it is effectively finished at this point. Beyond the relief of finishing a project, it is about realizing the vision I've had and the excitement of passing it on or snuggling under it that night.

Squaring Up a Quilt - Tutorial

Okay, time to 'fess up. How many of you go through the process of squaring up your quilts? I'll admit that I didn't think about it for the longest time. All the methods I had seen seemed like they required a ridiculous amount of floor space and the ability to block the quilt, like you would a new knit.

Squaring up a quilt really isn't that hard, but it is a step that slows you down when all you want to do is get that binding on and see what you quilt is going to be. It always helps to stay as square as possible along the way. Check each block as you go, and fudge seams if necessary when putting tops together. If you are using borders there is also a way to help bring a skewed quilt into square or ensure it stays square, but that's another tutorial!

I've always done my best to stay as square as possible during construction, but the evolution of my design aesthetic now sees the majority of my quilts finished without borders and not necessarily square blocks. That same evolution has led me to the following technique. See if it works for you.

You don't need any special tools to do this. Your sewing machine, thread, a large table top, self-healing cutting mat, rotary cutter, and a ruler at least 12 inches square.

Before you get started decide on how much extra batting, if at all, you want your binding to contain. I cut a quarter inch from the edge of my quilt top. My binding is then attached flush with the quilt top's edge with a quarter inch seam allowance. Folded over I can then hand sew the binding and it perfectly covers the seam from attaching the binding. If you want a less substantial binding then you could cut closer to the top's edge and use a smaller binding.

Here's how I do it.

1. Set your machine to a zig zag stitch that is small in width but long in stitch length. Stitch around the entire perimeter of your quilt, through all three layers. This essentially turns your quilt a solid piece of fabric, reducing the potential for movement when you attach your binding.
Ensure you stay as close to the edge as possible. If you have a walking foot, use it. I have an even feed foot on my machine and that's what I use. Oh, and take it from me, ensure that you have a throat plate in your machine that can accommodate a zig zag stitch! I nearly lost an eye when my needle broke. This stitch will be entirely hidden by your binding.

2. With your quilt supported on the table (if it hangs over the weight may pull you out of square as you cut) get ready to cut. The whole quilt doesn't have to lay flat, so don't worry about having a giant table. As long as your cutting edge and about 12-20 inches to the side of that edge stays flat.
3. Start in one corner. Line up the corner of the quilt top with the corner of the ruler, a quarter inch in from the edge. This is where the actual process of squaring begins. From the corner you will want to keep the quarter inch markings in line with your quilt top's edge. To do this you may need to pull the quilt into square. Hold the ruler down firmly but not so hard that you can't pull the fabric with your cutting hand. I find that my thumb holds the ruler more firmly, and thus holds the quilt in place, and that I can move the fabric near the top of my ruler. (see picture below). Pull the quilt, holding on to the batting and backing fabric until it is in line with the quarter in marks. You may have to pull the inside of the quilt in, rather than the edge out. Just go slow and pull as necessary. When you have it lined up with your ruler, cut it for the length of the ruler only.
This is what it looks like.
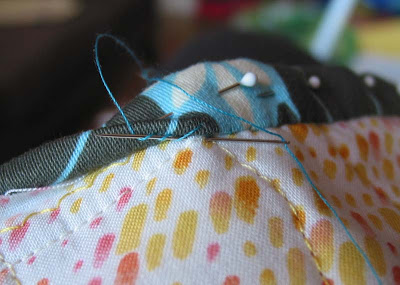
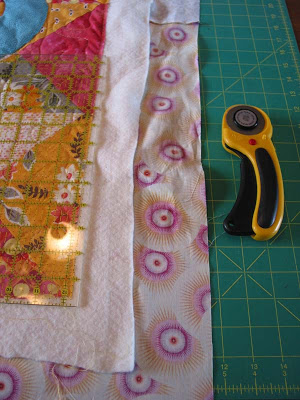
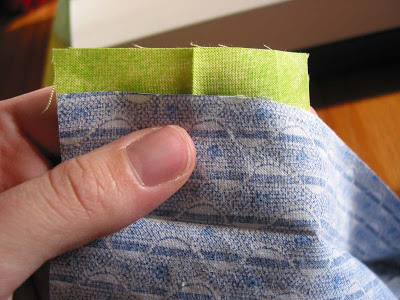
From the first cut, move your ruler up. Overlap up the cut edge by a few inches with the ruler, keeping the cut edge and the ruler's edge in line together. Then line-up your quilt top's edge with the quarter inch mark.

As you finish one cut, move the ruler up the edge of the quilt (keeping the quilt on your cutting mat). Constantly realign the quilt top's edge with that quarter inch mark. Pull the fabric as necessary to bring the quilt top's edge into alignment. Always hold the ruler firmly as you cut.
Continue around the edge of the quilt until you get to the next corner.
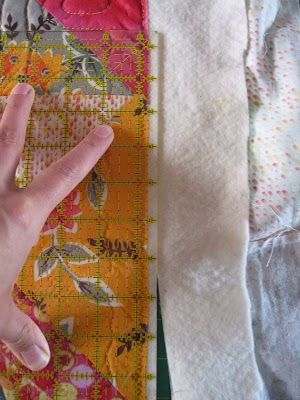
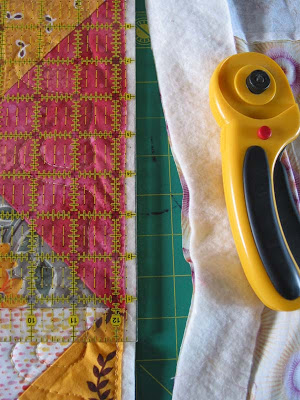
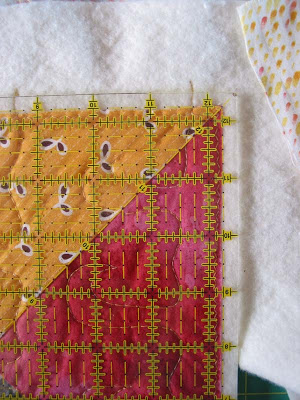
4. When you get to the corners ensure your quilt top edge lines up in the same way as the edge you are currently cutting. In other words, you should be cutting your vertical edge, As you approach the corner - at least 8 inches out - line up your ruler on the current corner as you did the first one. Square your top, or horizontal, edge by pulling into alignment prior to finishing the vertical cuts. Cut both sides of the corner at the same time.
Turn the quilt and continue around all edges and corners.

This technique has worked very well for me. And when all is said and done, it doesn't take more than a half hour to do a large quilt.
Once you have it all squared away attach your preferred binding. I'll show you that in my next tutorial.

Multi-Pieced Binding Tutorial

In reality, almost all bindings are pieced - unless you are doing a miniature or baby quilt. I wanted to offer you my technique (far from being unique) for a pieced binding and inspire you to do some multi-fabric bindings to finish your quilts.

Binding on a quilt is like hair. A bad haircut can ruin an incredible outfit, making your quilt look like the equivalent of an 80s yearbook photo. Okay, the clothes weren't great then either. But the right haircut will make you look just so fabulous, even if you are wearing two pairs of slouchy socks and a sweater tied over your shoulders.

Multi-fabric bindings aren't right for every quilt, but they are right for so many. Scrappy quilts, fat-quarter quilts, charm quilts, stack and whacks, and generally any quilt that uses more than 6-8 fabrics are prime candidates for multi-fabric bindings. Even a traditionally pieced quilt can be jazzed up with a multi-fabric binding. Generally, I take some of the fabrics that are used in the quilt, cut random length strips, sew them together, and attach to the quilt. Sometimes I get more formal and do the corners, for example, in one colour and the rest of the length in another.

A couple of notes on my technique. This is not for bias-cut bindings. A bias binding has its place (although it is rare on a quilt I make), but mixing bias cut and straight-grain cut fabric in the binding will just create a complicated mess for you. Secondly, this creates a double thickness of fabric on the edge of your quilt, a double-fold binding. You will not notice a difference, but it provides some added strength for wear and tear.

Here's how I do it.

1. Cut your strips of fabric. The length of the strip will depend on the size of the quilt. To maximize the effect you want at least 2 or 3 fabrics per side. My go-to width of binding strip is 2 and 3/4 inches. This gives a broad enough binding that wraps around the edge of the quilt easily.

*Do not use bias cut fabric*

2. Iron your strips in half lengthwise.
3. Now it is time to join all your strips. Open up the fabric, place your two fabric ends, right sides together, at right angles to each other.
Pin close to the top left corner and bottom right corner.
Draw a line from the outside corner to the outside corner. Do not draw your line from the top left corner to the inside corner, that won't get you anywhere but two randomly sewn together strips. Sew along your line.
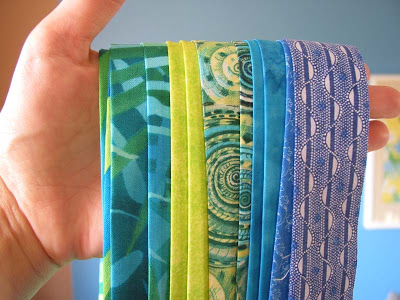
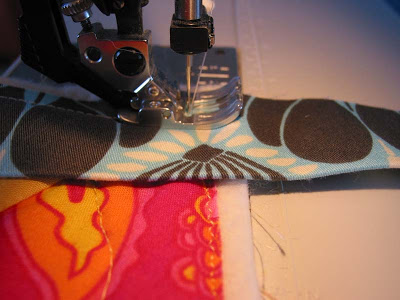
After a few tries you won't need to draw the line. Just sew one strip to the other and so on.
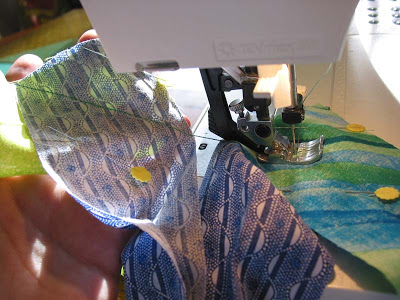
The key is to not get your strips twisted.
4. Once all your strips are sewn together cut off the extra fabric triangle. Press the seams to one side. Repress the strips in half where two strips meet.
5. Attach your binding in your preferred method. With this method I sew the binding on my quilt, one side at a time. Each corner is mitred. Then I fold over the binding and sew down by hand, covering the sewn line.

It will be out of order, but the next tutorial will be on squaring up a quilt. Then I will tackle the way I mitre binding corners (I don't do continuous bindings), hand sewing the binding down, and creating a hanging sleeve.

Circle Tutorial

In case you hadn't noticed, I have a bit of a fixation with circles. In the last two years I’ve made 4 circle quilts. In that time I’ve figured out an easy, reliable way to make even circles – circles that are actually round, that are easy to appliqué, and that don’t have points or tucks.

To get to this point I’ve tried a number of methods: dryer sheets, cardboard templates, plastic templates, aluminum foil, and fusible appliqué. I was never satisfied with any of these. It was either difficult to keep the fabric in place when drawing up the circle (with cardboard and plastic templates), the circles had points or tucks (with all methods but fusible appliqué, determining the center of the circle wasn’t always easy, or you had to use a satin or decorative stitch to finish things off neatly (with fusible appliqué).

There is nothing wrong with any of these methods and I’ve heard that people have success with them, but I sure wasn’t one of them.
Here is my nearly full proof method for creating and attaching perfect circles. This method works for machine or hand appliqué.

Supplies:
Freezer paper
Compass (remember these from elementary school?)
Pen
Iron and ironing board
Fabric
Pins
Sewing machine or hand appliqué supplies (needles and thread)

Circle basics:
The diameter of the circle is the distance from one side to the other. This is how big your circle is.
The radius is half the diameter, or the distance from the center to any one point on the edge.
The circumference is measurement of the outside edge of the circle.

Creating the Circle

Determine the size of circle you want.

1. Using the compass, draw a circle the desired size on the rough side of the freezer paper. Make sure the point of the circle is noticeable or re-mark it with a pen.


2. Cut out the circle right on the drawn line. Take care to use long, even cuts in order to minimize any sharp edges or points on the drawn circle. This is your freezer paper template.
3. Place your circle fabric wrong side up on an ironing board. Ensuring that you have roughly a ½ inch seam allowance, iron the freezer paper smooth side down to the fabric.
4. Cut out the circle of fabric, with the freezer paper template as a guide, with roughly a ½ inch seam allowance.

I use my machine for the next step because it is faster, but this can also be easily done by hand. If you do this step by hand, try to take small basting stitches. The larger your stitch length, by hand, the greater the chance for points on the finished edge.
5. Sew a basting stitch about a ¼ inch from the edge of the freezer paper template all the way around the circle. Leave the ends of your thread a few inches long. Do not backstitch or sew over the ends, you want these free.
6. Gently tug on the loose ends of thread. Short tugs seem to work better. This will draw your fabric edges over the freezer paper template, creating a turned over edge. You may have to work the gather a little, but provided you don’t pull sharply or too hard the threads will hold and you will get a pretty smooth edge.

7. Steam iron the gathered edge. Some people may choose to use starch at this time, but I’ll admit I never have. A hot iron does a good job of holding the edge well.

If you are attaching the circle right away, the freezer paper template can be removed after the following step. If you are waiting to attach the circle, keep the freezer paper attached until ready to use.

Attaching the Circle

The following steps apply if you are attaching the circle in the center of a square block or precise design. If you are doing this as part of a relatively random design, then simply remove the freezer paper prior to appliqué, pin, and sew.

1. Place a pin through the center of the freezer paper template (fabric and template should still be attached). This provides an extra mark for the center of the circle.

2. Remove pin and freezer paper, taking care not to rip the paper. If pin mark is still visible in fabric, replace pin. If it is not visible, then place template over circle to mark center again. Pull template off, leaving the pin in place (it’s okay if the template rips at this time, it’s easy to make more).
3. Mark the center of your block or design (where the center of the circle will go.


4. Place the circle, with the pin still marking the center, directly over the marked spot. Line up the mark and center point, then complete pinning.
5. Appliqué as desired.

I use my machine to appliqué most of the time – a small blanket stitch in a coordinating thread. You could hand appliqué, use invisible thread, or do a decorative stitch. I would not recommend a satin stitch at this point – you have a seam allowance so there would be a lot of fabric under the stitching.