I heard back from a lot of you in January that the round-up of my favourite quilts was something you wanted to see more of. I've decided to do this every 3 months for you. Even then it is hard to narrow it down!
Selvages are something that I now cut off and set aside - to giveaway. I have absolutely no motivation to make a selvage quilt myself. Even after seeing this one, I still don't want to make one. But I can look and admire the quality and beauty of this quilt. Great job Jacquie!
There are some lovely, lovely quilts on Jess' site. Simple and graphic. You see similar quilts around, but there is something about the way she places just that one extra bit of fabric or a carefully chosen binding that elevates her quilt above many modern others.
If you've been reading me for a while you know that I'm generally not a fan of quilts made entirely from one fabric line alone. But I adore what Andrea did from her inspiration - a drawing and design by her son. How cool is that? And a nice break from her year of solids.
Okay, so a slight bias here. But I had to share one more finish from my quilt along. I know many of us miss Amanda Jean's blogging, but you can keep up to date with all her work on Flickr. Thank goodness!
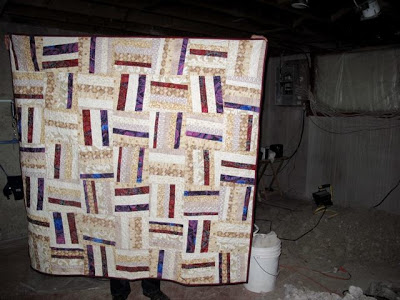
I'm done! For a while I was calling this quilt Pinstripes, but after finishing it and seeing that it doesn't match my original concept I am simply calling it Gratitude II. When I say it doesn't match my original concept, I mean that it is busier than expected and has less of the subtlety that my Pinstripe suit inspiration. I still like it and I know it will be quite cosy in our eventual finished basement.
The back is a simple mix of three of my favourite yellows. Arcadia, a Denyse Schmidt Katie Jump Rope, and this fantastic yellow and grey leaf pattern whose name escapes me. I'm going to get a label on there eventually, using the scraps from the front strips to frame it. I promise I'll share it when I do complete it.
The binding was an Amy Butler Midwest Modern. I used a few of her prints on the front, so I knew that the binding would be perfect. It was nice to use such a soft print to finish it off. I didn't want to use a blue print, as would be expected, because I thought they were standing out quite a bit already.
Finally, the quilting. Particularly because the top ended up rather busy, whatever I did for quilting was just going to get lost. So I went with the loopy quilting found here instead of stippling. And honestly, why wouldn't you? Loopy is so much easier than stippling. It's fast and perfectly contrasts the angles of the design.
Thank-you so much for your support in this Quilt Along. I'll admit, I'd hoped more of you would participate after such a good response to Gratitude. Then again, there was the little break life brought our family. And when I did re-start this? Just before Christmas? Not my smartest move. But I am so pleased with the results I've seen from those of you that have participated.
Over on Flickr, baileygirl_5 posted her fabric choices and the beginning of her strip sets. I love where she is going with this, using darks as her background and lights as her accents. Nice twist!
Elle in Da Coop is an old quilting friend and she was inspired to tackle another project on her always growing list. Look what picking similar colours to mine can do when you make the background pieces just a little more subdued. Browse around her December posts to see what she also did on the back and with all the leftover pieces. Fantastic!
And while there are a few more that have picked fabric or cut fabric, here is another set of blocks that have been started. Diane at Life Scraps used a few of the same fabrics which I used, but with a totally different effect.
If you come back to this at some point in the future, be sure to let me know, I would love to see what you create. Thanks for Quilting Along with me!
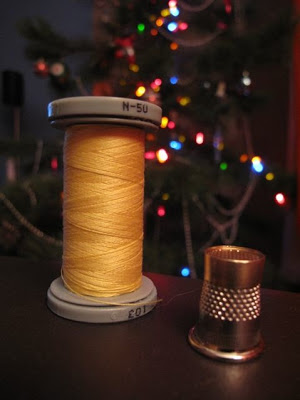
The finishing stitches are going into my second version of this wonky rail fence. I've been sitting by the still up Christmas tree (Happy Ukrainian Christmas everyone!) and stitching for a bit each evening. I love handstitching the bindings, but it seems to take me a long time. I see it as a good meditation at the end of the process.
Where are you at this point with the Quilt Along? When we last spoke we focused on assembling our blocks together into a completed top. All that's left are the finishing details, right? Yes, because making a back, basting, quilting, squaring up, and binding are just minor details! Well, they don't make for particularly exciting Quilt Along material.
Backing Many of us default to a large print with similar colours to our front. I've been known to use the fabric that maybe inspired the quilt top's fabric choices but didn't make the final cut. Use what works for you. If you want more ideas, check out this great Flickr group on Quilt Backs.
Basting I pin baste my quilts. If it is a small quilt I can manage on my kitchen floor. For larger quilts I use the boardroom tables at work. Never have I used a spray, they kind of scare me (more chemicals) but I've heard lots of people have success with them. To baste I simply tape my back taut on the tables, smooth out my batting on top, then lay my top over the batting. I pin every 3-4 inches. To close the pins I use my favourite tool: The Kwik Klip.
Quilting So much can be said about quilting this design. I think you can emphasize the notion of line with grid quilting, lines in any direction, or in the ditch work. With both my quilts I've chosen to contrast the top's design with swirly or loopy quilting. It is a personal preference. Don't get too hung up on picking the perfect design, go with what you are comfortable with. This is a busy quilt and detailed quilting will likely get lost.
Squaring Up Many, many of us skip this step - including me some times. But it really does help with your overall finish and is quite useful when you haven't cut everything on grain as is the case with this quilt. See my tutorial for how I do this. I do it after quilting but before attaching the binding. And cutting all the excess off the quilt is the step where I can see my quilt as a quilt, I love this step.
Binding 99% of the time I use a double fold binding. 100% of the time I attach each side individually and still mitre the corners. And it works everytime. Here is a tutorial on creating your bindings and one on attaching and finishing them.
So this is where I am at right now. Next week I will share with you the completed second quilt.
At this time I also want to announce a prize for those who participated with me. All you have to do is leave a comment on this post, or email me directly, and let me know where you are at in your quilt. Even if you've just picked out your fabrics but haven't make a single cut, I want to hear about it. If you have a blog or Flickr account, show me what you've done - I have to have some proof of progress. Besides, I would love to be able to share your work with others.
The prize will be 3 1/2 metre pieces of fabric - for stash or to start you on your own wonky rail fence - and some coordinating Presencia thread (my fave). I have some specific fabric in mind, but I am willing to cater to the winner's preferences (within reason). All you have to do is comment or send me an email by Tuesday January 12 at midnight MST.
So you have all your blocks cut out and sitting in a neat, untouched pile, right? Okay, I hope you've at least had a chance to cut them out so far. Today we are going to assemble them in to a finished quilt top.
The layout for this top is quite easy. All you have to do is remember to alternate horizontal blocks with vertical blocks. That is, your stripes go side to side on one block and up and down on the next. If you have a design wall, great. If, like me, you are in a constrained space you use whatever is handy - a fence, a bed, or the living room floor during what you hope is a very long nap.
I just pick a corner or the center of the quilt and start throwing down blocks. To be honest, I don't think about it too much at first except to ensure that I don't place two blocks side by side. Rather, I just want to get a feel for the layout. As I go I will start to notice whether I've got too many of one type of fabric together. Or might try to put some fabrics together to create a mini rail (of the rail fence) in the quilt.
Overall, I'm looking for balance of a couple of elements when laying out these tops:
My accent pieces aren't heavily weighted in one area over another - disperse the thick and the thin strips or the colours if you used more than one accent.
Variation in the angles of the strips - some should go right, some left.
Disperse the background fabrics as much as possible.
Looking both close-up and stepped back allow for you to see your quilt in the big picture. Another trick is to take a photo with your digital camera. This helps you see the layout at a distance. You can also go to the hardware store and buy a door peephole. Looking through this makes everything appear at a distance. I love my peephole (when I can find it). For a reminder of the finished layout check out the picture in the sidebar or the finished Gratitude quilt.
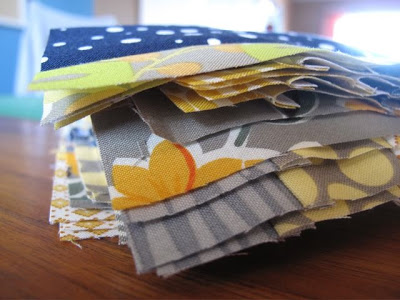
Once you are happy with your layout I like to stack my blocks in columns. Start at the top left corner of your layout. Take the corner block in your hand and place it directly on top of the block directly below it in layout. Do not rotate it or any of the blocks at this point. Continue to stack each column. I also label the top left corner of each stack with a pin and a sheet of paper. Just to minimize confusion.
To piece the top I sew column 1 to column 2, in one continuous strip. At the end of each block I simply sew a few stitches and then I start on the next set of blocks.
I sew the entire column together then press. To press I sew one row to the right, the next to the left. On this particular quilt I press towards the vertical strip. This will make the top lie quilt smoothly.
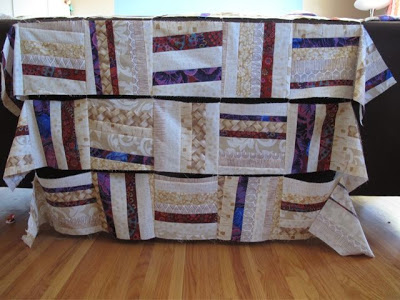
The top goes together quickly by sewing one column after another. I keep the next stack of blocks to the right of my sewing machine and grab a block as I go. Do not cut apart the completed rows. Once you've sewn all the columns together you are left with pieced rows. Your columns, strip pieced, create finished rows. See the picture below if that doesn't make sense.
All that remains is to sew your rows together. This is the one point where I pin. Because I pressed towards the vertical strip on each block and I alternated vertical and horizontal blocks in the layout my seams will lay flat when I match them up. I pin two rows rights sides together and sew. I repeat this until all the rows are together and then press all the seams in one direction.
Et, voila! A finished top.
Here is where I apologize for not having a picture of the completed top in the yellow/grey/navy. It is finished, but I haven't been able to take a picture because a) Hubby can't lift his arm for the picture b) even if I was home during the day to take a picture when it is daylight there is now snow on the ground. Soon, I promise.
Another video! My apologies for the bad lighting and my apparently rosy cheeks. (A total aside - I love when The Monster says 'apparently', it is a totally overused word in our house.) It's week 4 of the Quilt Along. How are you doing?
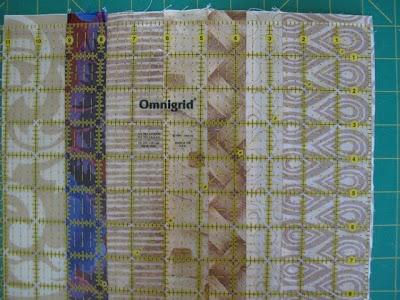
Start with your strips sets, well pressed and 1.5-2 inches wider than the desired finished size of your blocks. You can see below what I mean. I am aiming for a 9.5 inch unfinished block.
Take your ruler and start rotating it. Aim for an angle like below - just a little bit off center. One important thing to keep in mind is that you want to avoid teeny strips on the side. Ensure that you have at least .5 inch strip from the last seam to the edge of the cut. Conveniently, the ruler is your cutting guide so you can watch this.
Cut the right side and the top. If you are left-handed it might be more comfortable to cut the left and top first. Flip around your fabric strip. Generally I do this by rotating my entire cutting mat instead of lifting the fabric. Line up the bottom left corner (bottom right if you're left handed) with the 9.5 inch by 9.5 inch (or your desired size) marking on your ruler. This will create cutting lines on the edge of the ruler for your side and top to finish of the block. Cut.
And there you have a finished block. It can be used in any direction when it comes to laying out your blocks.
Now you need to cut out the rest of the blocks from the single strip set. How many you get will depend on your desired block size. You should get 6 if you want 6.5 inch blocks, 4 at 9.5, and 3 at 12.5. The process is the same as above, but you start above your last cut as opposed to the top of the strip set. You can fiddle with the rotation of the ruler here and there. All your blocks can be cut in the same direction or you can rotate the ruler in the opposite direction. I tend to do two in one direction, and two in the opposite.
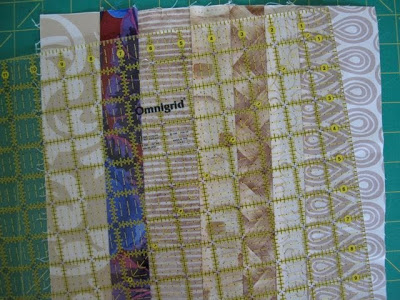
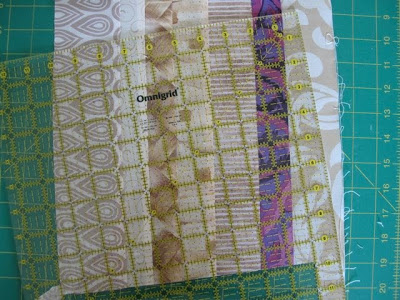
The next two photos are examples of one strip set cut. One for the original Gratitude quilt and one for the current one.
Notice the varying angles. This will give you even more opportunities for dramatic movement in the final top.
Next week will layout our quilt top and get it together. Remember, try not to play with your blocks too much once you've cut them. The seams are not finished and you don't want anything the loosen. See you next week!
Okay, now where we? Oh that's right, we were making a quilt together.
At this point you've hopefully picked your fabric and cut it in to strips. Finally, we can start sewing. And really, how hard can it be to sew strips together? It isn't hard, but there are some things we need to pay attention to as we sew.
Get Ready to Sew
Pick a neutral thread. Usually, I piece with a grey thread if I am using colours or medium and dark toned fabric.
Separate your strips with the background pieces in one pile and your accent pieces in another.
Take one strip each of all your background pieces and set aside.
Turn on your iron and get it hot.
Start Sewing
The first step is to sew all your strips (minus the ones set aside) together in pairs, right sides together. Match up the tops of the strips. Don't worry about the bottoms because all your strips will vary slightly in length.
Grab randomly! Sew together different background strips and sew background strips to accent strips. Do not sew accent strips to accent strips. Do not put an accent strip on the bottom of your pairs as you sew.
I find it easy to just sit and chain piece all these strips, one after the other. That means you sew one set together and without lifting your needle or cutting your threads you start sewing the next set of strips. And so on and so on.
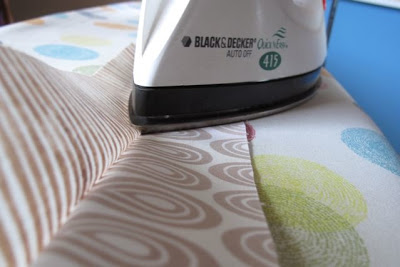
Pressing
I am a firm believer in pressing and pressing well. Really, you can't make this design work well without pressing. But keep in mind that pressing is not ironing the life out of your fabric and stretching it out.
One of my quilt mentors taught me that you should be able to press with one hand. We have a tendency to pull on fabric when we use two hands. The hand we are supposedly using to hold the fabric often pulls on it without us even thinking about it. Try taking your iron and pressing while holding your other hand behind your back. It will feel awkward, but it is a good exercise to see if you have a tendency to pull.
You will also see that this method really only works when you press to one side, not when pressing your seams open. I'm not a fan of pressing seams open, so this works for me.
To press your strip sets I recommend pressing the seam flat, right out of the sewing machine. Then nose your iron in between the fabrics, on the right side of the bottom strip. Slowly nudge the iron forward and to the side, pressing the top fabric to the side and down. When you've reached the end of the strip give it another full press. Set aside and repeat for the other strips.
When you were sewing you matched up the top of your strips, right? So all your pressing should be to the strip on the right. For the first set of strips (the pairs) this will mean you will always press towards the accent. If you have darker accents then this is what you want. If you have a darker background then you will press to the background pieces.
As you progress through sewing sets together keep trying to press to the right, unless you have a dark accent/background combo. Then always press to the dark. This conscientious pressing will ensure that your accent pieces will really pop.
Continue Sewing
Now that you have your first pairs of strip sets, you need to sew the pairs together. Again, grab randomly. And again, match up the tops of the sets. Depending on how you sewed your first sets together some typical examples of the order of fabrics when you sew pairs together might be:
background - background - background - accent
background - accent - background - background
background - accent - background - accent
Press.
Depending on the final size you want your block, at this point you may be adding a single strip or another strip set as you progress. The final size of your strip set should be at least an inch and a half to two inches larger than the desired block size. Keeping sewing strip sets together until you get the desired width.
The one thing to keep in mind when it comes to sewing your strip sets together is that you do not want an accent piece on the ends. In other words, do not have your strip set start or finish with an accent piece.
This is the part of the process that might seem pretty boring at first, but as your strips sets come together you will get the first true glimpse of how your fabrics will look together. Note whether fabrics are standing out in a good or bad way. Your accents should really pop from the backgrounds.
And remember to refer to week 1 instructions to know how many strips sets you will need if you have a specific quilt size in mind.
We'll see you next week, to create our blocks and create the layout that makes the design pop!
Thank-you so much for all your kind words over the past week. With everything that was going on it was wonderful to get your support. I am slowly coming out of the fog that was mere survival. And, in case you were wondering, the girls are now healthy and Hubby has started to feel some relief in his pain. He's got a ways to go in healing, but he is no longer glued to the couch. Hell, he even turned off the TV the other day he was finally so bored.
I did get some good quilting in on the weekend. Some friends offered to take the girls for a playdate so between that and naptime I had nearly a full day of quilting. It did wonders for my to-do list and my emotional health. First on the list was the samples for my class. It starts on Friday and there are one or two spots left if you are in town. Once that was done I managed to get ahead on the Quilt Along project. I will be coming back to that next week. I am quite excited by how it is coming together!
One thing I did want to announce at this point is that there will be a give-away for those participating in the quilt along. At the end of the posts I will ask you to share with me the progress you've made - whether it's just picking fabric or a completed quilt. I will draw a name of participants to receive some inspiring treats. And no, there will be no hints as to the prize.
This week is all about cutting your fabrics. It seems straight forward, it's just cutting fabric, right? This design is not dependent on evenly cut strips, but they do need to be cut straight. Check out my handy videos for my tips and technique on doing this. As always, email or comment if you have any questions.
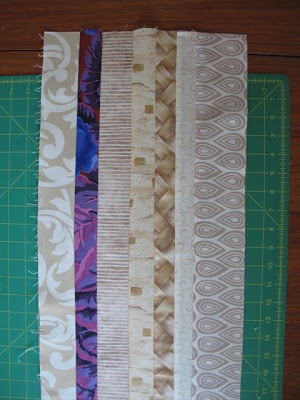
Cut all of your fabric in lengthwise strips (from selvage to selvage). Ensure that all your ends are straight. There is no prescribed width to the strips, they are all random widths. Mine ranged from about 1.5 inches to 3 inches, but I didn't measure at all. From each 1/2 meter (yard) of fabric I would aim for 8-10 strips.
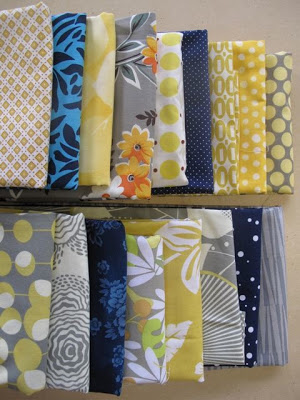
Once your fabric is cut you will get a better idea of how the fabrics work together. If any are jumping out at you as not playing nice with the others now is the time to replace them. For example, I'm not so sure about the one for mine that is second from the left in the top photo. It might be too light. But I haven't decided yet. It isn't a light, light one. In the photo below you can see the one third from the right that is lighter. I doubted that one and kept it in to great effect.
Next week will be sewing the strips and pressing. Yes, pressing. In the meantime, put a fresh blade in your rotary cutter and cut away.
If you are quilting along with me please let me know. I would love to be able to share your work with everyone else. I'm going to add a blogroll of participants on the site. If you don't have a blog then you can also link to a Flickr photostream. And speaking of Flickr, is there an interest setting up a group for the Quilt Along?
We are fighting the flu in this house. That means I will get lots of quilting done or none at all!
This is it, week 1 of the Gratitude Quilt Along. Thanks for joining me, it's going to be a lot of fun. Let's jump right in.
This quilt is made, quite simply, by cutting fabric into strips, sewing the strips into sets, cutting out blocks, and sewing those block together. It's pretty straightforward. The bold design is realized through good fabric selection and cutting the blocks on random angles. This week is all about fabric selection.
How do I pick my fabric?
Your fabric selection on this quilt will really make the design pop, so take some time this week to play with your fabrics. The final design of the quilt is based on a high contrast between your accent strips and your background strips. This contrast can come purely from colour, but value matters more.
Value - this is the distinction between light, medium, and dark in a colour. Colour - this is the visual perception of where you see your fabric compared to the spectrum of red, yellow, and blue. (But did you really need a definition?)
This quilt design works best with a light or medium background and a dark accent. I would also recommend that your dark accent be a different colour, but with good fabric choices you could do this in a single colour way, as long as your values are high contrast. My recommendation is that your background fabrics be in only one or two colours and that they relate to each other well by having a few fabrics with both colours in them.
Alternatively, I think it might work if you used a dark background with a light accent. That could make a really interesting quilt.
If you are having a hard time picking your fabrics and determining value, pull out a digital camera, if you have one, and take a picture of your fabrics together on the black and white setting. Even viewing it on the camera's tiny monitor should allow you to see differences in value, without colour being a part of the equation.
One last note about fabric selection, go for a variety of textures in your fabric. I strongly encourage you to make your fabrics a selection of large, medium, and small prints. In other words, don't pick a whole bunch of small dots for your background pieces, try some dots, weaves, florals, hand dyes, stripes, or even large scale prints in a single colour. Having texture in your quilt will provide a lot of movement without it being too busy.
Let's go through my fabric selections to help you see how I work through this process.
This was my initial fabric pull. When I start a project I simply grab everything that looks interesting. About half of these were in my stash and then I spent some cash in the LQS to augment the selection. The inspiration for the colour scheme actually came on the street one day. Out for a lunchtime walk I spotted a girl wearing a grey pinstriped suit with with a navy polka dot blouse and yellow shoes. That was months ago and the colour scheme stuck with me.
I love all these fabrics together, but for this design I'm pretty sure the lights won't work.
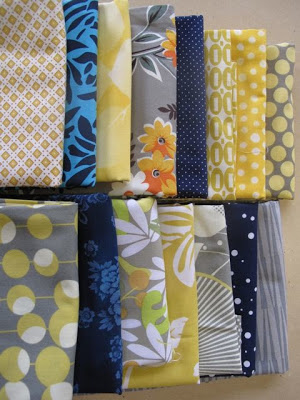
In this grouping I pulled out all the lights. I also pulled out the Amy Butler with the pink dots. Hmm, but then that Kaffe looked too peachy instead of golden, so out it came.
But I kept returning to that Denyse Schmidt Katie Jumpr Rope Yellow Dot and the Amy Butler Midwest Modern Floating Buds. I love those fabrics. I so wanted them to work. This will happen sometimes, but my choices were lose those fabrics or change all my background fabrics to work with these lighter values. I went with losing the lighter ones (and hanging on to them for the back of the quilt).
This is my final selection. I'm prepared to be flexible and change some these after I cut. For now, though, I really like the way this is looking.
How much fabric do you need?
That really depends on how large you want to make your quilt. I've put together a small table to help you determine fabric requirements. These are only estimates based on what I used to make Gratitude. You may want to have some extra fabric on hand if you are really stuck on a certain sized quilt.
SIZEBLOCK SIZE # of BLOCKS (inches unfinished)
Crib (42 by 48) 6.5 42 (45 by 54) 9.5 30
Lap (63 by 63) 9.5 49 (60 by 60) 12.5 25 (72 by 72) 12.5 36
Double (81 by 90) 9.5 90 (84 by 96) 12.5 56
To make Gratitude I used 8 different fabrics in 1/2 metre pieces This gave me a finished quilt of 63 inches square. I think it is a good idea to pick at least 6-8 different fabrics for teh design to pop. If you want a bigger quilt than you can either use more of each fabric or use more fabrics.
I realize that I haven't given you specific fabric yardage. This is because this is about process, not pattern. I want you to play with your fabrics - new or from stash - to come up witha combination that works for you. Just take some fabric and start cutting and sewing. Because this quilt is about process you may start with one size on mind and change it partway through to make a larger or smaller block size, or a larger quilt. If you are looking to other sized quilts let me know and we'll work our fabric requirements together.
I prefer to use yardage as opposed to fat quarters for this. You will be sewing your fabrics into full length strips and then cutting them into blocks, so having a selvage to selvage strip will make your life easier. It is possible to use fat quarters for this too, but it will require some piecing into longer strips, or sewing more strip sets.
Did that all make sense? I hope so. But if it didn't, email me or post a comment and I will answer it as best I can. If you are going to post your progress on your blog, please let me know so I can create a blog roll. I've had some people express interest in following along with all the participants.
I'm looking forward to seeing everyone's efforts and creations! Thanks for joining me.
Quilt Festival is over and I'm sad I didn't win any prizes. But I did get around to a number of sites and saw some fantastic quilts. I also found some wonderful new-to-me blogs. Thank-you to all my visitors and welcome to my new followers and subscribers.
Now, however, is it time to move on to the Gratitude Quilt Along for that quilt design. This Wednesday I will be launching the Quilt Along. This will be a 6 week event, from fabric choice to finishing. Of course there is no obligation to finish it in that time frame, but I'll be sewing right along with you and working my hardest to finish in those six weeks as well. If all goes well I am going to incorporate some video along the way, in addition to detailed pictures and instructions.
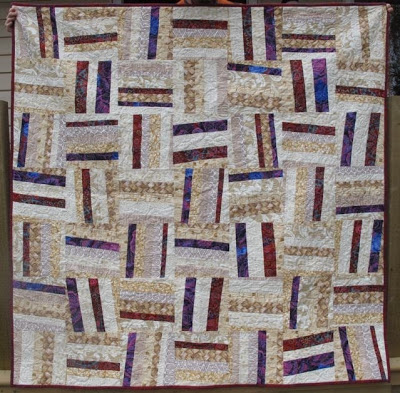
This quilt is a modern design, but it is based on a very traditional quilt - the Rail Fence. Unlike a traditional Rail Fence this quilt uses more fabrics, the strips are uneven sizes, and the blocks are cut on an angle. It is a very easy quilt to put together but, as you can see, gives you a very bold design. Fabric choice is really important so our first on-line class will focus on the fabric selection.
This is the first time I've shared a finished quilt with you that you didn't see anything of the process. I hope you aren't angry with me. I know, more than a little contradictory with the Workshop in Progress ideals. But I was testing the idea for a quilt along and wanted to be able to unveil it during the Blogger's Quilt Festival.
This is Gratitude (63 inches square).
Gratitude is for our neighbours. The neighbours who have saved our damn black dog during more than one thunderstorm - indeed, this is how we met them. The neighbours who always stop to say hi when they are out for an evening stroll. The neighbours who drew the plans for our basement and then refused payment for their work. And so we are giving them Gratitude.
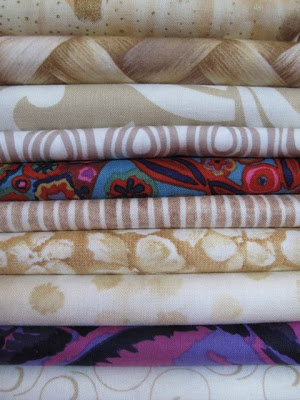
Said neighbours, B and M, live in a renovated house in our 50 year old neighbourhood. They've added on and opened up and it really is an homage to late 70s design. Parts of it may be dated, but I love their house. So the colours in this quilt are inspired by their house. They have rich red carpet, beige walls, and terra cotta and brick. It is a warm house that inspires creativity and friendship. They are lovely neighbours after all, and an architect and designer to boot.
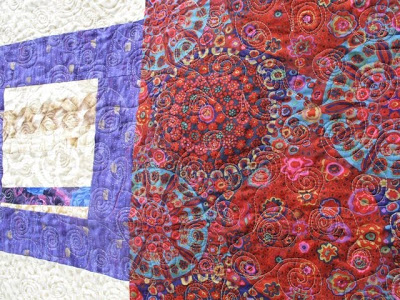
Victoria once asked her readers if there was any fabric that you wanted to buy on the bolt. I tend to get bored of a fabric, no matter how much I love it, after I've used it a few times. This red Kaffe, however, could change that. I did still see some at a LQS the other day and was tempted the buy the remaining yardage. I used it on the front as the red (along with another Kaffe in purple) and showcased it on the back.
You can also see the quilting on this photo. I did an all over swirl design, done free-motion. It was actually doodled from the scrollwork when I was in Banff. More hotel inspiration. I used my favourite thread, Presencia, in a cream colour. I actually wanted the quilting to be relatively subtle here, so as not to take away from the bold design of the top. I tried, but I couldn't just stipple it. I know there isn't anything wrong with stippling, but I wanted more. And more I got. As usual, it is heavily quilted. I swear, I don't mean to, but it seems I am unable to lightly quilt anything!
The binding was a lovely purple and red combo that matched so, so perfectly. I debated using a light brown so the red and purple on the top design popped a bit more, but when I found this fabric I knew it was meant to be. Funny, the LQS had it sitting right next to the Kaffe fabrics!
And finally, over a year after we received the plans from our neighbours and started the work to get the basement finished, here we are. Piles of concrete and wood. We've got the permits (renewed once already), picked the plumbing fixtures, and daydreamed about the master bath and quilt studio. But still it sits. (I took this photo today.) We're like the cobbler's kids with no shoes. Hubby works hard, the last thing he wants to do at the end of the day is put on the tools again. Sigh. At least I know that however overdue, Gratitude will be well-received.
Thanks for visiting, old and new friends. I am indeed going to launch this design as a quilt along. It is very easy, trust me. Stay tuned, I will launch the quilt along with a discussion about sizing and fabric choices on October 21.