teaching

The Whys

Since the creative production here isn't all that high, I've been thinking a lot about creative production. For me, that means writing and quilting. Over the course of a few conversations with a good friend we've asked each other about style, why we quilt, and what we think of when we talk about quilting.

Today I am going to address the last question.  It's kind of a word association game. 
When you think of quilting, what words come to mind?

For me, quilting means:

Creativity
Uniqueness
Comfort
Colour
How
Those were my first instinct words, what are yours?

Under My Belt

My first teaching experience is over.  My first experience teaching quilting, that is. It is now safe to say that I have a new dream career. Out of the window is my secret fantasy of being a DJ. Hmm, okay, that will still remain a not-so-secret fantasy and teaching will become my aspirational career.

For the past two Fridays I taught an Improv Piecing class to 4 lovely and interesting women. (Full disclosure: one of those women was my sister-in-law.) They were all experienced quilters, but they ran the gamut from exclusive pattern users to art quilter.  Most importantly, they were there eager to learn some new techniques.  And they all left happy, or so they told me.

I now know that one of the best parts about teaching is seeing what your students can do with the information/ inspiration you are able to share.  The 4 women showed up with 4 very different sets of fabrics.  One came with a delicious selection of her own hand-dyed fabric. There was a grouping of earth tone batiks that is making me want to rethink earth tones. My sister-in-law showed up with a good chunk of her staff, then augmented it heavily for the second class because she was in a purple kind of mood. 

The final student came with a grouping of fabric that all showcased a chicken theme.  I'll admit it, it wasn't my cup of tea, but I love the way her blocks turned out!  It goes to show that improv isn't just for the modern fabrics. She is planning on making a table runner with her blocks.

During the class we covered wonky log cabins, chopsticks, free piecing, maverick/liberated stars, and what I call building blocks. The above blocks with all the purple are, of course, my sister-in-law's. I fear that my brother may be cursing my name because we figure she really started 4 different projects!

The blocks at the top of the post and this wonky churn dash are all from the same student. Aren't they fantastic?  Sadly my camera and the lighting did not do justice to her gorgeous hand-dyes. She did a lot of work at home between classes because she was so inspired. So we started talking about what else you could improvise. 

I'm eager to teach again, having made notes and refining the approach a little bit. Unfortunately, this LQS isn't interested in hosting the class again.  That's okay, we thankfully have a lot of stores around!

Woohoo! An Announcment

If you know me at all by now it should be clear that I am not enamoured of my desk job. I have grand fantasies that may or may not come true about making a career out of being a creative soul. But in order for me to have even a remote chance of achieving that dream I have to start somewhere. Today I am pleased to announce that I am taking the first step in that direction.

I got a teaching job!  Let's be clear, a job teaching quilting.  Okay to be even more precise, a job teaching Improvisational Piecing.

A month ago I took an afternoon off work with the nanny at home with the girls.  I pressed my sampler, prepared some pitches, and hit the stores.  And the first one bit!  I actually pitched three classes and they picked up Improvisational Piecing.  How cool is that?


So, if you are in the Calgary area in late November, please sign up and I'll do my best to educate and entertain you. To register you can do so at Along Came Quilting.

Here are the details:
November 13 and 20
1:30-4:30 pm
Along Came Quilting
Unit 12, 1220-59 Avenue SE
Calgary, Alberta

See you in November!

Improv Sampler - Completed Top

So, would you hire me to teach you improvisational quilting?

My improv sampler is done - apologies for the crappy photo, Hubby was an unwilling partner as we photographed quilts yesterday.  And the quilt ended up much larger than my brain was thinking it was going to be.  Right now it is 76 inches square.  I think I should quilt it before I start pitching, what do you think?

This was the first time I used a solid white for the sashing.   I'm not sure why I resisted solids.  I do like the texture you get from a nice white-on-white, but the solid makes the blocks pop that much more.  Even better is that it is cheaper!

The colour scheme for this quilt came from one fabric alone.  It is a sweet print with birds and trees on it.  It actually was a scrap from a crib sheet that my mother-in-law made for my nephew, born almost two months ago.  I pulled the rest of the fabrics, other than the white, from my stash.  Each block contains that bird fabric as a way to tie it all together.  

Now, if only we could pin down a nanny and I could get out to stores and start pitching.  In the meantime, I'm plugging away on a baby quilt for the latest addition to the family, my nephew that was born today.  More on that this weekend.

Improv Sampler - Building Blocks


If I wasn't so anxious to get to quilting while both the little ones are done I would figure out how to get all four of these photos as one image.  Oh, and I could have cropped them a little. No big whoop.  The truth is that I forgot to take photos of these blocks before I put the quilt top together. They are now in with the others, awaiting the border.  

And yes, I am adding borders to this quilt.  It's not normal for me and it isn't normal for most improvisational style quilts.  But I am using this quilt as a teaching sample.  Going in to traditional shops I thought I should try to pay homage to more traditional quilt construction. Perhaps that will make it less scary for people?  Change is often feared, and improv style construction is new and different.  But I'm hoping the sunny colours will draw people in and curiosity, at least, will get the better of most!

These blocks are true improvisations.  I started with the scraps from the other blocks and just started sewing pieces together.  As I got going I could see some different opportunities, so you see 4 very different blocks.  All of them were made at the same time, with the same scraps.   And such different results.  I love them all.  I'm really tempted to do an all strippy quilt now. Nothing but rows and rows of scrappy stripes.  Hmm, this whole process is giving me so many more ideas.  

Either I have to give up sleep or I need the girls to sleep a heck of a lot more!  That being said, we are having a gorgeous day and we've already been to the park.  A soccer game in front of the house is on the agenda for later.  As long as I keep them away from my nose.  Oh, did I mention I broke my nose last week?  Fun times.  Yeah, I'm off to sew and ignore everything else!

Improv Sampler - Wonky Log Cabins

It's been said before here - I'm not a huge fan of wonky log cabins.  But they are an excellent first step into improvisational quilting.  It takes one of the oldest patterns/techniques and turns it on its head.  No templates and no precision cutting.

Most of the time when you see a wonky log cabin they are set as individual blocks within a quilt.  This makes for very bold, graphic designs.  In my searching though, I would be curious to see what wonky log cabin blocks look like set in traditional log cabin settings.  Hmm... I might yet tackle the log cabin again.

I won't pass on a tutorial, but I will send you to this one.  I couldn't have said it better.  The important thing to remember with wonky log cabins, really in any improvisational technique, is to still remember basic sewing principles.  Use a consistent seam allowance (preferably 1/4 inch).  Trim your excess fabrics so you aren't left with a mess of extra fabric on the back of the block.  And square up your block at the end. 

One final tip with these wonky log cabins: Try to make your final logs at least 3/4 inch wide (finished).  Any narrower than that and you will have these teeny strips that get lost when you piece the blocks into a quilt.

We can thank Denyse Schmidt for providing the true inspiration for all of us on these wonky log cabins.  But they are some amazing examples of these modern quilts all over the place. Some of my favourites can be found here, here, and here.

Improv Sampler - Free-Piecing

Welcome to free piecing.  This technique is definitely about the process.  And sometimes you win and sometimes you lose.  In other words, don't look too closely at that 'sun' block in the photo.

It does help to plan when you are doing free piecing, or at least have an idea of the general shape you want to finish with - a house, a flower, a star.  Quite often I actually make a sketch if my brain is baby addled and I can't figure out how the pieces should go together.  (I should share my sketches one day - if a quilt block could be a stick figure then I am an expert at drawing that!)

Free piecing in this context is about the process of cutting and piecing.  There are no templates and often no rulers when cutting.  Sewing is just one piece to the next.  You often start from the inside of the block and work out.  You have the be creative and improvise along the way.  For example, in the house block above I didn't cut a piece long enough to encompass the angle of the roof.  That means the roof doesn't overhang the house that much and the roof is smaller than intended.  Oh well.  I compensated by adding another strip of the background fabric to make the block big enough.  Problem solved.

This technique also works well in combination with freely cut applique pieces, like this artist.

Improv Sampler - Chopsticks

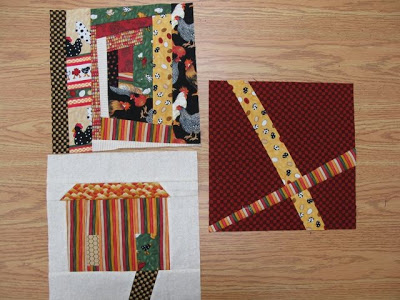
There really is more to improvisational quilting that wonky log cabins.  Of course, those are good too.  But this technique, which I call chopsticks, is the first step in some fun designs.

Start with a square that is roughly the size you want your finished block to be.  Or just start with a square in any size and see what happens.  Cut some strips of other fabrics, slightly longer than your square.

Slice your square on any angle - through the middle, close to the side, or even lop off a corner. Don't throw away either piece.  It is best to keep the pieces set-up as if you just cut them so you can remember how it all goes back together.

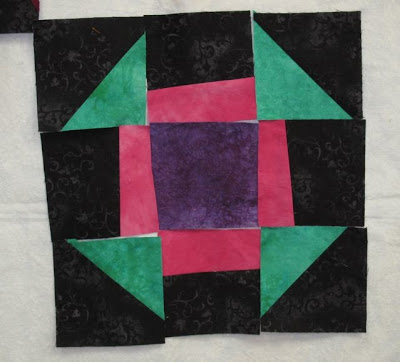
Pick up the piece on the left side and sew one of your strips to it, right sides together.  Open and press.

Pick up the remaining piece of your square and sew it to the edge of the strip, as if you were sewing the original square back together (but with the strip in between).  Open and press.

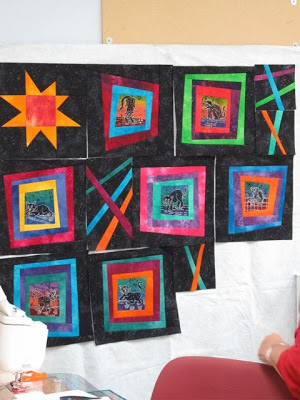
You can sew one strip or many.  The process is the same every time.  Start with the square, slice, re-sew, and press.  Your strips can be parallel, on an skewed angle, or even perpendicular, like this quilt.

Important tips for this technique:
- Don't start with a square that is exactly the finished size you want because you will lose bits as you re-sew.  Start larger and trim down.
- Try not to have strips less than 3/4 inch on the edges.
- Strongly contrasting fabrics work best, but you could get a subtle design with fabrics close in value or colour.

Bright Days Ahead

Sorry about that.  I didn't mean to take such a break.  I've been plugging away on a few projects, but none have really been going anywhere.  My doll quilts are almost all done and ready for shipping.  Project Improv is slowly moving forward.  And all has been put aside to get that baby quilt done. Life has taken some unexpected twists and turns lately.  Some great (a pipsqueak of a nephew) and some not so great (hospital visits and such).

The good thing about such times is the opportunity for reflection.  Actually, the motivation to force yourself to regroup.  That's the same thing, right?  Sure, life is crazy and will only get more so in the coming months.  It's a perfect time to launch a new career!

I've decided to make a good and honest woman out of myself.  With quilting, that is.  I'm putting together some class notes and a few pitches and I'm going to get out there and try and convince someone to hire me to teach.  I've been thinking about it for over a year, but haven't had the nerve or the commitment to do it.  But with the return to work looming and the prospect of a few more years at a job that no longer excites me I decided I had to do something. I still have to go back to the desk job, but with Hubby's support I'm taking the plunge, and the time sacrifice, to launch this new path.  To be honest, I'm quite giddy about it.  If only the girls would coordinate their nap schedules a bit better so I can get more work done!

Any tips from you pros? Any notes from the dedicated class goer?