improvisation

Water, Water Everywhere

Did you know that today is United Nations World Oceans Day? While it is against the laws of nature to make a quilt of water and fish - and would be kind of gross even if you could - I am starting a quilt inspired by water.

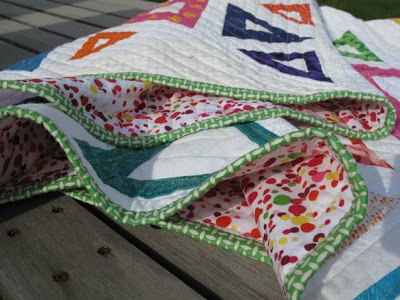
This is the first pull for that quilt. To be honest, I got the idea when I did the pull for my Key Lime Pie quilt. I just loved the looks of the greens with blues that I used for the limes. Still on the high from the memories of Baja these fabrics jumped out of the stash and begged to be sewn together.

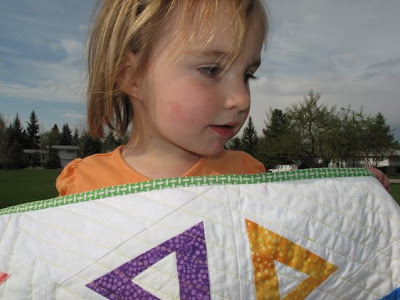
As I said, this was the first pull. I always have that initial rush of fabric delight and pull everything out that my conceivably work with the colourful notion in my head. When designing heads prevail I weed out about a third. Then, as I cut, more gets culled from the pile and maybe some other ones get added in. It would be different if I started out with a specific pattern in mind. Because for me quilting if often about process rather than final design, the fabric choices are dynamic and continually evolving.

I'm curious to see where this one takes me.

Off to the Races

If you're here for the Sew Mama Sew giveaway, welcome. The giveaway is in the previous post. In the meantime, enjoy my latest quilt: Wednesday Night Races.

This is my Project Improv quilt. I pieced it entirely from scraps and stash, and sadly barely made a dent in my stash. The blocks are all triangles, pieced like wonky log cabins. I've said it before, it was a challenge to piece the top together and I couldn't avoid a few inset seams, but it worked out well. The whole thing squared up nicely too. (I know it doesn't seem like it in the photo, but it was a breezy day.)

The name came to me after I shared the photo of the top with the Project Improv Flickr group. A couple of people mentioned that it reminded them of flags at a marina. Back in my university days I would join some friends for the Wednesday Night Races at one of the sailing clubs in Halifax. It was an exhilerating, raucous, and slightly scary event for this Prairie gal. My friend did his best to scare the crap out of me, but I always came back. That wasn't entirely the experience with this quilt, but I liked the memory and decided to pay homage with the naming of the quilt.

The entire quilt is quilted with straight lines. I started following one triangle and went around and around it. This I repeated across the quilt with triangles of different sizes and filled in spaces with lines. Very bold. For thread I used a Mettler silk finish 100% cotton, my latest favourite for quilting, in three shades of yellow. White seemed too stark on the coloured parts, but I didn't want something too dark on the white parts. The yellow was perfect.

Sure, I could have used a multi-pieced binding, but because the quilt isn't that large (slightly larger than crib, but I can't remember the exact measurements right now) I thought a single binding would provide a bit of rest to the eye. I picked up a few pieces of Katie Jump Rope and Flea Market Fancy in a sales rack a few weeks ago and the green was perfect.

We had to take pictures in the park across the street from our house because we currently have no front steps. The Monster was quite keen on holding the quilt herself for me to take a picture. How could I say no?
Wednesday Night Races, along with this quilt, this one, and one more I have to share with you are headed to a show this weekend. My first quilt show! No, not just my quilts, let's not get too excited. But it is the first time I've shared my quilts in public, other than through the blog. If you are in the Calgary area please stop my Heritage Park Festival of Quilts for the show. They hang hundreds of quilts throughout the historic park - on buildings, fences, clotheslines, and in some of the old houses. It is quite the sight, really. I'll post some pics next week.

Your Parents Are Cool


Because I can't get motivated to quilt this quilt, I thought I would share some overdue pictures of the surprise baby quilt I posted about months ago.  My nephew was born two months ago, but we were only able to share the quilt with the little guy last weekend.  And of course I forgot to charge the camera batteries to take pictures.  These ones come courtesy of my sister-in-law.  I'll post some more detailed shots next week.

Can you see where I got the inspiration?  My brother- and sister-law are very funky decorators.  Once I saw the pictures of this graphic I knew exactly what to do for the quilt.  Out went the circles and in came this improvisational piece.

Included in the fabrics are oranges I won from Sew Mama Sew, the sheets and bed skirt my mother-in-law made for the nursery, and a few from quilts both The Monster and Smilosaurus have.  A most excellent use of stash.

I struggled with the back for a while, I wasn't quite sure how to use the fabric I had.  Ultimately I went for another recreation of the graphic.  The label is simple and I left it unadorned so it didn't distract from the design.  Can you see it there on the right hand side?

There will be more pictures, I promise.  You should see the quilting pattern on this.  Very funky and it was so easy!

In the meantime, I'm just opening a beer and watching 24.  Hubby is out of town and I have no energy to quilt.  Maybe tomorrow.  Oh, and don't tell Hubby, but I also bought some fabric on-line.  Bad Cheryl.

Project Improv Quilt

Man, this was a beast to finish!  I was stuck for a while and didn't want to touch this.  My brain couldn't figure out how to do those white triangles on the edges and how to get the top together without inset seams.  Finally, after quite a few naps I got the damn thing done.  And there are still inset seams.

This is my Project Improv quilt.  I wanted to try something new.  Honestly, this isn't that new. The blocks were made exactly as you would a wonky log cabin, only with three sides.  I used a template to trim each block to size. The layout is no different than a very traditional quilt called Thousand Pyramids.  Sometimes you don't need to throw out the old when you want something new.  

AmandaJean inspired this multi-coloured look with her Snippets quilt. The entire top was made from scraps/stash.  That being said, I realized that I have no white batting so I still need to go shopping!

Improv Sampler - Completed Top

So, would you hire me to teach you improvisational quilting?

My improv sampler is done - apologies for the crappy photo, Hubby was an unwilling partner as we photographed quilts yesterday.  And the quilt ended up much larger than my brain was thinking it was going to be.  Right now it is 76 inches square.  I think I should quilt it before I start pitching, what do you think?

This was the first time I used a solid white for the sashing.   I'm not sure why I resisted solids.  I do like the texture you get from a nice white-on-white, but the solid makes the blocks pop that much more.  Even better is that it is cheaper!

The colour scheme for this quilt came from one fabric alone.  It is a sweet print with birds and trees on it.  It actually was a scrap from a crib sheet that my mother-in-law made for my nephew, born almost two months ago.  I pulled the rest of the fabrics, other than the white, from my stash.  Each block contains that bird fabric as a way to tie it all together.  

Now, if only we could pin down a nanny and I could get out to stores and start pitching.  In the meantime, I'm plugging away on a baby quilt for the latest addition to the family, my nephew that was born today.  More on that this weekend.

Improv Sampler - Building Blocks


If I wasn't so anxious to get to quilting while both the little ones are done I would figure out how to get all four of these photos as one image.  Oh, and I could have cropped them a little. No big whoop.  The truth is that I forgot to take photos of these blocks before I put the quilt top together. They are now in with the others, awaiting the border.  

And yes, I am adding borders to this quilt.  It's not normal for me and it isn't normal for most improvisational style quilts.  But I am using this quilt as a teaching sample.  Going in to traditional shops I thought I should try to pay homage to more traditional quilt construction. Perhaps that will make it less scary for people?  Change is often feared, and improv style construction is new and different.  But I'm hoping the sunny colours will draw people in and curiosity, at least, will get the better of most!

These blocks are true improvisations.  I started with the scraps from the other blocks and just started sewing pieces together.  As I got going I could see some different opportunities, so you see 4 very different blocks.  All of them were made at the same time, with the same scraps.   And such different results.  I love them all.  I'm really tempted to do an all strippy quilt now. Nothing but rows and rows of scrappy stripes.  Hmm, this whole process is giving me so many more ideas.  

Either I have to give up sleep or I need the girls to sleep a heck of a lot more!  That being said, we are having a gorgeous day and we've already been to the park.  A soccer game in front of the house is on the agenda for later.  As long as I keep them away from my nose.  Oh, did I mention I broke my nose last week?  Fun times.  Yeah, I'm off to sew and ignore everything else!

Improv Sampler - Wonky Log Cabins

It's been said before here - I'm not a huge fan of wonky log cabins.  But they are an excellent first step into improvisational quilting.  It takes one of the oldest patterns/techniques and turns it on its head.  No templates and no precision cutting.

Most of the time when you see a wonky log cabin they are set as individual blocks within a quilt.  This makes for very bold, graphic designs.  In my searching though, I would be curious to see what wonky log cabin blocks look like set in traditional log cabin settings.  Hmm... I might yet tackle the log cabin again.

I won't pass on a tutorial, but I will send you to this one.  I couldn't have said it better.  The important thing to remember with wonky log cabins, really in any improvisational technique, is to still remember basic sewing principles.  Use a consistent seam allowance (preferably 1/4 inch).  Trim your excess fabrics so you aren't left with a mess of extra fabric on the back of the block.  And square up your block at the end. 

One final tip with these wonky log cabins: Try to make your final logs at least 3/4 inch wide (finished).  Any narrower than that and you will have these teeny strips that get lost when you piece the blocks into a quilt.

We can thank Denyse Schmidt for providing the true inspiration for all of us on these wonky log cabins.  But they are some amazing examples of these modern quilts all over the place. Some of my favourites can be found here, here, and here.

Improv Sampler - Free-Piecing

Welcome to free piecing.  This technique is definitely about the process.  And sometimes you win and sometimes you lose.  In other words, don't look too closely at that 'sun' block in the photo.

It does help to plan when you are doing free piecing, or at least have an idea of the general shape you want to finish with - a house, a flower, a star.  Quite often I actually make a sketch if my brain is baby addled and I can't figure out how the pieces should go together.  (I should share my sketches one day - if a quilt block could be a stick figure then I am an expert at drawing that!)

Free piecing in this context is about the process of cutting and piecing.  There are no templates and often no rulers when cutting.  Sewing is just one piece to the next.  You often start from the inside of the block and work out.  You have the be creative and improvise along the way.  For example, in the house block above I didn't cut a piece long enough to encompass the angle of the roof.  That means the roof doesn't overhang the house that much and the roof is smaller than intended.  Oh well.  I compensated by adding another strip of the background fabric to make the block big enough.  Problem solved.

This technique also works well in combination with freely cut applique pieces, like this artist.

Improv Sampler - Chopsticks

There really is more to improvisational quilting that wonky log cabins.  Of course, those are good too.  But this technique, which I call chopsticks, is the first step in some fun designs.

Start with a square that is roughly the size you want your finished block to be.  Or just start with a square in any size and see what happens.  Cut some strips of other fabrics, slightly longer than your square.

Slice your square on any angle - through the middle, close to the side, or even lop off a corner. Don't throw away either piece.  It is best to keep the pieces set-up as if you just cut them so you can remember how it all goes back together.

Pick up the piece on the left side and sew one of your strips to it, right sides together.  Open and press.

Pick up the remaining piece of your square and sew it to the edge of the strip, as if you were sewing the original square back together (but with the strip in between).  Open and press.

You can sew one strip or many.  The process is the same every time.  Start with the square, slice, re-sew, and press.  Your strips can be parallel, on an skewed angle, or even perpendicular, like this quilt.

Important tips for this technique:
- Don't start with a square that is exactly the finished size you want because you will lose bits as you re-sew.  Start larger and trim down.
- Try not to have strips less than 3/4 inch on the edges.
- Strongly contrasting fabrics work best, but you could get a subtle design with fabrics close in value or colour.

This basket has been and will become some more improvised blocks.  In my bid for teaching supremacy - okay, just one teaching job to start - I've been putting together class notes and a class sample.  After all, you can't pitch a class without showing what you'll do.

Generally I don't like samplers, but I did want to be able to demonstrate a few different improvisational  techniques.  By no means are they the only ways to tackle improv quilting, but they are a good way to break free from patterns.  These techniques are also about the process, not necessarily a final design result.  There is design and then there is improv.  One step at a time for breaking the pattern addiction.

Over the next week I'll share with you the finished blocks and ultimately the finished quilt top. That is, if I can find the time to finish all of it.  I've got 12 of the 16 blocks finished, but the last few days haven't been very productive with a sick Hubby and our anniversary.  And now the baby is sick so I'm not sure what naptime will bring.  We do what we can.