Blizzards, Banana Cake and Builder Men


December 4th and we're finally getting a good snowfall.  Indeed, it is a full on blizzard of white out there.  The weather folks might call it a winter storm, but we all know that the wicked wind, sandy snow, and a cold that makes you never, ever want to leave your house means that it is a blizzard.  If you're me that means you bake.

Today's recipe comes to you courtesy of The Monster.  When I suggested we bake she informed me that we must bake a birthday cake.  Today, however, is not the birthday of anyone on this house.  That perfect three year old mind remembered that it was her cousin's birthday a few days ago and therefore we must make him a birthday cake.

Now, I have no idea what kind of cake my nephew would have liked, but The Monster decided he wanted a peanut butter cake.  I talked her into a banana cake with peanut butter icing. So we dug through the cookbook shelf and found a recipe for banana cake in the Favorite Family Recipes of Holy Cross Parish cookbook. It's one of those cookbooks where everyone submits the pride and joy of their kitchens. That means it is really hit or miss depending on the recipe instructions. We got ourselves a hit here!

The girls got aproned up, we turned on the Toopy and Binoo Christmas album (oh, thank-you Grandma), and we set ourselves up for a messy old time.  We mashed bananas, creamed butter and sugar, sifted flour, and licked, licked, licked everything. You know, I'm convinced that if I put liverwurst in the Kitchen Aid they would devour it.

This is your basic cake recipe.  There isn't anything fancy about it except for the fact that it calls for the baking soda to be added to the wet ingredients. It bakes in a classic 9 by 13 pan.  In reality it is a simple weeknight dessert.  It isn't overly sweet and it is wonderfully moist, with a good crumb as they say.

While the girls napped I set to making the icing. I'll be honest, it was a bit of a challenge because it turns out I need a few groceries. Did I mention there was a blizzard going on? So I hoped for the best with the bit of peanut butter and icing sugar I had.  I had my fears, but damn, it is good icing! Not at all sweet and as creamy as it can be when you only have natural peanut butter in the house. And just the right amount for a sheet cake.

This is the kind of cake you want after trudging home from a day at school (or work).  It is a cake that makes you feel loved.  It is a cake that mom can feel pretty good serving and also enjoy with a cup of tea.  Ahem, let me refresh my cup.

And tonight it will also be our dessert as we treat our builder men, as The Monster calls them, who've been helping Hubby out with digging, pouring concrete, and framing in the basement. Sunday dinner on Friday night.  Mayhem, new friends, and cold weather comfort at the table.

Banana Cake with Peanut Butter Icing
Makes 1 9x13 pan

Banana Cake
1/2 cup butter, softened
1 cup sugar
2 eggs
1 tsp vanilla
2 cups flour
1 tsp baking powder
1 tsp salt
2 large, ripe bananas
3/4 cup milk
1 tsp baking soda

1. Preheat oven to 350 degrees F and butter and flour a 9x13 pan. 
2. Cream together butter and sugar until fluffy.
3. Add eggs, one at a time, and vanilla, mixing well after each addition.  Scrape down sides.
4. In a separate bowl sift together flour, baking powder, and salt.  Set aside.
5. Mash bananas well.  Combine with milk and baking soda.
6. Add 1/3 of the banana mixture of the butter/sugar/eggs.  Add 1/2 flour mixture.  Continue alternating wet and dry ingredients, ending with wet. Mix until smooth.
7. Pour into prepared pan and bake for 45-50 minutes. Let cool completely.

Peanut Butter Icing
1/4 cup softened butter
1/2 cup peanut butter
2 cups icing sugar
5-6 tbsp milk

1. Cream together butter and peanut butter.
2. Add the icing sugar, 1/2 cup at a time.  Alternate with a tbsp of milk until all the sugar is incorporated.  Mix well until light and fluffy.  If you want a softer icing add a touch more milk.
3.  Frost cake and enjoy.

Oh Sweet Joy!

The other night all four of us were gathered around the dining room table, post dinner.  Hubby was using his stupid new contraption to roll up the change from the piggy banks. (Hello college fund!) The girls were enthralled with his efforts and the contraption.  To keep my hands busy I pulled out a quilt that needed some hand stitching.  Suddenly, what I was doing was far more interesting to The Monster.

Sadly, my tiny little #8 needle and the need for small stitches made it difficult for her to actually be of help. So I promised her that we would go on a special shopping trip the next day and gather supplies for her to start sewing.
 
Last night we sat down on the couch and started sewing.  I bought a medium sized hoop, some plain white cotton with a loose weave, and some large (but very real) needles.  I also let her pick out a few colours of basic embroidery floss.  Really I just wanted her to get the idea of pulling a needle through fabric while still getting a chance to see her results.

My little girl was in heaven.  We discussed the need to push the needle through front to back and back to front.  And how we had to pull the thread all the way through.  To make it easier on both of us I doubled up the thread and tied a solid knot.  I did not want to be constantly rethreading a needle! Besides, this was about process, not results.

After Smilosaurus unravelled the remaining embroidery floss and sucked the spools of thread I had also purchased she decided she wanted to learn sewing as well.  So she climbed up next to me and tried her hand at needle pulling thread.  Enthralled and impatient.

I should mention that this was actually my first time embroidering.  Seriously, I've never done it before.  This is despite the fact that my Baba was one of the most impressive cross-stitchers I've ever encountered. I worked on a little piece that had The Monster's name on it.  And honestly, I could really get behind this kind of hand work.  Look out!

This was the end result.  I moved the fabric in the hoop a few times because The Monster complained that the fabric was dirty whenever we switched colours.  That is, she wanted a fresh slate. Then she got irritated with me watching over her so I let her at it.  That's when she forgot the front to back, back to front lesson.  But isn't it perfect?

Giveaway Day


It's Giveaway Day at ! I had such a good time in the spring, so I knew I had to sign up again. I've actually got two giveaways here.

First up is a quilt.  I made this wall hanging to celebrate the launch of 350.org. And with the big meeting starting in Copenhagen next week I thought it a perfect time to highlight local and global efforts to address climate change.  I won't step on my soap box but I will say this:

I believe climate change is happening.
I believe humans are having a discernible impact on the world's climate.
I believe that if climate change is not proven to be real we have done no harm in taking action.
I believe that real change will come from both the individual and the political.


This quilt reflects the Prairie Landscape in its choice of fabrics, the layout to mimic the fields, and the quilting details. I made it without buying a thing.  It is machine pieced with fusible applique, machine quilting, and a handstitched binding. It is 100% cotton and comes with a hanging sleeve already attached.


Leave a comment here for one entry.  I don't believe in forcing action, insincere action, on people so there are no extra entries for signing up at 350.org. But I strongly encourage you to at least check out that organization and the many others.  And rather than enter here, make one small commitment to yourself and the next generation to reduce emissions - change a lightbulb, shut off the car, shop at the farmers' market, or turn down the thermostat.

As quilters there are many ways we can reduce the impact of what we do. A key way is through the use of scraps.  This is my daily scrap bin.  From here, I sort according to colour and selvages. I'll be honest, I used to throw out these pieces, but I use them now.  Except, I don't use the selvages.  However, I now know that other people use these with gorgeous results.  So I am giving away my relatively recent collection of selvages.  Close to 50 unique selvages from Amy Butler to Denyse Schmidt and everything in between.

I will use the random number generator to pick two winners.  Please, leave your comments and note any commitments you are making to tackle climate change on the homefront.  The giveaway is open until December 6, midnight MST. And yes, I will happily ship internationally.

Quilt Along Week 5 - Assembly


So you have all your blocks cut out and sitting in a neat, untouched pile, right? Okay, I hope you've at least had a chance to cut them out so far. Today we are going to assemble them in to a finished quilt top.

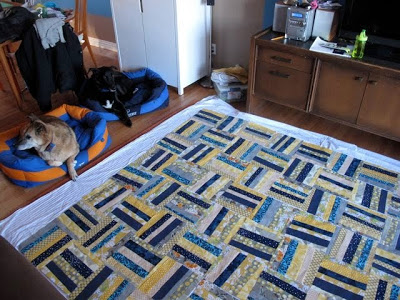
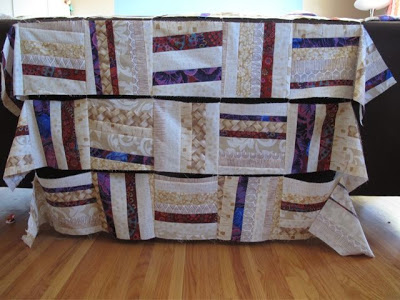
The layout for this top is quite easy. All you have to do is remember to alternate horizontal blocks with vertical blocks. That is, your stripes go side to side on one block and up and down on the next. If you have a design wall, great. If, like me, you are in a constrained space you use whatever is handy - a fence, a bed, or the living room floor during what you hope is a very long nap.

I just pick a corner or the center of the quilt and start throwing down blocks. To be honest, I don't think about it too much at first except to ensure that I don't place two blocks side by side. Rather, I just want to get a feel for the layout. As I go I will start to notice whether I've got too many of one type of fabric together. Or might try to put some fabrics together to create a mini rail (of the rail fence) in the quilt.


Overall, I'm looking for balance of a couple of elements when laying out these tops:
  • My accent pieces aren't heavily weighted in one area over another - disperse the thick and the thin strips or the colours if you used more than one accent.
  • Variation in the angles of the strips - some should go right, some left.
  • Disperse the background fabrics as much as possible.

Looking both close-up and stepped back allow for you to see your quilt in the big picture. Another trick is to take a photo with your digital camera. This helps you see the layout at a distance. You can also go to the hardware store and buy a door peephole. Looking through this makes everything appear at a distance. I love my peephole (when I can find it). For a reminder of the finished layout check out the picture in the sidebar or the finished Gratitude quilt.

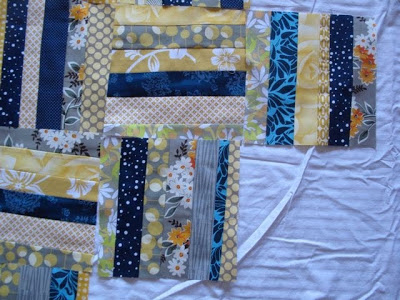
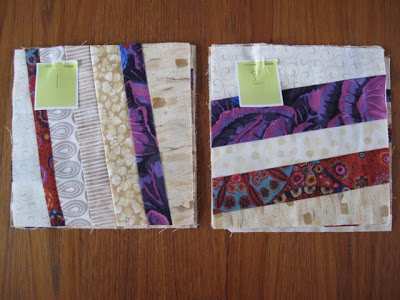
Once you are happy with your layout I like to stack my blocks in columns. Start at the top left corner of your layout. Take the corner block in your hand and place it directly on top of the block directly below it in layout. Do not rotate it or any of the blocks at this point. Continue to stack each column.  I also label the top left corner of each stack with a pin and a sheet of paper. Just to minimize confusion.

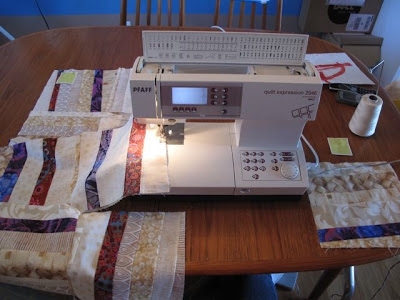
To piece the top I sew column 1 to column 2, in one continuous strip. At the end of each block I simply sew a few stitches and then I start on the next set of blocks.  

I sew the entire column together then press.  To press I sew one row to the right, the next to the left.  On this particular quilt I press towards the vertical strip.  This will make the top lie quilt smoothly.

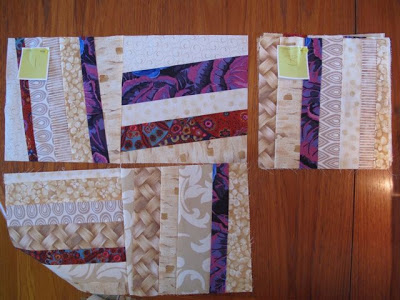
The top goes together quickly by sewing one column after another. I keep the next stack of blocks to the right of my sewing machine and grab a block as I go. Do not cut apart the completed rows. Once you've sewn all the columns together you are left with pieced rows.  Your columns, strip pieced, create finished rows. See the picture below if that doesn't make sense.

All that remains is to sew your rows together.  This is the one point where I pin. Because I pressed towards the vertical strip on each block and I alternated vertical and horizontal blocks in the layout my seams will lay flat when I match them up. I pin two rows rights sides together and sew. I repeat this until all the rows are together and then press all the seams in one direction.

Et, voila!  A finished top.

Here is where I apologize for not having a picture of the completed top in the yellow/grey/navy. It is finished, but I haven't been able to take a picture because a) Hubby can't lift his arm for the picture b) even if I was home during the day to take a picture when it is daylight there is now snow on the ground. Soon, I promise.