"quilt along one"

Friday Favourites - Quilts of First Quarter 2010

I heard back from a lot of you in January that the round-up of my favourite quilts was something you wanted to see more of. I've decided to do this every 3 months for you. Even then it is hard to narrow it down!

Selvages are something that I now cut off and set aside - to giveaway. I have absolutely no motivation to make a selvage quilt myself. Even after seeing this one, I still don't want to make one. But I can look and admire the quality and beauty of this quilt.  Great job Jacquie!

There are some lovely, lovely quilts on Jess' site. Simple and graphic.  You see similar quilts around, but there is something about the way she places just that one extra bit of fabric or a carefully chosen binding that elevates her quilt above many modern others.

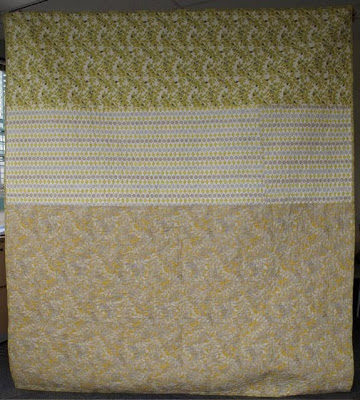
If you've been reading me for a while you know that I'm generally not a fan of quilts made entirely from one fabric line alone. But I adore what Andrea did from her inspiration - a drawing and design by her son.  How cool is that? And a nice break from her year of solids.
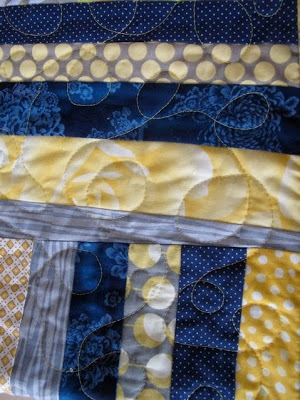
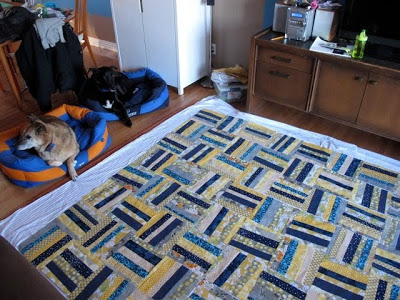
White binding. White binding on a multicoloured striped quilt.  Need I say more?

I'm glad I'm not the only one who puts quilts in her office.  At least it doesn't seem odd when you work in a crafty kind of place like Lark Books.

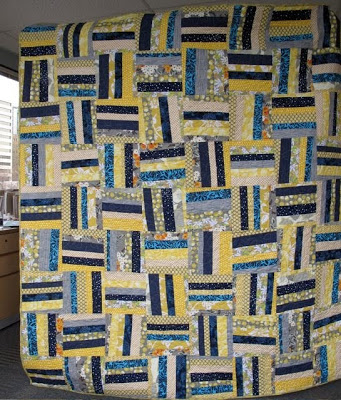
Off Kilter by Amanda Jean from Crazy Mom Quilts
Okay, so a slight bias here. But I had to share one more finish from my quilt along. I know many of us miss Amanda Jean's blogging, but you can keep up to date with all her work on Flickr. Thank goodness!

I hope you enjoyed this little tour.

Quilt Along Week 7 - All Done

I'm done! For a while I was calling this quilt Pinstripes, but after finishing it and seeing that it doesn't match my original concept I am simply calling it Gratitude II. When I say it doesn't match my original concept, I mean that it is busier than expected and has less of the subtlety that my Pinstripe suit inspiration.  I still like it and I know it will be quite cosy in our eventual finished basement.

The back is a simple mix of three of my favourite yellows. Arcadia, a Denyse Schmidt Katie Jump Rope, and this fantastic yellow and grey leaf pattern whose name escapes me. I'm going to get a label on there eventually, using the scraps from the front strips to frame it.  I promise I'll share it when I do complete it.

The binding was an Amy Butler Midwest Modern.  I used a few of her prints on the front, so I knew that the binding would be perfect.  It was nice to use such a soft print to finish it off. I didn't want to use a blue print, as would be expected, because I thought they were standing out quite a bit already.
 
Finally, the quilting. Particularly because the top ended up rather busy, whatever I did for quilting was just going to get lost.  So I went with the loopy quilting found here instead of stippling.  And honestly, why wouldn't you?  Loopy is so much easier than stippling. It's fast and perfectly contrasts the angles of the design.

Thank-you so much for your support in this Quilt Along. I'll admit, I'd hoped more of you would participate after such a good response to Gratitude.  Then again, there was the little break life brought our family. And when I did re-start this?  Just before Christmas?  Not my smartest move. But I am so pleased with the results I've seen from those of you that have participated.

Over on Flickr, baileygirl_5 posted her fabric choices and the beginning of her strip sets. I love where she is going with this, using darks as her background and lights as her accents.  Nice twist!

Elle in Da Coop is an old quilting friend and she was inspired to tackle another project on her always growing list.  Look what picking similar colours to mine can do when you make the background pieces just a little more subdued. Browse around her December posts to see what she also did on the back and with all the leftover pieces. Fantastic!

And while there are a few more that have picked fabric or cut fabric, here is another set of blocks that have been started.  Diane at Life Scraps used a few of the same fabrics which I used, but with a totally different effect.

If you come back to this at some point in the future, be sure to let me know, I would love to see what you create. Thanks for Quilting Along with me!


Quilt Along Week 6 - Finishing Up

The finishing stitches are going into my second version of this wonky rail fence. I've been sitting by the still up Christmas tree (Happy Ukrainian Christmas everyone!) and stitching for a bit each evening. I love handstitching the bindings, but it seems to take me a long time. I see it as a good meditation at the end of the process.

Where are you at this point with the Quilt Along? When we last spoke we focused on assembling our blocks together into a completed top. All that's left are the finishing details, right? Yes, because making a back, basting, quilting, squaring up, and binding are just minor details! Well, they don't make for particularly exciting Quilt Along material.

Backing
Many of us default to a large print with similar colours to our front. I've been known to use the fabric that maybe inspired the quilt top's fabric choices but didn't make the final cut. Use what works for you. If you want more ideas, check out this great Flickr group on Quilt Backs.

Basting
I pin baste my quilts. If it is a small quilt I can manage on my kitchen floor. For larger quilts I use the boardroom tables at work. Never have I used a spray, they kind of scare me (more chemicals) but I've heard lots of people have success with them. To baste I simply tape my back taut on the tables, smooth out my batting on top, then lay my top over the batting. I pin every 3-4 inches. To close the pins I use my favourite tool: The Kwik Klip.

Quilting
So much can be said about quilting this design. I think you can emphasize the notion of line with grid quilting, lines in any direction, or in the ditch work. With both my quilts I've chosen to contrast the top's design with swirly or loopy quilting. It is a personal preference. Don't get too hung up on picking the perfect design, go with what you are comfortable with. This is a busy quilt and detailed quilting will likely get lost.

Squaring Up
Many, many of us skip this step - including me some times. But it really does help with your overall finish and is quite useful when you haven't cut everything on grain as is the case with this quilt. See my tutorial for how I do this. I do it after quilting but before attaching the binding. And cutting all the excess off the quilt is the step where I can see my quilt as a quilt, I love this step.

Binding
99% of the time I use a double fold binding. 100% of the time I attach each side individually and still mitre the corners. And it works everytime. Here is a tutorial on creating your bindings and one on attaching and finishing them.

So this is where I am at right now. Next week I will share with you the completed second quilt.

At this time I also want to announce a prize for those who participated with me. All you have to do is leave a comment on this post, or email me directly, and let me know where you are at in your quilt. Even if you've just picked out your fabrics but haven't make a single cut, I want to hear about it. If you have a blog or Flickr account, show me what you've done - I have to have some proof of progress. Besides, I would love to be able to share your work with others.

The prize will be 3 1/2 metre pieces of fabric - for stash or to start you on your own wonky rail fence - and some coordinating Presencia thread (my fave). I have some specific fabric in mind, but I am willing to cater to the winner's preferences (within reason). All you have to do is comment or send me an email by Tuesday January 12 at midnight MST.

Quilt Along Week 5 - Assembly


So you have all your blocks cut out and sitting in a neat, untouched pile, right? Okay, I hope you've at least had a chance to cut them out so far. Today we are going to assemble them in to a finished quilt top.

The layout for this top is quite easy. All you have to do is remember to alternate horizontal blocks with vertical blocks. That is, your stripes go side to side on one block and up and down on the next. If you have a design wall, great. If, like me, you are in a constrained space you use whatever is handy - a fence, a bed, or the living room floor during what you hope is a very long nap.

I just pick a corner or the center of the quilt and start throwing down blocks. To be honest, I don't think about it too much at first except to ensure that I don't place two blocks side by side. Rather, I just want to get a feel for the layout. As I go I will start to notice whether I've got too many of one type of fabric together. Or might try to put some fabrics together to create a mini rail (of the rail fence) in the quilt.


Overall, I'm looking for balance of a couple of elements when laying out these tops:
  • My accent pieces aren't heavily weighted in one area over another - disperse the thick and the thin strips or the colours if you used more than one accent.
  • Variation in the angles of the strips - some should go right, some left.
  • Disperse the background fabrics as much as possible.

Looking both close-up and stepped back allow for you to see your quilt in the big picture. Another trick is to take a photo with your digital camera. This helps you see the layout at a distance. You can also go to the hardware store and buy a door peephole. Looking through this makes everything appear at a distance. I love my peephole (when I can find it). For a reminder of the finished layout check out the picture in the sidebar or the finished Gratitude quilt.

Once you are happy with your layout I like to stack my blocks in columns. Start at the top left corner of your layout. Take the corner block in your hand and place it directly on top of the block directly below it in layout. Do not rotate it or any of the blocks at this point. Continue to stack each column.  I also label the top left corner of each stack with a pin and a sheet of paper. Just to minimize confusion.

To piece the top I sew column 1 to column 2, in one continuous strip. At the end of each block I simply sew a few stitches and then I start on the next set of blocks.  

I sew the entire column together then press.  To press I sew one row to the right, the next to the left.  On this particular quilt I press towards the vertical strip.  This will make the top lie quilt smoothly.

The top goes together quickly by sewing one column after another. I keep the next stack of blocks to the right of my sewing machine and grab a block as I go. Do not cut apart the completed rows. Once you've sewn all the columns together you are left with pieced rows.  Your columns, strip pieced, create finished rows. See the picture below if that doesn't make sense.

All that remains is to sew your rows together.  This is the one point where I pin. Because I pressed towards the vertical strip on each block and I alternated vertical and horizontal blocks in the layout my seams will lay flat when I match them up. I pin two rows rights sides together and sew. I repeat this until all the rows are together and then press all the seams in one direction.

Et, voila!  A finished top.

Here is where I apologize for not having a picture of the completed top in the yellow/grey/navy. It is finished, but I haven't been able to take a picture because a) Hubby can't lift his arm for the picture b) even if I was home during the day to take a picture when it is daylight there is now snow on the ground. Soon, I promise.